Photoshop's filters are powerful tools that allow users to transform images, create special effects, and enhance visual appeal. From subtle adjustments to dramatic alterations, understanding the breadth and depth of Photoshop's filter capabilities is key to unlocking creative potential. This guide explores the diverse range of filters available, their applications, and how they can be leveraged for both artistic and practical purposes.
The Art of Blurring: Softening, Smoothing, and Special Effects
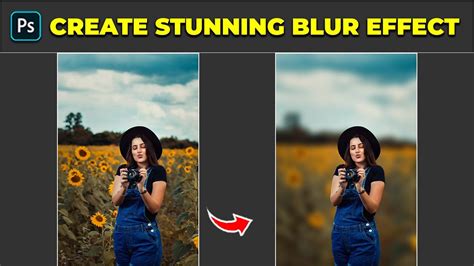
Blur filters are fundamental to image manipulation, offering a variety of ways to soften an image, reduce noise, or create artistic effects.
Gaussian Blur: This filter is widely used for softening an image or selection by an adjustable amount. It works by applying a weighted average to the pixels, based on a bell-shaped curve. This results in a smooth, natural-looking blur. It's important to note that when Gaussian Blur (or Box Blur, Motion Blur, or Shape Blur) is applied to a selected image area, it can sometimes produce visually unexpected results near the edges of the selection. This is because these blur filters use image data from outside the selected area to create new, blurred pixels inside the selected area. For example, if the selection represents a background area that you want to blur while keeping the foreground sharp, the edges of the blurred background area will be contaminated with colors from the foreground, producing a fuzzy, muddy-looking outline around the foreground.
Box Blur: Similar to Gaussian Blur, Box Blur quickly blurs a selection by an adjustable amount. It uses a simpler averaging method, which can sometimes be faster but may produce less aesthetically pleasing results than Gaussian Blur, especially with larger blur radii.
Motion Blur: This filter simulates the effect of movement by blurring an image in a specified direction and amount. It's excellent for conveying a sense of speed or dynamism. You can adjust the degree of rotation and intensity (from 1 to 999) to achieve the desired effect.
Shape Blur: Unlike other blur filters, Shape Blur allows you to define the shape of the blur kernel. This means you can create unique blur effects by choosing from various shapes and sizes (from 1 to 50) for the kernel, resulting in a painterly effect.
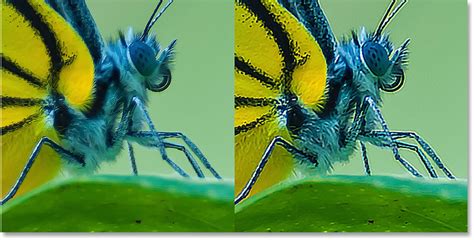
Smart Sharpen: This advanced filter is designed to sharpen an image while minimizing noise and halo effects. It offers precise control over sharpening, allowing you to adjust the radius, reduce noise, and even apply sharpening differently to shadows and highlights. The enhanced Smart Sharpen filter empowers users to produce high-quality results through adaptive sharpening technology that minimizes noise and halo effects. The streamlined UI design for this filter offers optimized controls for targeted sharpening. Smart sharpening in Photoshop supports CMYK. Additionally, you can sharpen arbitrary channels. To avoid halos, decrease the Radius until the halo effect disappears. Adjust the Reduce Noise slider such that the noise in the image looks similar to how it was before you began sharpening the image. Too much noise reduction can result in a plasticy look.
Creative Filters: Simulating Traditional Media and Artistic Styles
Photoshop offers a rich array of filters that mimic traditional art techniques, enabling users to achieve effects like painted canvases, charcoal sketches, and textured paper.
Artistic Filters: These filters are designed to replicate the look of various art forms.
- Colored Pencil: Draws an image using colored pencils on a solid background, creating a hand-drawn aesthetic.
- Cutout: Ideal for collages or typography, this filter simplifies an image into a few distinct color levels and accentuates edges, giving it a posterized, cut-and-paste look.
- Dry Brush: Simulates a dry brush technique (between oil and watercolor), applying strokes of color with a textured, broken appearance.
- Fresco: Applies a textured, fresco-like appearance to an image.
- Neon Glow: Outlines the edges of color and adds a neon-like glow to them, perfect for creating glowing lines.
- Paint Daubs: Applies a thick, impasto-like paint effect, simulating the look of oil paintings with visible brush strokes.
- Palette Knife: Mimics the effect of applying paint with a palette knife, creating bold strokes and textures.
- Poster Edges: Enhances edges with a posterized effect, simplifying details and creating defined areas of color.
- Rough Pastels: Recreates the look of pastel chalk strokes on a textured background, with visible grain and subtle blending.
- Smudge Stick: Simulates the effect of smudging charcoal or pastel, blending colors and creating soft, diffused areas.
- Sponge: Applies a textured, sponge-like effect, with irregular color blending and a mottled appearance.
- Underpainting: Creates an effect similar to an underpainting in oil or acrylic, with visible brush strokes and a textured surface.
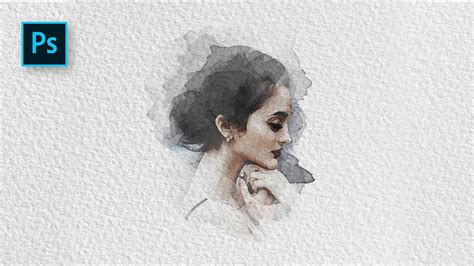
- Watercolor: Simulates the look of watercolor painting, with soft edges, blended colors, and simplified details.
Brush Strokes Filters: These filters focus on mimicking various brush and ink stroke effects.
- Accented Edges: Finds the transitions of major brightness areas and thinly outlines them for each color channel, for an effect similar to the lines in a contour map.
- Angled Strokes: Sketches an image using diagonal strokes, creating a dynamic, textured look.
- Crosshatch: Draws black lines on an image, simulating a cross-hatching technique used in drawing and engraving.
- Ink Outlines: Outlines the edges of an image with ink-like lines, creating a graphic novel or comic book style.
- Sprayed Strokes: Creates the effect of a spatter airbrush, with fine dots and a textured spray appearance.
Distort Filters: These filters manipulate the pixels of an image to create various distortions, from subtle waves to dramatic warping.
- Glass: Applies a glass-like distortion to an image, making it appear as if viewed through warped glass. This filter can be very memory-intensive.
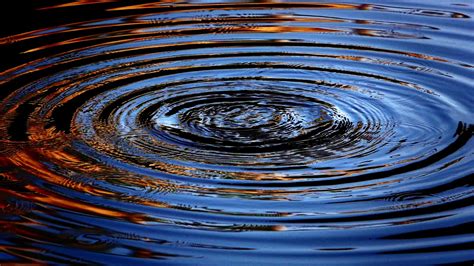
- Ocean Ripple: Creates the effect of ripples on the surface of water, with smooth, undulating waves. For greater control, use the Wave filter.
- Wave: Distorts an image along a curve, allowing you to create various wave-like patterns. You can adjust any point along the curve.
- Twirl: Rotates a selection around a central point, creating a swirling effect.
- Ripple: Similar to the Wave filter, but with greater control over the intensity and direction of the ripples. It can be set to Small, Medium, or Large, and you can choose from Circular or Diagonal ripple types.
- Polar Coordinates: Converts rectangular coordinates to polar coordinates (or vice versa), distorting the image radially. This can be used to create cylindrical or spherical effects.
- Spherize: Squeezes a selection, making it appear as if it's bulging outwards or inwards, creating a spherical effect.
- ZigZag: Distorts a selection radially, creating a zigzag pattern. The Ridges option sets the number of direction reversals of the zigzag from the center of the selection to its edge.
- Page Curl: Simulates the effect of a page being turned, with a curved fold and shadow.
Pixelate Filters: These filters break down an image into larger, more distinct blocks of color.
- Crystallize: Converts areas of solid or similar colors into blocks of like-colored pixels, creating a mosaic-like effect.
- Color Halftone: Simulates the effect of using an enlarged halftone screen on each channel of the image. For each channel, the filter divides the image into rectangles and replaces each rectangle with a circle. The circle size is proportional to the brightness of the rectangle.
- Pointillize: Converts an image into a pattern of dots, similar to pointillist paintings.
- Mosaic: Divides an image into square blocks of a uniform color, useful for abstract effects or for creating a pixelated look.
Render Filters: These filters generate patterns and textures within an image.
- Clouds: Creates a cloud-like pattern using the foreground and background colors. You can invert the colors to produce a different cloud pattern.
- Difference Clouds: Creates a cloud pattern where the colors are inverted in a cloud pattern.
- Lighting Effects: Applies various lighting effects to an image, simulating different light sources and their interactions with the surface. This can be used to create 3D or other reshaping effects. These filters can be very memory-intensive.
- Lens Flare: Simulates the effect of light reflecting off a camera lens, creating a bright glow with concentric circles.
The Inverse Curve Technique for Painting Light! - Photoshop Tutorial
Texture Filters: These filters add texture to an image, simulating materials like grain, canvas, or stucco.
- Craquelure: Creates a network of fine cracks, resembling aged paint or cracked earth.
- Grain: Adds a film grain effect to an image, useful for emulating the look of old photographs or high-speed film.
- Mosaic Tiles: Divides an image into tiles and adds grout between them, creating a tiled effect.
- Patchwork: Creates a patchwork effect by dividing the image into square blocks and filling them with colors sampled from the image.
- Stucco: Applies a stucco-like texture to an image, giving it a rough, granular surface.
- Texturizer: Applies a texture you select or create to an image, allowing you to simulate materials like canvas, brick, or sandstone.
Sharpen Filters: These filters enhance the edges and details in an image, making it appear crisper.
- Sharpen: A basic sharpening filter that enhances edges by increasing contrast.
- Sharpen Edges: Sharpens only the edges of an image, preserving the overall smoothness.
- Sharpen More: A more aggressive version of the Sharpen filter.
- Unsharp Mask: A classic sharpening filter that allows precise control over the sharpening amount, radius, and threshold. This filter sharpens an image by letting you set the sharpening algorithm or control the amount of sharpening that occurs in shadows and highlights. This is the recommended way to sharpen if you donât have a particular sharpening filter in mind.
Stylize Filters: These filters apply artistic effects to an image, often by finding and enhancing edges or by blending colors in unique ways.
- Extrude: Creates a 3D effect by extruding pixels from the image, giving it a blocky, extruded appearance.
- Find Edges: Detects and highlights the edges in an image, creating a line-art effect.
- Glowing Edges: Outlines the edges of an image with a glowing effect, similar to neon lines.
- Solarize: Inverts the brightness values of an image, similar to the effect of overexposing photographic film.
- Trace Contour: Finds the contours of an image and outlines them, creating a stylized, contour-map-like effect.
- Wind: Applies a wind-blown effect to an image, creating streaks and distortions that suggest movement.
Video Filters: These filters are primarily designed for video editing but can also be used for still images.
- De-Interlace: Removes interlacing artifacts from video images.
- NTSC Colors: Adjusts colors to conform to the NTSC broadcast standard.
Specialized Filters and Advanced Techniques
Beyond the broad categories, Photoshop offers specialized filters for specific tasks and advanced manipulation.
Liquify Filter: This powerful filter allows for extensive image distortion and reshaping. It's particularly useful for retouching portraits, creating fluid effects, or exaggerating features. You can use various tools within Liquify to push, pull, twist, reflect, pucker, and bloat pixels. The filter uses a specified kernel to create the blur, and its size can be adjusted for greater or lesser distortion.
Vanishing Point: This filter allows you to create perspective planes and apply edits, such as cloning, painting, and transforming, as if you were working on a flat surface in perspective. It's invaluable for compositing and retouching architectural or product shots where perspective is critical. The filter uses a perspective map, to determine how to distort a selection. You can save the perspective planes as a Photoshop file and apply it later.
Digimarc: This filter embeds a watermark into an image, allowing for copyright protection and image tracking. Digimarc plug-ins require a 32-bit operating system.
Custom Filter: This allows you to design your own filter effect by defining a mathematical operation (convolution) that dictates how each pixel's value is recalculated based on its neighbors. You can save and reuse custom filters.
Maximum and Minimum Filters: These filters are particularly useful for modifying masks. The Maximum filter expands white areas and shrinks black areas (dilation), while the Minimum filter shrinks white areas and expands black areas (erosion).
Median Filter: This filter reduces noise by replacing pixel values with the median brightness value of the surrounding pixels. It's effective for removing "salt and pepper" noise. To achieve a balance between sharpening the image and hiding defects, try various combinations of Radius and Threshold settings. Or apply the filter to selected areas in the image.
Oil Paint Filter: This filter simulates the look of oil paint, allowing you to adjust brush strokes, cleanliness, and stylization for a painterly effect. You can control the size of the brush strokes (from 1 to 50) and types for a painterly effect.
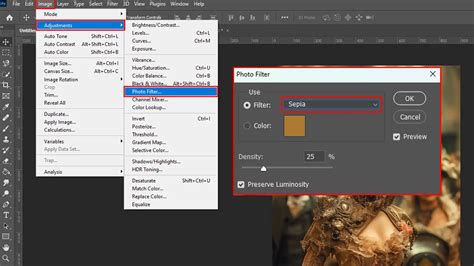
Photo Filter Adjustment Layer: While not a direct filter in the traditional sense, the Photo Filter adjustment layer offers a quick and effective way to apply color casts or correct color imbalances, mimicking the effect of placing a colored filter in front of a camera lens. It's super easy to use and brings up a properties panel. You can choose from 21 filter options or select a custom color. The "Preserve Luminosity" option helps maintain the image's brightness levels. This is perfect for quickly adding a specific atmosphere to your photos or correcting color casts.
Smart Filters: Non-Destructive Editing Powerhouse
A significant advancement in Photoshop is the introduction of Smart Filters. When any Photoshop filter (with a few exceptions like Lens Blur, Flame Picture Frame, Trees, and Vanishing Point) is applied to a Smart Object layer, it becomes a Smart Filter.
Non-Destructive Workflow: Smart Filters appear in the Layers panel below the Smart Object layer. This means they are not permanently applied to the pixels, allowing you to edit, reorder, disable, or delete them at any time without degrading the original image data.
Editable Settings: You can double-click on a Smart Filter in the Layers panel to re-access and modify its settings.
Blending Options: Smart Filters also allow for editable blending options, giving you further control over how the filter interacts with the layer.
Filter Masks: Each Smart Filter can have its own mask, allowing you to selectively apply the filter's effect to specific areas of the layer. This is achieved by painting on a filter mask, similar to layer masks, which allows for varying levels of transparency and control.
Understanding Filter Behavior and Limitations
It's crucial to understand how Photoshop filters operate to achieve predictable and desirable results.
Edge Contamination: As mentioned with blur filters, when applied to selections, filters can use image data from outside the selected area, leading to unexpected results at the selection edges. This "edge contamination" can cause color bleeding or artifacts.
Memory Intensity: Some filters, particularly those involving complex distortions or rendering (like Glass or Lighting Effects), can be very memory-intensive and may slow down performance on less powerful systems.
Smart Objects: Using Smart Objects is highly recommended when applying filters, especially for complex or iterative work, to leverage the benefits of Smart Filters and non-destructive editing.
By exploring and experimenting with Photoshop's extensive filter library, users can unlock a world of creative possibilities, from subtle enhancements to groundbreaking artistic expressions. Understanding the nuances of each filter and employing techniques like Smart Filters ensures a powerful and flexible workflow for any visual project.