How many times have you shot a photograph and then afterwards you realize, "Hey, I wish I’d gone a little bit wider"? This common frustration, along with countless other editing challenges, is now being met with a revolutionary solution within Adobe Photoshop: Generative AI. This article delves into how to effectively use generative AI, specifically Adobe Firefly's Generative Fill, within Photoshop, transforming your image manipulation capabilities from basic adjustments to boundless creative exploration. We'll cover everything from accessing the feature to advanced techniques and practical applications, empowering both novice and seasoned professionals to unlock new levels of efficiency and artistic expression.
Accessing and Understanding Generative Fill
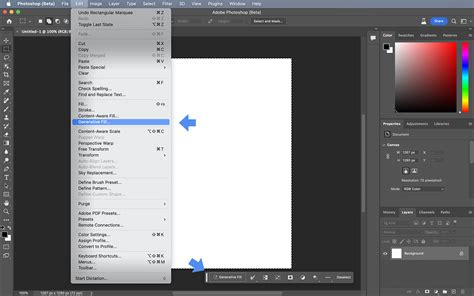
To harness the power of Generative Fill, the first step is ensuring you have the necessary software and version. Generative Fill is integrated into Adobe Photoshop and is available through the beta version. To get it for yourself starting today, you'll need a valid Creative Cloud account. Begin by opening your Creative Cloud desktop application and signing in. Navigate to the "Updates" section and select "Check for updates." This process will connect to the server and ensure you download the very latest version of Photoshop. Once updated, go to "Beta apps" and look for Photoshop. You will see an "Install" button if you haven't already installed it. If you have previously installed the beta version, click "Update" to ensure you are on Photoshop version 24.6.0 or later. It is important to note that a current subscription is required; older versions like CS6 will not support this feature.
The core concept behind Generative Fill is remarkably straightforward. You start by selecting an object or area within your image. Then, you simply describe what you want to generate in a text prompt. For instance, if you wish to expand the canvas of a photograph, you can grab the crop tool, drag it out to make the canvas a little bigger, make a selection of the new empty area, and then hit "Generate." Adobe Sensei, Adobe's AI, will then build the rest of this image. You are often presented with three variations, and if you don’t like them, you can click on the variations displayed at the bottom or in the properties panel to explore different options.
For a quick example of its application, imagine using the Lasso tool to make a quick selection. Hit "Generative Fill," and you could input a prompt like "red T-shirt." The AI will then provide several options for a red T-shirt, which you can then choose from or regenerate. This capability extends to more complex edits, such as replacing entire backgrounds.
Practical Applications: Transforming Your Images
The versatility of Generative Fill is best understood through practical examples. Let's explore how it can be used to replace backgrounds, modify clothing, remove objects, and even extend image canvases.
Replacing Backgrounds
Suppose you have a photograph where you wish to change the background. Grab the Lasso tool and make a rough selection around the existing background. It's often beneficial to make a rather rough selection, not too tight, to give the AI some room to work with. Now, hit "Generate a Fill" and input a prompt like "city." The AI will generate three options for a city background. You can further refine this by changing the prompt to "city at night," and the AI will create new variations accordingly. Each time you regenerate or change the prompt, it creates three more images.
A key advantage of Generative Fill is how it manages edits. Notice that everything is created on a separate "generated layer." This means you can easily hide it, turn it back on, or stack different generated elements. This non-destructive workflow is crucial for maintaining flexibility in your editing process.
Modifying Objects and Elements
Generative Fill isn't just for backgrounds; it excels at modifying existing elements within an image. For instance, if you want to change an object's appearance, like a jacket, you can make a rough selection around it. Then, in the "Generative Fill" prompt, type "plaid shirt." You can then look at the variations by clicking the small arrow or the thumbnails. While results are often impressive, sometimes they aren't perfect. For example, you might notice unusual rendering of wrists or other anatomical details. In such cases, you can simply hit "Generate" again to create three new options. The properties panel will display these new variations, along with previous ones, allowing you to select the best fit.
The AI's ability to generate new content is astounding. Consider changing a jacket to a plaid shirt. The AI not only renders the shirt but also creates the appropriate sleeve areas, demonstrating a sophisticated understanding of image context. If you desire a different hairstyle, you can simply input "short hair" into the prompt. Sometimes, the AI might produce unexpected results, like generating a jean jacket when you asked for short hair, but this is part of the iterative creative process. The fact that these edits are on separate layers allows for further adjustments like masking and blending.
Removing and Replacing Objects
Removing unwanted elements or replacing them entirely is another powerful application. To remove a person, for example, make a selection around them and hit "Generate, and fill." If you want to replace them with something specific, like a "satellite dish," type that into the prompt. If you simply want to remove the person without adding anything, leave the prompt box blank and hit "Generate." The AI will intelligently fill the space, making it appear as though the person was never there.
This capability is not about simply cutting and pasting. These are brand new images generated by the AI that never existed before. The AI analyzes the image context, understanding what is present, and then recreates elements from scratch.
Extending Image Canvases
Expanding the boundaries of your photographs is also made effortless. Using the crop tool, extend the canvas of your image. Then, select the new empty area with a tool like the Rectangular Marquee tool. Hit "Generate or Fill." If you only want to extend the image without adding specific elements, leave the prompt blank and hit "Generate." The results can be remarkably seamless, extending the existing scene with plausible new content. You'll often receive a couple of variations to choose from.
To add life to an extended street scene, you can make a selection and prompt for "a dog." The AI will generate dogs that blend naturally into the scene. If you want to add more dogs, you can duplicate the generated layer (by holding Alt or Option and dragging) and then regenerate the new layer with a modified prompt or simply regenerate it to get a different dog. The prompt travels with the layer, allowing for further creative control. If a generated dog appears too large, you can use Free Transform (CTRL+T) to resize it and then regenerate to get a different dog that fits the adjusted scale. You can even copy a generated dog and prompt it to "sit on top of there," and the AI will intelligently position and render it.

The Technology Behind the Magic: Adobe Sensei
The intelligence powering these advanced features is Adobe Sensei, Adobe's AI and machine learning platform. Adobe has been developing Sensei for about 10 years, meaning it has a deep well of knowledge from years of analyzing selections and various edits made within Adobe products. Sensei analyzes photographs within Adobe Stock and uses this learning to recreate images or parts of images from scratch. This means it's creating visuals that have never existed before, a truly remarkable feat.
Generative AI, in essence, is a type of artificial intelligence that creates new data, such as images or text, by learning from existing data. Adobe Firefly is a family of generative AI models designed to boost creativity and accelerate workflows within Adobe products. It acts as a creative co-pilot, helping users ideate, explore, and produce content more efficiently. By entering simple text prompts directly into Creative Cloud apps, users can unlock the magic of Firefly.
Advanced Techniques and Workflow Integration
Mastering Generative Fill involves more than just basic prompting. Combining it with other Photoshop features and understanding advanced techniques can significantly enhance your editing workflow.
Layering and Masking
As mentioned, Generative Fill creates edits on separate layers. This is fundamental for advanced workflows. You can use layer masks to selectively reveal or conceal parts of the generated content, allowing for precise integration. For instance, if a generated background partially covers a subject you want to keep visible, you can use a mask to hide the unwanted areas of the generated layer.
Combining with Content-Aware Fill
While Generative Fill is powerful, sometimes a preliminary Content-Aware Fill can set a solid foundation for more complex edits. Content-Aware Fill analyzes the pixels surrounding a selection to fill in gaps with similar content. Generative Fill, on the other hand, uses AI to create entirely new content based on prompts, making it more versatile for creative additions and replacements.
Creative Exploration and Experimentation
Generative Fill opens up avenues for truly creative exploration. You can generate fantasy landscapes, surreal elements, or experiment with unexpected compositions by using random prompts. This iterative process of prompting, reviewing variations, and refining can lead to unique and standout artwork.
Troubleshooting Common Issues
Occasionally, generated content might not meet expectations. If the results are not as desired, try simplifying your prompts. Visible transitions between the filled area and the original image can be a common issue. To address this, tools like the Healing Brush can help blend the edges more naturally. If incorrect objects are generated, resetting the prompt and refining your description can lead to improved outcomes.
Who Benefits from Generative AI in Photoshop?
The applications of Generative AI in Photoshop are far-reaching, impacting various creative professionals and hobbyists:
- Photographers: Seamlessly remove unwanted objects, enhance parts of a photo, or even extend images beyond their original boundaries.
- Graphic Designers: Quickly create mockups, generate unique assets for branding, or experiment with different visual styles.
- Artists and Hobbyists: Design fantasy landscapes, add surreal elements to existing artwork, or personalize projects like scrapbooks and greeting cards.
- Fashion Designers: Visualize new clothing patterns, experiment with textures and fabrics, or create compelling product imagery.
- Architects and Interior Designers: Render realistic landscapes or room designs, showcasing their concepts with greater impact.
- Marketers: Create eye-catching visuals for advertising campaigns, ensuring their message stands out.
- Web Designers: Generate website elements, backgrounds, or placeholder imagery efficiently.
- Craft Enthusiasts: Design custom backgrounds for scrapbooks or greeting cards, personalizing their projects in unique ways.
Enhancing Skills and Continuous Learning
Mastering Adobe's AI Photoshop Generative Fill is an ongoing process. To enhance your skills, focus on clarity when inputting text prompts and always start with high-resolution images. Experimentation is key; if the first result isn't satisfactory, try different prompts. Practice consistently to better understand the tool's capabilities and limitations.
To further your expertise, consider utilizing high-quality educational materials. Courses such as "Photoshop Generative AI Mastery: From Novice to Pro" offer comprehensive training. Adobe's official tutorials and documentation provide valuable instructional videos and step-by-step guides. Books and eBooks focused on Adobe Photoshop can also strengthen your foundation by breaking down complex features. Engaging with online communities and forums is another excellent way to troubleshoot issues, gain insights from experienced users, and contribute your knowledge. Many of these platforms host live sessions, webinars, and Q&A sessions that are highly beneficial for continuous learning.
The Future of Creative Editing
Generative AI in Photoshop, powered by Adobe Firefly and Sensei, represents a significant leap forward in digital image manipulation. It simplifies numerous editing tasks, allowing users to add, remove, or modify elements effortlessly. This technology not only enhances efficiency but also unlocks new dimensions of creativity, empowering users to bring their most ambitious visions to life. As the technology continues to evolve, we can expect even more sophisticated tools and seamless integration, further blurring the lines between imagination and reality in the digital art world.