Photoshop offers a versatile toolkit for transforming ordinary photographs into captivating watercolor paintings. Whether you aim to create a unique profile picture, enhance a cherished pet portrait, or design artistic holiday gifts from old family photos, the software provides an accessible pathway to achieving this aesthetic. This guide delves into various methods, from straightforward filter applications to more intricate layering techniques, allowing users of all skill levels to harness the expressive potential of watercolor within a digital medium.
The Allure of the Watercolor Aesthetic
Watercolors possess a unique charm, characterized by their translucent washes, soft edges, and the organic way colors blend and bleed. For many, the appeal lies in the perceived simplicity and the beautiful, often serendipitous, results that watercolor painting can yield. However, mastering traditional watercolor techniques can be a time-consuming endeavor, requiring practice and specialized materials. Photoshop bridges this gap, enabling individuals to replicate the visual language of watercolors without needing to wield a physical brush. This digital approach not only democratizes the creation of watercolor-style art but also offers unparalleled flexibility and control, allowing for experimentation and refinement that might be challenging with traditional media.
The desire to achieve a watercolor effect in Photoshop stems from a personal appreciation for the art form. Perhaps one admires the fluidity of watercolors but lacks the manual dexterity or experience to paint them. Alternatively, it might simply be a creative impulse to explore different artistic techniques and discover new visual possibilities. Regardless of the motivation, Photoshop provides the means to translate photographic subjects into a painterly format, making it a powerful tool for both hobbyists and professionals looking to add an artistic flair to their images.
Quick Wins: Leveraging Photoshop's Built-in Filters
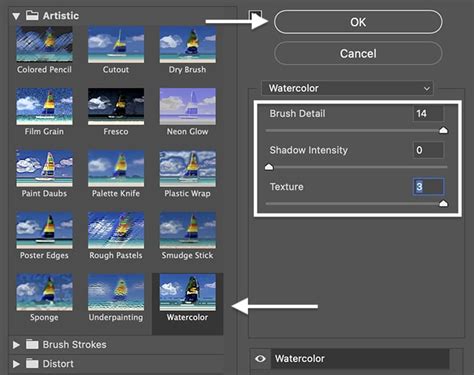
For those seeking a rapid transformation, Photoshop's built-in filters offer a direct route to a painterly look. The "Watercolor" filter, accessible through the Filter Gallery, is a prime example. While it can provide a quick approximation of the effect, some users find its default output to be somewhat rudimentary, appearing as if a filter has been superficially applied. To achieve a more nuanced and convincing watercolor effect, a combination of filters often yields superior results.
A common starting point involves duplicating the background layer. This is a crucial step, as it preserves the original image, allowing for non-destructive editing and the ability to revert to the original at any point. The shortcut for duplicating a layer is Ctrl+J on Windows or Command+J on Mac. Once the layer is duplicated, a filter can be applied. For instance, the "Dry Brush" filter, found under the Artistic category in the Filter Gallery, can be a good starting point. Adjusting the slider values for brush size, detail, and texture allows for customization.
To further refine the image and move beyond a simple filter application, layering multiple filters becomes essential. After applying an initial filter like "Dry Brush," another filter, such as "Cutout," can be applied. This filter helps to simplify the image, reducing the number of colors and details to create a more graphic, painterly appearance. The appearance might seem unusual at this stage, but this is often rectified by adjusting layer blending modes.
Another effective filter combination involves simplifying the image first. One approach is to duplicate the background layer three times. The top two layers are then temporarily hidden by clicking on their visibility (eyeball) icons. On the remaining visible layer, the "Cutout" filter can be applied to simplify the image. Subsequently, the second layer (from the top) is made visible again. This layer can then have the "Dry Brush" filter applied. Finally, the top layer is made visible, and a filter like "Median" from the Noise category can be applied. The Median filter is particularly useful for removing fine details without excessive blurring, thereby maintaining well-defined edges, which is often desirable in a watercolor effect.
Advanced Techniques: Layering, Brushes, and Textures
Moving beyond the immediate application of filters, more sophisticated techniques unlock greater control and realism in creating watercolor effects. This often involves a combination of layer manipulation, custom brushes, and the incorporation of textural elements.
Strategic Layering and Blending Modes
The foundation of many advanced Photoshop watercolor effects lies in strategic duplication and layering of the original image. Each duplicated layer can be subjected to different filters and adjustments, and their interaction is controlled through blending modes.
For instance, after duplicating the background layer and applying filters, one might duplicate the layer again. This new layer can be transformed into black and white. To integrate this black and white layer seamlessly, its blending mode in the Layers panel can be changed from "Normal" to "Multiply." This mode hides all white pixels and allows black pixels to show through, effectively creating a darker, more intense version of the image or a stark outline. This can add depth and a sense of the underlying sketch that often characterizes watercolor paintings.
Another common practice is to group layers that contribute to the watercolor effect. This group can then be duplicated, and one of the duplicates can be merged into a single layer. This merged layer can then be scaled up and subjected to a blur filter, such as "Gaussian Blur," with a significant radius (e.g., 250 pixels). This creates a soft, diffused background element that can enhance the painterly feel.
My Most Useful Technique After a DECADE of Watercolor Painting
Harnessing the Power of Custom Brushes
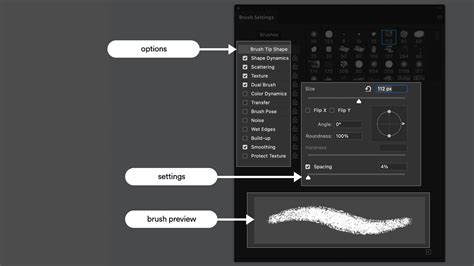
While filters provide a good starting point, the true essence of watercolor often lies in the unique characteristics of brushstrokes. Photoshop's Brush tool, when paired with custom watercolor brushes, allows for the addition of authentic-looking paint textures and organic strokes.
Many resources offer downloadable watercolor brush sets designed to mimic real-world media. These can range from brushes that replicate the soft, bleeding edges of wet-on-wet watercolor to those that capture the textured grain of dry brush techniques. To use these brushes, they must first be downloaded and then imported into Photoshop via the Brush panel menu.
Once imported, these brushes can be used to paint directly onto new layers. For example, creating a new layer and selecting a watercolor brush with blue color can add washes of color. Using different brushes and colors, such as red, on separate layers allows for building up the composition. Experimenting with blend modes like "Normal" or "Multiply" for these brushstroke layers can further influence how they interact with the underlying image.
A particularly effective technique involves using brushes on a layer mask. After grouping image layers and merging them, a layer mask can be added. By holding down the Alt (or Option on Mac) key while clicking the "Add layer mask" icon, a black mask is created, which hides the entire content of the layer. Then, by selecting a watercolor brush and painting with white on this mask, specific areas of the merged image can be revealed, creating a selective watercolor effect. Adjusting the brush opacity to around 30% and dabbing lightly can produce subtle, diffused reveals, mimicking the way watercolor paint might be lifted or applied sparingly.
Incorporating Paper Textures for Authenticity
A hallmark of traditional watercolor paintings is the texture of the paper itself, which often influences the way the paint behaves and appears. To achieve a truly convincing watercolor effect in Photoshop, incorporating a paper texture overlay is often a vital step.
This can be achieved by finding a suitable paper texture image online â parchment paper, watercolor paper, or even a subtle canvas texture can work well. This texture image is then placed into the Photoshop document as a new layer, typically positioned at the very top of the layer stack. The canvas size should be adjusted to ensure the paper texture completely covers the artwork.
Once the paper texture is in place, its blending mode can be adjusted. Often, setting the paper texture layer's blend mode to "Multiply" or "Screen" can integrate it effectively with the underlying watercolor effect, allowing the paper's grain to subtly show through the painted image. Alternatively, if the paper texture has been photographed or scanned, it might already have inherent variations that can be leveraged.
In some workflows, the paper texture is applied to a layer that then acts as a mask for the main image. For instance, a layer mask can be added to the main image layer, and then filled with black. The paper texture can then be applied to this mask, and by painting with white on the mask, the watercolor image is revealed through the texture of the paper. This ensures that the paper's characteristics directly influence the visibility and appearance of the watercolor effect.

Automating the Effect: Photoshop Actions
For users who desire a consistent and time-efficient way to create watercolor effects, Photoshop Actions are an invaluable tool. An action is essentially a recorded sequence of steps that can be played back on any image, automating complex processes with just a few clicks.
Many pre-made watercolor effect actions are available for download, offering a quick solution for transforming photos. While these actions provide convenience, they often offer limited control over the final outcome, as they are preset sequences. However, some actions are designed with customization in mind, allowing for minor adjustments to parameters after the action has been run.
To use an action, it must first be loaded into Photoshop's Actions panel. This is done by opening the Actions panel, clicking the hamburger menu icon, and selecting "Load Action." Once loaded, the action will appear in the Actions panel as a folder containing one or more steps. To apply the effect, the user typically selects the desired action and clicks the "Play" button.
Some actions might require user input during playback. For example, an action might prompt the user to select a specific area of the image, such as the main subject, using a selection tool like the Lasso tool. This allows the action to apply the watercolor effect more selectively. After the action completes, the image will have been transformed, offering a quick and impressive watercolor rendition.
My Most Useful Technique After a DECADE of Watercolor Painting
Beyond the Filter: Creative Exploration and Customization
The journey into creating watercolor effects in Photoshop extends beyond pre-defined filters and actions. True artistic expression often involves a combination of techniques, a willingness to experiment, and a personal vision.
Reference Images and Planning
Before diving into Photoshop, the process can be significantly enhanced by gathering reference images. This involves sketching out a general idea or concept and then researching various visual elements that align with that vision. This research and planning process is intertwined, allowing for the exploration of different directions and the identification of key elements that will inform the final artwork. Looking at actual watercolor paintings can provide invaluable insight into color palettes, brushstroke styles, and compositional approaches.
Customizing Colors and Adjustments
Photoshop's adjustment layers offer a powerful way to fine-tune the color and tonal qualities of the watercolor effect. For instance, the "Photo Filter" adjustment can be used to warm up or cool down the image, mimicking the effect of light on a painted surface. Selecting a "Warming Filter" and adjusting its density can impart a pleasant, aged feel, while a "Cooling Filter" can create a more subdued, atmospheric look.
Furthermore, individual color channels can be manipulated, or curves and levels adjustments can be applied to precisely control the contrast and saturation of the watercolor elements. This level of granular control ensures that the final artwork aligns perfectly with the artist's intent.
Adding Artistic Flourishes
To elevate a digitally created watercolor, consider adding unique artistic flourishes. This could involve:
- Manual Brushwork: Using the Brush tool with custom watercolor brushes to add intentional strokes, highlights, or subtle textural details that might not be captured by automated filters. This allows for a more personal touch.
- Pop Art Integration: For a bold, graphic style, one could explore tutorials that combine watercolor effects with pop art aesthetics, reminiscent of artists like Andy Warhol or Roy Lichtenstein. This could involve layering vibrant color blocks or comic-book-style outlines.
- Logo or Text Integration: For design projects, incorporating logos or text can be seamlessly achieved. By placing these elements within the workflow, they can be integrated into the watercolor aesthetic, creating unique branding or promotional materials.
The ultimate goal is to move beyond a mere filter application and to create an image that feels genuinely artistic and expressive. By combining different techniques, experimenting with settings, and adding personal touches, Photoshop can become a powerful digital canvas for crafting stunning watercolor-inspired art. The flexibility of the software means that each image can be treated as a unique project, leading to a diverse range of results, from subtle washes to vibrant, bold compositions.

tags: #watercolor #painting #photoshop