Photoshop's Transform tool is a cornerstone of digital image manipulation, offering a versatile array of functions to resize, reshape, rotate, and reposition elements within your designs. Whether you're a beginner or an experienced user, understanding these transformation capabilities is crucial for achieving precise and creative results. This guide will delve into the various methods and techniques available within Photoshop's Transform features, empowering you to manipulate objects with confidence and finesse.
The Foundation: Understanding Standard and Free Transform
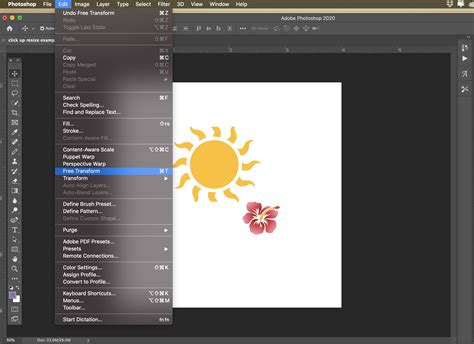
At its core, Photoshop's transformation capabilities are divided into two primary functions: Standard Transform and Free Transform. Standard Transform provides users with basic adjustments such as scaling, rotating, and skewing. Free Transform, on the other hand, allows for more fluid and intricate manipulation, encompassing warping, distorting, and applying perspective changes.
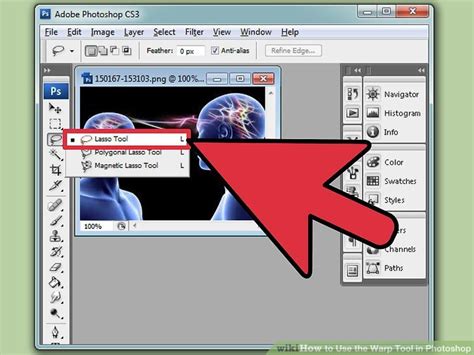
To access these powerful tools, you typically begin by making a selection around the object or layer you wish to modify. For quick access to the Free Transform function, the keyboard shortcut is invaluable: Ctrl+T for Windows users, and Command+T for Mac users. Once activated, a bounding box with handles will appear around your selected object, indicating that it is ready for manipulation.

Essential Transform Operations
Within the Free Transform mode, a right-click (Windows) or Control-click (Mac) on the bounding box reveals a sub-menu containing a comprehensive list of transform options. These include:
Scale: This is perhaps the most fundamental transformation. To resize an object, you can simply click and drag any of the handles on the bounding box. By default, as of Photoshop CC 2019, dragging a corner handle scales the layer proportionally, meaning the aspect ratio is maintained. This is visually indicated by the "Maintain Aspect Ratio" icon (a link symbol) being in the "ON" state in the Options bar. To scale non-proportionally, you can hold down the Shift key while dragging a handle. Conversely, holding Alt (Win) or Option (Mac) while dragging a handle scales the object proportionally from its center point.
When scaling an object down, especially a pixel-based layer, you might notice a checkerboard pattern appearing in the areas where the object is no longer present. To avoid this, it's beneficial to add a background layer, such as a Solid Color fill layer, before transforming. This ensures that the surrounding areas are filled with a color rather than transparency.
Rotate: To rotate an image, move your mouse cursor outside the bounding box. The cursor will transform into a curved, two-sided arrow. You can then click and drag to rotate the image freely. For precise rotations, you can enter a specific angle in the Options bar at the top of the screen.
Skew: Skewing slants your object vertically and horizontally, altering its structure by tilting or sloping it along the X or Y axis. To temporarily activate Skew mode while Free Transform is active, hold down Ctrl (Win) or Command (Mac) and drag a side handle. Holding Shift+Ctrl (Win) / Shift+Command (Mac) and dragging constrains the skew movement to horizontal or vertical.
Distort: Distort allows you to stretch your object in all directions. To perform a four-point distortion, hold Ctrl (Win) or Command (Mac) and drag any of the corner handles. Adding the Shift key while doing this will constrain the movement horizontally or vertically.
Perspective: This function applies a one-point perspective to the chosen object, simulating a third-dimensional viewpoint by adjusting the vanishing points of an image. It is particularly useful for architectural photography and graphic design when aligning objects within a scene. To temporarily activate Perspective mode, hold Shift+Ctrl+Alt (Win) / Shift+Command+Option (Mac) and drag a corner handle.
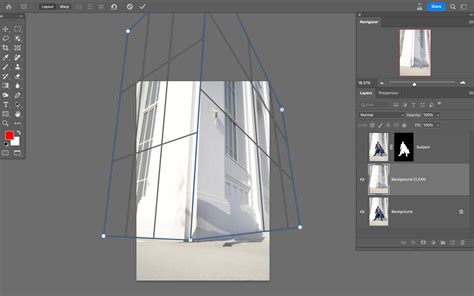
Warp: Warp offers detailed manipulation of an object's shape. When activated, a "mesh" graph appears over the image, providing control points that can be freely dragged to reshape the object. This is ideal for making subtle adjustments to the contours of objects.
The Transform Warp Feature
The Transform Warp feature is a powerful tool for visually reshaping and fine-tuning image layers with intricate control. To access it, first select the layer or area you want to warp in the Layers panel (Window > Layers).
Within the Warp options, you can:
- Adjust Warp Settings: Change the orientation of a warp style using the "Change Warp Orientation" icon in the Options bar.
- Split Warp Lines: Use the "Density" option to set how many lines appear between each split warp line. You can also add grid lines by splitting the warp horizontally, vertically, or crosswise using the split icons in the Options bar.
- Select Multiple Points: Select multiple anchor points by Shift-clicking them or dragging over them while holding Shift.
- Modify Anchor Points: Bezier control points can now be moved independently. Option-click (Mac) | Alt-click (Win) to toggle between moving them in unison or independently. Alternatively, right-click (or Control-click Mac) on an anchor point and choose "Convert Warp Anchor Point" from the context-sensitive menu.
- Customize Warp Guidelines: Click the gear icon in the Options bar to customize the color and opacity of warp guidelines, making them easier to see against your image.
- Delete Split Lines: If a split line is selected, pressing the Delete key will remove it.
- Choose Warp Styles: Drag control points to manipulate the shape of the item or choose a warp style from the Warp pop-up menu in the Options bar. For example, the "Cylindrical" preset can transform flat work, including text, onto a rounded cylindrical surface.
Advanced Transform Techniques and Considerations
Beyond the fundamental operations, Photoshop offers several advanced techniques and important considerations for transforming objects effectively.
Non-Destructive Transformations with Smart Objects
A critical aspect of working with transformations is understanding their impact on image quality. Each time you resize, rotate, or transform a pixel-based layer, Photoshop needs to redraw the pixels, which can lead to a loss of clarity and detail. To avoid this degradation, it is highly recommended to convert your layer into a Smart Object before applying transformations.
Smart Objects act as containers that protect the original image data. Any transformations applied to a Smart Object are applied to the object itself, not the pixels within. This means that you can scale a Smart Object down, then scale it back up, and it will retain all of its original information, unlike a regular pixel-based layer which would discard information when scaled down and then attempt to create new information when scaled up.
To convert a layer to a Smart Object, you can go to the Layers panel, click the "More" menu in the upper-right corner, and select "Convert to Smart Object." Alternatively, you can navigate to Layer > Smart Objects > Convert to Smart Object. After completing your transformations, you can rasterize the Smart Layer to allow for normal image editing if needed.
INCREDIBLE Singing Transformation Video
The Reference Point and Its Role
The "Reference Point" defines the anchor around which objects are transformed, such as rotating or scaling. In earlier versions of Photoshop, this was represented by a target icon in the center of the transform box. While Adobe has hidden this icon in more recent versions, its functionality remains. You can access and reposition the Reference Point by using the Reference Point Grid in the Options Bar. Each square in this grid represents one of the handles around the transform box. Clicking on a specific square moves the Reference Point to that handle, thus changing the center of the transformation.
To make the Reference Point visible when using Transform, you can go to Edit (Win) / Photoshop (Mac) > Preferences > Tools and check the "Show Reference Point when using Transform" option.
Transform Again and Other Useful Shortcuts
The Transform Again feature (Ctrl+Alt+T on Windows or Command+Option+T on Mac) is incredibly useful for repeating the exact same transformation applied to an object or layer. This is invaluable for creating patterns or applying consistent edits across multiple elements.
Other helpful shortcuts include:
- Zooming While Transforming: Command (Mac) / Control (Win) "+" to zoom in, Command (Mac) / Control (Win) "-" to zoom out.
- Applying Transformations: Press Return (Mac) | Enter (Win), click in the preview area outside the transformation handles, or select another tool to accept your changes and exit Free Transform.
- Canceling Transformations: Press the Esc key to cancel Free Transform without saving your changes.
- Transforming Layers with Masks: By default, Photoshop transforms both the layer and its associated mask.
Preferences and Customization
Photoshop's preferences play a significant role in how tools like the Transform tool function. To access the preferences dialog box, go to Edit (Win) / Photoshop (Mac) > Preferences > General.
One crucial setting related to the Transform tool is the Legacy Free Transform option. Ticking this box reverts the transform behavior to its pre-CC 2019 state.
The color of the transform box outline can also be customized. If the default color is difficult to see against your image, you can change it in the Preferences dialog box under the "Control Color" option. The "Classic" option is often a good choice as it displays a dark outline on light image areas and a light outline on dark areas, ensuring visibility.
Tips for Best Results
To ensure optimal results when using Photoshop's Transform tool:
- Maintain Quality: When working with vector shapes or shape layers, select the appropriate interpolation method to maintain their quality and sharpness. For pixel-based layers, consider converting to Smart Objects to prevent quality loss.
- Precise Movement: Use the Move Tool or the keyboard arrow keys for precise object positioning.
- Alignment: Enable "Snap to Grid" or "Snap to Guides" for accurate alignment.
- Options Bar: Always keep an eye on the Options bar, as it provides access to specific functions like the Maintain Aspect Ratio button, Rotation Angle, and various transform presets.
- Interpolation Method: For the Free Transform command to automatically choose the best resampling method based on the transformation made, set "Interpolation" to "Bicubic Automatic" in the Options bar.
- Show Transform Controls: To display the transformation handles at all times, select the Move tool and enable "Show Transform Controls" in the Options bar.
- Transforming Numerical Values: Use the Width and Height text boxes in the Options bar to enter specific percentage values for scaling. Similarly, you can enter values for the new location of the reference point in the X and Y text boxes.
By mastering these transformation techniques, you unlock a vast potential for creative expression within Photoshop, allowing you to precisely manipulate images and objects to realize your artistic vision.