Welcome back to our DaVinci Resolve Tutorial series! Understanding how to manipulate the speed of your clips is a game-changer. When you're new to video editing, it's easy to fall into the trap of thinking that outstanding transitions between clips require flashy effects and animations. A truly seamless transition hinges on thoughtful camera movement during filming, identifying connections between clips in post-production, and then bringing it all together through speed alterations. Now let's delve into how to change clip speed in DaVinci Resolve.
The Power of Speed Ramping
Speed ramping is the process of digitally speeding up and then slowing down a video clip. This is a great technique for corporate videos or for hyper-stylized filmmakers who need this effect in their workflow. A speed ramp typically works best by speeding up slow-motion footage for a short period of time before slowing it down again. This technique was made popular in films through Zach Snyder who famously used this technique in the movie 300.

Slow-motion videos are typically best for the speed-ramping effect because of the high frame rate that it was shot at. A higher frame rate video leads to smooth speed ramping because of the number of frames in the video. While speed ramping is still incredibly possible at normal speeds, slow motion will for sure yield the best results.
So, why speed ramp? Well, for those in the corporate world of video editing or creating content for social media, speed ramping is almost an absolute necessity. Speed ramping can be used to bring the audience from one scene to the next in a spectacular fashion or to emphasize a certain point in the video. In filmmaking, it can be used to make a scene more “epic” seeming than it would normally be.
If you can, keep speed ramping in mind while shooting your video. Knowing what you’re going to speed ramp in post-production makes the actual speed ramp itself look much better than it normally would.
Changing Clip Speed in DaVinci Resolve: The Basics
DaVinci Resolve, while typically known as a color grading and color correction tool, is an incredibly capable editor that has an amazing speed effect. This beginner’s DaVinci Resolve tutorial for Mac and Windows devices will go over how to make speed changes inside DaVinci Resolve 17 and DaVinci Resolve 18.
There are a few different ways to speed ramp inside DaVinci Resolve. Something to note is that speed ramping is NOT the same as changing the frame rate of your video. Changing the FPS (frames per second) gives a much different effect than speed ramping does.
Speed remapping in DaVinci Resolve is incredibly easy and can be done with only a few clicks. You can change the speed of your clip by right-clicking on your video clip and going to "Change Clip Speed" in the drop-down menu. A pop-up window will then appear, presenting you with a range of options for changing your clip’s speed.
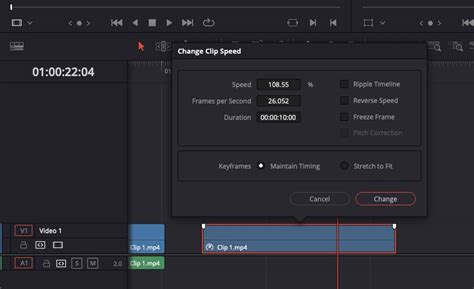
These two parameters are interconnected, so when you adjust one, the other changes accordingly. Once you've made your adjustments, click OK, and voila! You've successfully altered the speed of the clip.
Key Speed Manipulation Options
Within the "Change Clip Speed" window, you'll find several crucial options:
- Speed: Moving the percentage of the clip speed will result in different speeds for your video clip. You can drag these points to the left or the right to result in a smooth speed transition in the speed controls. Decreasing the speed on selected clips will give a slow-motion effect whereas speeding these clips up will make the motion choppy and quick.
- Ripple Timeline: Once activated, any speed changes you make to a clip will cause subsequent clips to shift along the timeline accordingly. This is essential for maintaining the overall length and flow of your project.
- Reverse Speed: You can also activate "Reverse Speed" to reverse a clip. This can add dramatic effect or be used for creative storytelling.
- Freeze Frame: Another useful function is the "Freeze Frame". This option essentially takes a screenshot of the current frame, allowing you to extend that image indefinitely. This is perfect for emphasizing a particular moment or creating a stylistic pause.
- Pitch Correction: When you adjust the speed of a clip, the pitch of the audio may change. This feature helps to mitigate those changes to some extent, ensuring your audio remains listenable.
On top of this, another option in this menu allows for a freeze frame effect to occur along with another option to reverse the speed and ripple sequence.
Advanced Speed Control with Retime Controls and Keyframes
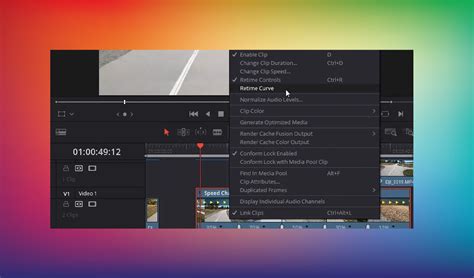
While the "Change Clip Speed" menu offers a good starting point, DaVinci Resolve provides more granular control through "Retime Controls" and "Retime Curves."
You can access Retime Controls by right-clicking on your footage and selecting "Retime Controls," or by pressing the shortcut "Ctrl + R" (or "⌘R" on Mac). This will bring up the speed change tool inside the timeline, which is indicated by a bunch of blue arrows.
Adding Speed Points for Dynamic Ramps
Once Retime Controls are active, you can add "Speed Points." Click on the arrow below the clip and select "Add Speed Point." You can add multiple speed points to your timeline. After adding speed points, you'll see that each point has an individual speed control beneath it. The primary control remains "Change Speed."
Speed points let you quickly speed up and then slow down a video clip, creating dynamic speed ramps. Fool around with the speed of the clip you’re working with as well as these settings to see what works the best for you.
Achieving Smooth Transitions with Retime Curves
However, a new issue arises: all our operations so far have been linear, but a gradual fade in or out creates a more pleasing aesthetic. Similar to the operations we discussed earlier, right-click on your footage and select "Retime Curve."
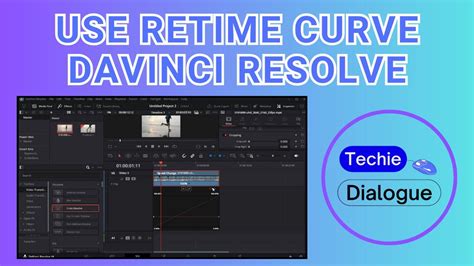
The Retime Curve editor allows you to visualize and precisely control the speed changes over time. You can drag these points to the left or the right to result in a smooth speed transition in the speed controls. This is where you can fine-tune your speed ramps to be subtle or dramatic, ensuring a professional and polished look.
There are a lot of speed-ramping techniques that can be utilized once you master this effect. Smooth transitions can be created through the use of DaVinci Resolve speed ramps as well as intense pans or whips with a lot of motion blur.
Again, speed ramping is something that is hyper-specific to the type of content you’re trying to create, so play around with it using these techniques to see what you’re able to come up with.
Enhancing Frame Interpolation for Smoother Motion
In DaVinci Resolve, when we apply speed changes, it's practically impossible for all frames to evenly divide within each second. This can lead to choppiness or artifacts, especially when speeding up or slowing down footage significantly. To combat this, DaVinci Resolve offers sophisticated Frame Interpolation options.
First, click on "File" > "Project Settings" in the top menu bar. Scroll down in the "Master Settings" until you find "Frame Interpolation."
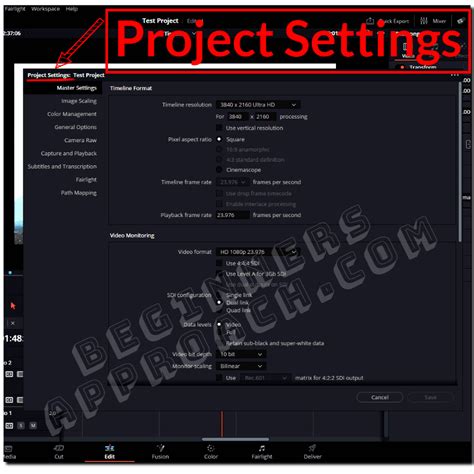
You have three primary methods for frame interpolation:
- Nearest: This option uses the closest frame to fill in the gaps when your video is sped up or slowed down. It's the fastest method but can result in the most noticeable artifacts.
- Frame Blend: This option blends frames together to create new ones. It offers a smoother result than "Nearest" but can introduce ghosting or motion blur.
- Optical Flow: This is the most complex method. It creates entirely new frames based on the motion and color analysis of surrounding frames. Optical Flow generally produces the smoothest and most natural-looking results, but it is also the most computationally intensive.
Choosing the right frame interpolation method is crucial for achieving the desired look and preventing visual degradation. Experiment with these settings to find the best balance for your specific footage and speed ramp.
INSANE Slow Motion with Any FPS in DaVinci Resolve (2 Minutes)
Efficiency and Workflow Enhancements
Tasks that used to take lots of mouse moves and keystrokes can now be done in a fraction of the time. Tools like TourBox aren't just a tool - they're a helpful assistant for your creative work. While not directly related to speed manipulation, optimizing your workflow with specialized hardware can significantly speed up your editing process, allowing you to focus more on creative decisions like speed ramping.
Additionally, for those working with dialogue or interviews, tools like Simon Says can add even more simplicity to working with subtitles in DaVinci Resolve. With a native plugin, you can automatically generate captions and transcribe your content in 100 different languages, saving you immense amounts of time.
Conclusion: Elevating Your Content with Speed
Speed ramping in apps such as DaVinci Resolve is a simple yet effective way to add production value to your content. If done well, a speed ramp can elevate content to an insane degree and make for a rollercoaster of a ride. Small tips and tricks such as these are essential when editing content for the sake of efficiency. The more time saved as a video editor, the better. By mastering the techniques of clip speed manipulation in DaVinci Resolve, you can transform ordinary footage into dynamic and engaging visual narratives.