Photographing through glass presents a common yet persistent challenge for photographers: unwanted reflections. Whether it's the glare from shop windows, the interior lights of a car, or the ambient conditions of an office space, these reflections can obscure the intended subject, mar an otherwise perfect shot, and lead to the abandonment of potentially great photographs. This article delves into the evolving landscape of reflection removal in Adobe Photoshop, exploring both cutting-edge AI-powered tools and time-tested manual techniques to help you salvage and enhance your images.
The Genesis of the Problem: Understanding Reflections
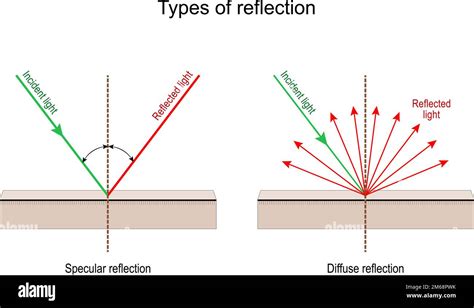
Reflections occur when light bounces off a surface, in this context, the glass of a window or other transparent material. When you photograph through a window, your camera captures two distinct images simultaneously: the scene you intend to photograph on the other side of the glass, and a reflected view of the environment behind you. This reflected image is a consequence of glass reflecting only a portion of the light that strikes it, resulting in a weaker, superimposed image. Crucially, this reflected view is not simply a mirrored version of what's behind you; it's akin to placing your camera inside the space, turning it around, and removing the glass pane.
The complexity of these combined images is amplified when the scenes on either side of the glass differ significantly in terms of content, white balance, sharpness, or lighting. This disparity is what makes isolating and removing the unwanted reflection a non-trivial task. For years, photographers have grappled with this issue, often resorting to creative workarounds or accepting imperfect results.
The AI Revolution: Photoshop's New Reflection Removal Tool
Adobe has significantly streamlined the reflection removal process with the introduction of an AI-powered feature, primarily accessible through the Camera Raw filter. This technology, developed by a dedicated team including Eric Kee and Adam Pikielny, aims to intelligently identify and separate the intended scene from the reflected elements within a photograph.
Activating and Utilizing the AI Tool
To begin, it is essential to convert your image layer into a Smart Object. This crucial step allows for non-destructive editing, enabling you to revisit and refine your adjustments later. Right-click on your image layer in the Layers panel and select "Convert to Smart Object."
Next, access the Camera Raw filter. Once inside Camera Raw, navigate to the "Technology Previews" section within the Preferences Panel and ensure that the "New AI Features and Settings Panel" is enabled. This is where the magic happens.
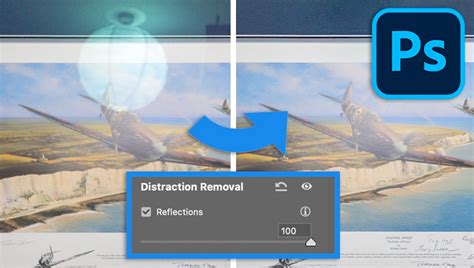
Within the Camera Raw filter, you will find the "Distraction Removal" section. Expand this to reveal the "Reflection Controls." Here, you will encounter the primary tool for AI-powered reflection removal. The tool operates by analyzing the image and attempting to disentangle the two superimposed scenes.
Quality and Intensity Controls
A key aspect of this AI tool is the ability to select the "Output Quality." Options typically include "Preview" (lowest resolution, fastest processing, suitable for social media), "Standard" (intermediate resolution, ideal for screen viewing), and "Best" (highest resolution, takes longer to process, but yields noticeably improved results). While the "Best" option requires more processing time, it is generally preferred for its superior output.
The "Intensity" slider is central to controlling the strength of the reflection removal. It defaults to 100%, meaning the tool applies its full effect. You can lower this slider to zero to see the original image with the reflection, or even drag it to -100. At -100, the tool aims to show you only the reflected scene, effectively isolating it. This two-ended slider is a testament to the AI's ability to untangle complex scenes, acknowledging that sometimes the model might mix up the background scene and the reflected scene.
Limitations and Specificity of the AI
It's important to understand the current scope of this AI technology. This first iteration is primarily designed to address reflections from large, plate-glass windows that occupy a significant portion of the field of view. It is not intended for smaller or distant windows, reflections where the window frame intrudes, or reflections from curved surfaces like eyeglasses, car bodies, or even clouds reflected in a lake. While future updates may expand its capabilities, for now, its strength lies in tackling prominent window reflections.
Furthermore, the AI model performs best on raw photo files (DNGs, CR2s, ARWs, ProRAWs, etc.). While plans are in motion to support JPEG, HEIC, and other common file formats, raw files provide the most detailed information for the AI to work with. The AI also struggles with images containing very bright, specular highlights or "clipped" pixels, where the camera sensor has been oversaturated. In these areas, the AI cannot infer what the original detail might have been and will likely render them as dark or noisy, rather than attempting to guess the missing information.
Beyond AI: Manual Techniques for Stubborn Reflections
While the AI tool is remarkably effective, it's not a magic bullet for every reflection. As Jesús Ramirez of the Photoshop Training Channel points out, some reflections, especially stubborn or complex ones, may still require manual intervention. The AI is not generative AI; it's designed to remove specific types of reflections, not create new content.
The Remove Tool and Blank Layers
For those recalcitrant reflections that persist after using the AI, a hands-on approach is often necessary. After applying the Camera Raw filter and accepting the initial AI-driven removal, you can create a new, blank layer above your Smart Object. Select Photoshop's "Remove Tool" from the toolbar. This tool, powered by content-aware technology, allows you to paint over remaining distracting reflections. By manually painting over these areas, you gain precise control, enabling you to address problem spots that the AI might not have handled perfectly. Toggling the visibility of your layers allows you to clearly see the impact of your edits and the extent of the improvement.
FINALLY! Photoshop Removes Window Reflections with 1-Click
Extracting and Repurposing Reflections
An intriguing, less obvious application of the AI tool, as highlighted by Jesús Ramirez, is the ability to extract reflections themselves. By setting the Intensity slider to its minimum (-100), you can isolate the reflection. This extracted reflection can then be moved to another image file using the Move Tool.
However, extracted reflections often appear rough or textured. To prepare them for integration into a new scene, applying a Gaussian Blur from the Filter menu is recommended. Adjust the blur radius until the texture is smoothed out. To blend this softened reflection into a new image, change the blending mode of the reflection layer to "Screen." This blending mode makes black pixels transparent, allowing the reflection to appear naturally overlaid on the new photograph. Further refinement can be achieved by adding a Brightness/Contrast adjustment as a clipping mask to the reflection layer. This allows you to precisely control the intensity of the reflection, making it brighter or darker to match the new scene.
Best Practices and Proactive Measures
While Photoshop offers powerful tools for removing reflections, the most effective strategy remains prevention. Understanding the physics of light and how reflections form can help you avoid them in the first place.
Avoiding Reflections During Capture
- Control Lighting: When photographing through windows from the inside of a room, turn off interior lights to make your camera's position darker than the scene you're photographing. This reduces the contrast that leads to strong reflections.
- Minimize Lens Distance: For display cases or windows, press your camera lens directly against the glass. An ultra-wide lens can be beneficial here to capture as much of the scene as possible without significant distortion.
- Angle and Distance: Shooting head-on into glass produces a weaker reflection than shooting from an angle. If shooting from an angle, a polarizing filter can help, though be mindful that it may alter colors.
- Telephoto Lenses: For museum paintings lit by spotlights, standing back and using a telephoto lens can often move the reflected spotlights outside the frame of the painting.
- Eyeglasses: A pro tip for photographing people wearing eyeglasses is to slightly tilt the glasses. This simple adjustment can often eliminate reflections without the need for complex post-processing.
Understanding Failure Cases
The AI model, like any technology, has its limitations. It struggles with:
- Complex Reflections: If a reflection is so strong or intricate that it's difficult for a human to discern what's what, the AI will likely face similar challenges.
- Bright, Clipped Highlights: As mentioned, areas where pixels are saturated to white provide no detail for the AI to work with.
- Specific Scenarios: Cityscapes at night and small, intricate reflections are areas where the current technology may not perform optimally.
Workflow Considerations and Advanced Techniques
The order in which you apply reflection removal can matter. Generally, it's recommended to address reflections after correcting the image orientation (rotation) but before significant global adjustments like white balance or exposure, as removing reflections effectively presents a new image. If you've used an Adobe Adaptive Profile, re-applying or updating it after reflection removal might be necessary to avoid residual artifacts.
For those seeking ultimate control or dealing with particularly challenging images, a more advanced workflow exists. This involves importing the same DNG file into Photoshop three times, each with the Camera Raw slider set to -100, 0, and 100. Load these into separate layers. Then, change the Image Mode to "32 Bits/Channel" to work with high dynamic range data. You can then create masks to selectively blend regions from each of these layers, using blending modes like "Linear Dodge" for combining the -100 and 100 images, or "Normal" for blending with the original. This method, while complex, offers unparalleled flexibility in reconstructing the scene.
Even though the AI model wasn't specifically trained to remove sun flares, it often performs surprisingly well in these instances.
The Future of Reflection Removal
The development of AI-powered reflection removal in Photoshop represents a significant leap forward in image editing capabilities. It democratizes a complex task, making professional-quality results accessible to a wider range of users. The ongoing development promises further enhancements, with plans to support more file formats and tackle smaller, more intricate reflections.
Jesús Ramirez, a respected educator in the field, emphasizes that there are "many ways to do things in Photoshop." The beauty of these new tools lies in their ability to augment, rather than entirely replace, traditional techniques. By understanding both the AI's strengths and limitations, and by mastering manual refinement methods, photographers can confidently tackle window reflections, transforming potentially discarded images into compelling visuals. The goal is to empower you to turn a photo you might otherwise delete into one that is good enough to share, opening up a wealth of creative opportunities that were previously hindered by the persistent challenge of glass reflections.
tags: #remove #reflection #in #photoshop