DaVinci Resolve, a powerful post-production software, offers extensive control over video editing. However, a common stumbling block for many users, from beginners to seasoned professionals, is understanding and managing timeline frame rates. This guide aims to demystify frame rate settings within Resolve, providing clear, actionable steps to navigate these crucial parameters and resolve common issues.
Understanding the Fundamentals of Frame Rate
Before diving into the specifics of DaVinci Resolve, it's essential to grasp what a frame rate is and why it matters. Frame rate, often abbreviated as FPS (Frames Per Second), refers to the number of individual images, or frames, that are displayed by a video in one second. This fundamental setting significantly impacts the visual appearance, motion fluidity, and overall viewer experience of your content. The choice of frame rate is not merely a technical detail; it influences how realistic a video looks, how smooth fast motion appears, and even the perceived "feel" of the footage.
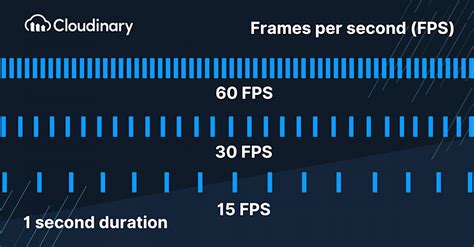
Different media platforms and production types have established conventions for frame rates. For instance, traditional film is often shot at 24 FPS, while television broadcasts might utilize 25 FPS (PAL) or 29.97 FPS (NTSC). Online content, particularly on platforms like YouTube, can accommodate a wider range, often favoring 24, 30, or 60 FPS. Choosing the correct frame rate from the outset is crucial because it dictates the basis for playback and can affect the workflow and final output. Furthermore, the frame rate directly influences file size and export times; higher frame rates contain more information per second, leading to larger files and longer rendering processes.
DaVinci Resolve's Frame Rate Hierarchy: Project, Timeline, and Clip Levels
DaVinci Resolve offers flexibility by allowing frame rate adjustments at multiple levels:
- Project Level: This sets the default frame rate for all new timelines within a specific project. It acts as a foundational setting for your entire project's video output.
- Timeline Level: Each individual timeline within a project can be assigned its own specific frame rate. This is particularly useful when working with footage shot at different frame rates or when creating sequences that require a particular motion characteristic.
- Clip Level: Individual clips can also have their frame rates interpreted differently. This allows for fine-tuning how specific pieces of footage are displayed, especially when dealing with slow-motion effects or footage captured at non-standard rates.
The project frame rate dictates the default for any new timeline created. However, a critical limitation in DaVinci Resolve is that once a timeline is started and media is imported, its frame rate cannot be directly changed. This is a hard lesson many editors learn, often due to a misstep during the initial project setup or media import.
The Challenge: Changing an Incorrect Timeline Frame Rate
Many users encounter a situation where they realize their timeline's frame rate is incorrect after they've begun editing. This might happen if the initial project setting was overlooked or if footage was imported without setting the project frame rate first. The software's design, for reasons not always apparent to the user, prevents direct modification of an active timeline's frame rate once it's populated with media.
One common scenario is needing to deliver a video in a different frame rate than the original project. For example, working with NTSC (29.97 FPS) footage but needing to export for a PAL region (25 FPS). This transition can present challenges, especially concerning audio synchronization and motion smoothness, as frames will either need to be duplicated or dropped.
Workarounds for Incorrect Timeline Frame Rates
While DaVinci Resolve doesn't offer a direct "change timeline frame rate" button after media import, several effective workarounds exist. These methods involve recreating the timeline with the desired settings and transferring the content.
Method 1: Recreating the Timeline with Media Re-import (The "Undo" Trick)
This is often cited as the least painful method for correcting an incorrect project frame rate before significant editing has occurred.
- Delete All Media: Begin by deleting all the media clips from your project's Media Pool.
- Access Project Settings: Navigate to the Project Settings (usually found under the "File" menu or via a keyboard shortcut).
- Change Project Frame Rate: Locate the "Timeline Frame Rate" setting and change it to your desired value.
- Save and Close: Save your project settings and close the settings tab.
- Undo: Immediately perform an "Undo" command (Ctrl+Z on Windows, Cmd+Z on macOS). This action will restore the media that was deleted back into the Media Pool. Crucially, the frame rate change you made in the Project Settings will remain.
This peculiar behavior occurs because certain functionalities, particularly those related to external services like YouTube integration, rely on specific cookie settings. When you undo the media deletion, the project settings that were momentarily altered persist.
Method 2: Creating a New Timeline and Copying Content
This method is more robust and suitable when the "undo" trick isn't feasible or when you specifically need a new timeline with a different frame rate within the same project.
- Create a New Timeline: On the Edit page, navigate to the Media Pool panel. Right-click in an empty space and select "Create New Timeline."
- Name the Timeline: Give your new timeline an appropriate name.
- Disable "Use Project Settings": Crucially, uncheck the "Use Project Settings" option for the new timeline.
- Set Custom Frame Rate: Go to the "Format" tab within the timeline creation dialog. From the "Timeline frame rate" dropdown menu, select your desired FPS.
- Create the Empty Timeline: Click "Create." You now have an empty timeline with the correct frame rate.
- Copy and Paste Clips: Switch back to your original timeline. Select all the clips (Ctrl+A or Cmd+A) and copy them (Ctrl+C or Cmd+C).
- Paste into New Timeline: Navigate to your newly created, empty timeline. Paste the copied clips (Ctrl+V or Cmd+V). The content from your old timeline will now reside in the new timeline, conforming to its frame rate.
This approach ensures that the new timeline operates at the desired frame rate, while the project's overall frame rate might remain unchanged. This is particularly useful for segmenting your project or for specific export requirements.
Method 3: Nesting the Old Timeline
An alternative to copying and pasting individual clips is to "nest" the entire original timeline within a new one.
- Create a New Timeline: As in Method 2, create a new timeline and set its frame rate to your desired value, unchecking "Use Project Settings."
- Nest the Original Timeline: Open your original timeline. Select all clips (Ctrl+A or Cmd+A) and then go to "Sequence" > "Nest Selected Clips into New Timeline." This will create a new timeline containing your original sequence as a single nested element.
- Copy the Nested Timeline: Copy this newly created nested timeline.
- Paste into the Target Timeline: Switch to your new, correctly-framed timeline and paste the nested sequence.
This method can be more organized for complex sequences and helps maintain the integrity of the original edit while adapting it to a new frame rate environment.
Method 4: Dynamic Project Switching
For more advanced workflows, dynamic project switching can be leveraged.
- Create a New Project: Start by creating an entirely new DaVinci Resolve project.
- Set Project Settings: In this new project, go to Project Settings and set the desired frame rate.
- Import Original Project: Go to "File" > "Project Manager." Select your original project and use the "Open" option. This will open the original project within the new project's context.
- Copy Timeline: Navigate to the timeline you wish to transfer from the original project. Copy the entire timeline.
- Paste into New Project: Switch to your new project and paste the copied timeline. It will now adopt the frame rate settings of the new project.
This method is particularly effective when dealing with significant project restructuring or when migrating elements between projects with different frame rate requirements.
Re-interpreting Clips and Handling Frame Rate Differences
Beyond timeline settings, you can also adjust how individual clips are interpreted. This is especially useful for footage that doesn't inherently match your project or timeline frame rate.
Clip Attributes: Re-interpreting Individual Clips
Sometimes, you may have footage shot at a higher frame rate (e.g., 60 FPS or 120 FPS) that you want to use on a standard 24 FPS timeline. Instead of simply dropping it in, which might not yield the desired slow-motion effect or could introduce artifacts, you can re-interpret the clip's frame rate.
- Locate Clip in Media Pool: On the Edit page, go to the Media Pool tab.
- Select Clip(s): Select the clip(s) you wish to modify. You can select multiple clips using Ctrl or Cmd.
- Open Clip Attributes: Right-click on the selected clip(s) and choose "Clip Attributes."
- Adjust Video Frame Rate: In the "Clip Attributes" panel, navigate to the "Video" tab. Under "Video Frame Rate," select your desired frame rate from the dropdown menu. For instance, if you have 60 FPS footage and want it to play at 24 FPS on your timeline, you'd set this to 24.
- Confirm Changes: Click "OK."
DaVinci Resolve will now re-interpret the clip's playback speed based on the new frame rate. If you intend to export at this new frame rate, you might need to confirm this change. Be aware that changing a clip's frame rate will affect its duration. A clip recorded at 60 FPS and interpreted as 24 FPS will play back slower, effectively becoming a slow-motion clip.

Handling Variable Frame Rate (VFR) Footage
Footage captured with smartphones or screen recording software (like OBS Studio) often uses Variable Frame Rate (VFR). This means the FPS can fluctuate within a single recording, which can cause playback and editing issues in professional NLEs like Resolve.
If you encounter VFR footage, it's best practice to convert it to a Constant Frame Rate (CFR) before importing it into DaVinci Resolve. Tools like HandBrake or FFmpeg can be used for this conversion, allowing you to set a target constant frame rate (e.g., 24, 30, or 60 FPS). Once converted to CFR, you can then import it into Resolve and proceed with editing as usual, setting your timeline frame rate accordingly.
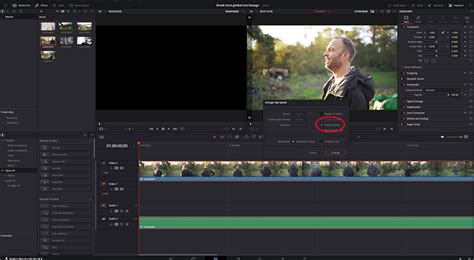
Audio Considerations: Pitch Preservation
When changing frame rates, particularly when converting between standards like NTSC (29.97 FPS) and PAL (25 FPS), altering the playback speed can inevitably affect the audio pitch. If you're working with music or dialogue where pitch accuracy is critical, this is a significant concern.
DaVinci Resolve's "Change Speed" function in the Edit mode has an "Adjust pitch to match" option. While this attempts to maintain the original pitch, it can sometimes lead to audio artifacts like phasing, especially in stereo recordings.
For more precise pitch control, especially when going from a higher frame rate to a lower one (which implies slowing down the playback), you might need to:
- Trial and Error: Experiment with the "Adjust pitch to match" setting and listen carefully for artifacts.
- External Plugins: Consider using dedicated audio plugins designed for pitch correction or manipulation. These often offer more sophisticated algorithms that can preserve pitch without introducing unwanted side effects.
- Re-recording or ADR: For critical audio, especially dialogue, re-recording the audio at the target frame rate or using Automated Dialogue Replacement (ADR) might be the most reliable solution, though it adds significant post-production time.
When converting from 29.97 FPS NTSC to 25 FPS PAL, there will inherently be some skipped frames or a slight visual shift, which is unavoidable due to the differing frame densities. Preserving audio pitch across such a conversion requires careful attention.
Keyframe Pitch Your Audio Down - DaVinci Resolve
Playback Frame Rate vs. Timeline Frame Rate
It's important to distinguish between the timeline frame rate and the playback frame rate. The timeline frame rate is the actual number of frames per second your sequence is composed of. The playback frame rate is the speed at which these frames are displayed on your monitor, especially an external reference monitor.
While Resolve can often display footage smoothly even if the playback hardware's refresh rate differs slightly from the timeline frame rate (e.g., displaying 24 FPS on a 60 Hz monitor), it's generally best practice to keep them aligned for optimal playback and monitoring. If you're using an external monitor for critical viewing, ensure its refresh rate is compatible with your project's frame rate.
Conclusion: Proactive Frame Rate Management
The limitation on changing timeline frame rates after media import in DaVinci Resolve underscores the importance of proactive planning. Understanding frame rates, their impact on visuals and technical requirements, and setting them correctly at the project or timeline creation stage is paramount. While workarounds exist for correcting mistakes, they often involve extra steps and potential compromises. By carefully considering your project's needs from the outset and utilizing the various settings within DaVinci Resolve, you can ensure a smoother editing experience and a higher quality final output. Remember, the frame rate is a fundamental building block of your video, and getting it right from the start saves time and prevents headaches down the line.