Moving your digital art environment to a new computer can feel like a daunting task, especially when you've accumulated a vast library of custom brushes, tools, and settings. For long-time users of Clip Studio Paint (CSP), formerly known as Manga Studio, this process often involves more than just installing the software and re-downloading assets. This guide aims to provide a clear, step-by-step approach to migrating your entire CSP setup, ensuring a seamless transition to your new machine, drawing on insights from experienced users and official guidance.
Understanding the Core Challenge: User Data Migration
When you install Clip Studio Paint, the program creates a dedicated folder that stores all your personalized data. This includes not only your downloaded materials but also your custom brushes, tool settings, workspaces, and even purchased assets. The primary challenge in transferring CSP to a new computer lies in correctly locating, copying, and re-integrating this crucial user data. Simply installing the software on a new PC will result in a fresh, default setup, leaving you to painstakingly reconfigure everything from scratch. This can be a significant setback, particularly for artists who rely on a highly personalized workflow with hundreds of custom brushes and meticulously organized material libraries.
The "CELSYS Folder" Method: A Common but Incomplete Solution
One of the most frequently suggested methods for transferring CSP data involves directly copying the "CELSYS" folder from your old computer to your new one. This approach is often detailed in various online tutorials and forums. The idea is that this folder contains all the necessary user-specific information.
To attempt this method, you first need to locate the "CELSYSUserData" folder on your original computer. The exact path can vary depending on your operating system and installation choices, but it's typically found within your user documents. If you cannot find the CELSYSUserData folder, launching Clip Studio and Clip Studio Paint on your system can help create it.
Once located, you'll need to make a complete copy of this folder. This can be done by transferring it to an external hard drive, a USB drive, or using a cloud storage service. After copying, you navigate to the equivalent location on your new computer and paste the copied "CELSYSUserData" folder.
However, as many users have discovered, this method often proves to be incomplete. While it may successfully transfer newly downloaded materials, it frequently fails to bring over essential elements like custom tool sets, personalized workspaces, and installed brushes. Users often report that after performing this copy-and-paste operation, Clip Studio Paint on the new computer still loads with its default settings, as if no data transfer had occurred. This can be incredibly frustrating, leading to the fear of having to rebuild your entire asset library and workflow from the ground up.
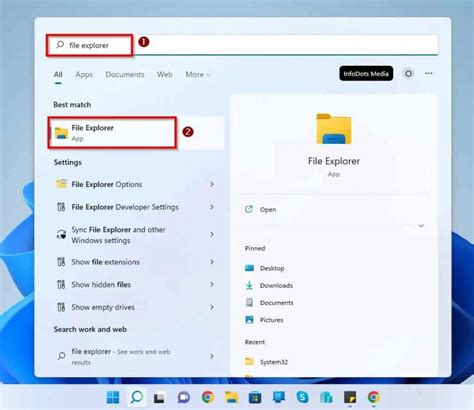
How to Show Hidden Files and Folders in Windows 10
Troubleshooting the "CELSYS Folder" Method: Hidden Files and Incomplete Copies
A common pitfall with the "CELSYS Folder" method is the potential for hidden files and folders. Operating systems, particularly Windows, may hide certain system folders by default to prevent accidental modification. If your "CELSYSUserData" folder isn't immediately visible, you may need to enable the display of hidden files and folders within your operating system's file explorer settings. This is a crucial step that can make the difference between finding the folder and giving up on the method entirely.
Another critical aspect to verify is the data capacity of the copied folder. Before initiating the transfer to your new computer, please make sure that the data capacity of the copied folder matches that of the folder on the source computer. If the data size does not match, the copy may be incomplete, leading to the very issues users encounter where essential data is missing. This discrepancy in size often indicates that not all files were successfully transferred, explaining why custom brushes and workspaces might not appear on the new installation.
The Cloud Backup Method: A More Robust Solution
Recognizing the limitations of the direct folder transfer, Clip Studio Paint offers a more integrated and comprehensive solution through its cloud service. This method leverages your Clip Studio account to back up and restore your settings, ensuring that a wider range of your personalized data is transferred. This approach is particularly effective for migrating custom tool sets, workspaces, and installed brushes, which are often missed by the manual folder copy method.
Step-by-Step Cloud Backup and Restore Process
To utilize the cloud backup method, you'll need to have access to your old computer and ensure that Clip Studio Paint is installed and functional on it.
Initiate the Backup on Your Old Computer:
- Open the main Clip Studio application (not Clip Studio Paint).
- Ensure you are logged into your Clip Studio account.
- Locate and click on the Cloud bar, typically found at the top of the Clip Studio window, often to the left of your account name and icon.
- Within the Cloud menu, select the option to Back Up Settings.
- This process may take some time, especially if you have a large amount of data or if this is your first time running a backup. The system will upload your settings, materials, brushes, and other custom configurations to your Clip Studio cloud storage.
Accessing Your Materials Location:
- While still in the Clip Studio app on your old computer, you can find the location of your materials by looking for a "Location of Materials" window or setting. This will display the specific folder paths where your assets are stored. This information can be useful for cross-referencing or for manual backup of specific assets if needed, but the cloud method aims to automate this.
Restore Settings on Your New Computer:
- On your new computer, ensure Clip Studio Paint is installed.
- Open the Clip Studio application and log in with the same Clip Studio account you used on your old computer.
- Navigate to the Cloud bar again.
- This time, select the option to Restore Settings.
- The program will download your backed-up data from the cloud. This restoration process can also take a significant amount of time, depending on your internet speed and the amount of data being restored.
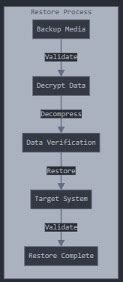
Verifying the Transfer:
- Once the restoration is complete, close and reopen Clip Studio Paint.
- You should now find that your custom brushes, tool sets, workspaces, and downloaded materials have been successfully transferred to your new computer. This method is generally more reliable for bringing over the full spectrum of your personalized setup.
Utilizing Cloud Settings for Automatic Backups
For future convenience and to prevent potential data loss, it's highly recommended to configure automatic backups. Within the Cloud Settings window in the Clip Studio application, you can often find options to automatically back up your items. By enabling this feature, Clip Studio will regularly upload your settings and data whenever you log into the application, ensuring that your progress is consistently saved to the cloud. This proactive approach can save you considerable time and effort should you need to transfer your setup again in the future.
License Transfer and Installation on a New Device
A common question when moving to a new computer is whether the software license can be reused. For Clip Studio Paint, purchased licenses can typically be transferred. If you have a perpetual license, you can usually install the software on a new device. The process involves uninstalling CSP from your old computer (if possible and desired) and then installing it on your new machine. You will then need to activate the software using your existing product key or license information.
For subscription-based versions, the process is generally simpler. As long as you are logged into your Clip Studio account on the new computer, the software will recognize your subscription and grant access.
Product Key Usage and Activation
If you are using a perpetual license and have your product key, you will use this key during the installation process on your new computer. The CELSYS website or the Clip Studio Paint installer will guide you through the activation steps. It's important to note that there might be a limit to how many devices your license can be activated on simultaneously. If you encounter issues, you may need to deactivate the license on your old computer before activating it on the new one, or contact CELSYS support for assistance.
Managing Materials and Assets
Beyond the core workspace and brushes, managing your materials and purchased assets is crucial. The Cloud Backup method is designed to handle these as well. However, if you encounter issues with purchased assets not appearing, double-checking your login status with your Clip Studio account on the new machine is essential. Your purchases are tied to your account, and ensuring you are logged in correctly will usually resolve any discrepancies.
The "Manage Materials Screen" within Clip Studio also offers tools for organizing and backing up your assets. While the cloud service is the primary method for comprehensive transfer, understanding the material management features can be beneficial for manual organization and specific asset backups.
Liz Staley's Experience: A Testament to the Cloud Method
The insights shared by experienced users like Liz Staley, a long-time user and author on Clip Studio Paint, underscore the effectiveness of the cloud backup method. Having encountered the same frustrations with the manual "CELSYS folder" transfer, Staley found that the cloud service was instrumental in successfully migrating her extensive collection of tools, materials, and custom settings to a new PC. Her experience highlights that while the direct folder copy might transfer some basic assets, it often falls short for the more complex configurations, making the cloud-based approach the more reliable route for a complete setup transfer.
Considering Different Operating Systems
While the core principles of transferring user data remain consistent, there can be minor variations in file paths and system settings when moving between different operating systems (e.g., Windows to macOS, or vice versa). The "CELSYSUserData" folder will reside in different default locations on each OS. For instance, on Windows, it's often in Documents\CELSYS, whereas on macOS, it might be within your user's Library folder.
The cloud backup method largely abstracts these OS-specific details, as the backup and restore process is managed through the Clip Studio application itself, which is designed to be cross-platform compatible. When transferring settings to different operating systems, referring to official documentation like "How to Use the Cloud Service," specifically sections on "Copy Your Settings to Different Devices" and "How to Use the Manage Materials Screen," is highly recommended.
Final Thoughts on a Smooth Transition
Upgrading your hardware or moving to a new computer is a significant step. While the prospect of transferring a complex digital art environment like Clip Studio Paint might seem daunting, a systematic approach can make the process manageable. By understanding the limitations of manual file transfers and leveraging the robust cloud backup and restore functionality provided by Clip Studio, artists can ensure that their personalized workflow, extensive brush libraries, and custom settings are seamlessly carried over to their new system. This not only saves a considerable amount of time and effort but also allows for an immediate return to productive creative work without the frustration of rebuilding a customized workspace.