Adding texture to your digital artwork can elevate it from flat to visually rich, imbuing your designs with depth, character, and a tangible feel. Adobe Illustrator, while primarily known for its crisp vector scalability, offers a surprising array of tools and techniques to achieve sophisticated texture overlays. This guide will walk you through several methods, from simple built-in effects to more advanced custom brush creation and the integration of raster elements, empowering you to add unique tactile qualities to your illustrations, typography, and graphic designs.
The Foundation: Setting Up Your Canvas
Before diving into texture application, it's often beneficial to establish a base. This could be a simple background or a foundational element of your design. For instance, let's consider creating a simple vase illustration.
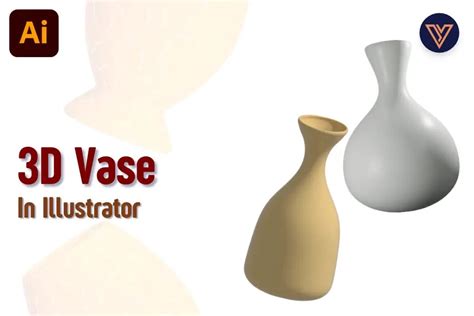
We begin by creating a simple background and then decorating the vase. Using specific color codes like #2A323D for darker sections and #FFE7C5 for lighter ones, we can build up the form. It's crucial to mask these elements where necessary, ensuring they conform to the desired shapes. This is achieved by selecting the desired shapes, right-clicking, and choosing "Make Clipping Mask." Once the vase is shaped, we can introduce a foreground line using the Paintbrush Tool (B). A 160 px wide, 2 px thick Stroke line in #2A323D can define the silhouette or add detail.
Method 1: The Photoshop Effects Grain Approach
One of the most straightforward ways to introduce a grainy texture is by leveraging Illustrator's integration with Photoshop effects. This method is particularly effective for achieving a subtle, naturalistic grain.
To implement this, once your base artwork is ready, navigate to Effect > Photoshop Effects > Texture > Grain. Within the Grain dialog box, selecting "Stippled" as the Grain Type offers a good starting point. You'll then want to adjust the "Intensity" and "Contrast" sliders. The key is to experiment until you achieve a result that complements your artwork without overpowering it.
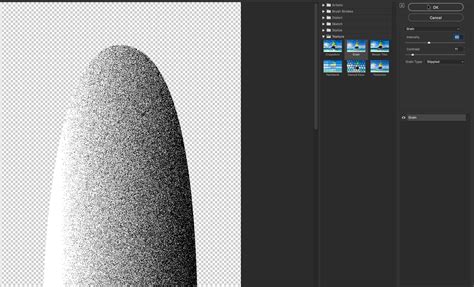
The position and density of this texture can be further refined. By opening the Gradient panel, you can manipulate the sliders. Dragging the top slider to the left can introduce more detailed texture, while moving it to the right will reduce its prominence.
The final step in this method involves blending the texture with your artwork. Open the Transparency panel and select a Blending Mode that harmonizes with your design. For instance, using the "Overlay" Blending Mode, as demonstrated in the example with the vase, creates a pleasing, subtle transition, effectively integrating the texture into the existing elements.
Method 2: Crafting Custom Scatter Brushes for Texture
For more controlled and unique textural elements, creating custom brushes is an excellent approach. This method allows for greater artistic input and can yield distinctive results, such as a stippled or dotted texture.
After establishing the shapes for your object, such as the second vase in our example, you can bring up the Brush panel. With all relevant shapes selected, click on "New Brush." Ensure that the brush type is set to "Scatter Brush." A new window will appear, allowing for various adjustments. While you might not see an immediate preview of all changes, settings like Size, Spacing, Scatter, and Rotation can be fine-tuned.
How to Use the Scatter Brush Tutorial | Adobe Illustrator CC
For instance, you can set the "Size" to "Pressure" and lower its level to around 28%. Adjusting the "Spacing" to 40% and ensuring "Scatter" is at 0% while setting "Rotation" to "Random" with a -120º angle can produce a specific scattered effect. Once your custom brush is configured, it will appear in your Brushes panel. Select this custom stipple brush and use the Paintbrush Tool (B) to draw lines. Applying colors like #000000 for the left side and #FFFFFF for the right side of the vase can create a shading or textural effect. The "Weight" of the Stroke can also be adjusted to achieve the desired visual impact.
Method 3: Harnessing Illustrator's Pattern Libraries
Illustrator offers a rich library of pre-made patterns, many of which can be effectively utilized for textural overlays. This method is often overlooked but can provide quick and interesting results.
To access these patterns, select the Compound Shape you wish to texture. Then, open the Swatches panel. Click on the "Swatch Libraries menu" located at the bottom left of the panel and navigate to Patterns > Basic Graphics > Basic Graphics_Textures. This will open a new window showcasing various textures.
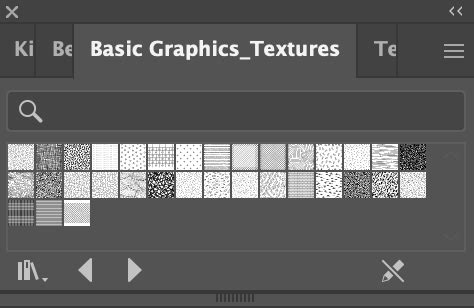
By selecting a swatch from this library, you can apply it as a fill to your chosen object. For example, using the "Bird Feet" swatch from the Basic Graphics_Textures library and setting its Blending Mode to "Overlay" can create a unique background texture. Further customization can be achieved by combining different pattern fills or by exploring other swatches within the library. This method is highly flexible; you can easily swap out one pattern for another or experiment with combining multiple patterns to achieve complex visual effects.
Advanced Techniques: Leveraging the Appearance Panel
The Appearance panel is a powerhouse for creating complex graphic styles and textures within Illustrator. It allows you to stack multiple fills, strokes, and effects on a single object, offering immense flexibility.
Seamless Background Textures
To create a seamless background texture, start with a rectangle. Apply a linear gradient fill, adjusting the color stops and angle to your preference. Then, using the Appearance panel, add a new fill. Change this fill to a gray color and apply the Effect > Texture > Grain effect, setting the Grain Type to "Sprinkles" with specific Intensity and Contrast values (e.g., Intensity to 90, Contrast to 50).
Next, adjust the Blending Mode of this gray fill to "Multiply" in the Appearance panel's Opacity settings. Add another new fill, this time a Radial Gradient set to white, with varying opacities for the color stops (e.g., 40% and 0%). Change the Blending Mode of this radial gradient fill to "Overlay." This layered approach creates a sophisticated seamless background.
Texturizing Editable Text
The Appearance panel's true power shines when applied to editable text. Type your desired text, then remove any stroke and fill from the text object. In the Appearance panel, add a new fill and apply a linear gradient. Create another new fill, and this time, apply a texture effect like Effect > Texture > Texturizer, choosing a texture such as "Burlap" and adjusting parameters like Scaling, Relief, and Light.
Set the Blending Mode of this textured fill to "Multiply" and adjust its Opacity. You can further enhance the text by adding a subtle drop shadow using Effect > Stylize > Drop Shadow. The beauty of this method is that the text remains fully editable, allowing you to change the wording or font while retaining the applied texture.
For a different text effect, you might apply a linear gradient and then use Effect > Distort & Transform > Transform to create a subtle offset, adding depth.
Integrating Raster Textures and Bitmaps
While Illustrator is vector-based, it can effectively incorporate raster images and bitmaps, especially for textural purposes. It's important to note that Illustrator can become overloaded if every grain is rendered as a vector object. Therefore, creating textures in Photoshop first and then importing them as raster images can be more efficient.
Using Photoshop for Raster Textures
In Photoshop, you can create a base layer, perhaps with a dark gray background, and fill a circular selection with color on a new layer. Applying the "Dissolve" Blending Mode can create random pixel holes. Using a layer mask allows for controlled opacity adjustments. Applying a Gaussian blur to the mask and then painting with a soft brush at low opacity can introduce roughness. You can further refine the effect by applying Curves to the layer mask for depth or by using lower resolutions for larger holes.
Alternatively, you can paint manually with soft brushes using the "Dissolve" blend mode in Photoshop. Noise can also be added and then masked for a fading effect. While these methods can simulate grainy textures, they might be less precise than dedicated vector techniques. For more authentic textures, consider scratching patterns onto paper with a pencil, scanning them, and then adjusting contrast and colorizing them in Photoshop.
Applying Bitmap Textures in Illustrator
For bitmap textures, prepare your image in Photoshop by converting it to Grayscale, then to Bitmap. Experiment with different conversion methods and adjust levels or curves before conversion. Save the image as a TIFF file.
In Illustrator, create a new layer and place your TIFF file. You can assign a fill color in the Colors panel and experiment with Blending Modes in the Transparency panel.
A powerful application of bitmap textures is using them as masks. Black pixels in the bitmap will be treated as opaque, and white pixels as transparent. Select the placed bitmap image and the artwork you wish to texturize, then in the Transparency panel, choose "Make Mask." This allows the texture to reveal or conceal parts of your artwork.
Utilizing Third-Party Plugins and Resources
Beyond Illustrator's native tools, specialized plugins and external resources can significantly enhance your texturing capabilities.
Texturino Plugin
Texturino, a plugin from Astute Graphics, is specifically designed for applying textures in Illustrator. It offers a dedicated Texture panel where you can browse textures by category. Applying a texture like "Polycotton Texture" from the "Fabrics" category and then using the "Invert" control can simulate effects like a dark T-shirt.
Envato Elements and Other Marketplaces
For a vast collection of pre-made textures, subscription services like Envato Elements are invaluable. They offer unlimited downloads of texture Illustrator packs, including distressed textures, grain kits, and more. You can find everything from halftone vintage textures to hand-painted wave patterns and fabric textures like denim and T-shirt material.
Other valuable resources include FreeVector.com for seamless textures and specific bundles from providers like The Vector Lab, which offer bitmapped textures tailored for Illustrator users.
Applying Textures Consistently with Graphic Styles
Once you've created a texture effect you're happy with, you can save it as a Graphic Style for easy application to other objects. Select your textured artwork and click the "New Graphic Style" button in the Graphic Styles panel. Now, simply select any other text or vector object and click on your newly created style in the panel to instantly apply the same textural treatment. This is incredibly efficient for maintaining visual consistency across a project or for applying complex effects to multiple elements.
You can even refine existing graphic styles by adjusting elements within the Appearance panel. For instance, adding an offset fill or a drop shadow to a button's texture can add further visual interest.
Conclusion: Elevating Your Designs with Texture
Adding texture to your Illustrator artwork is a versatile technique that can transform flat vector graphics into dynamic, engaging visuals. Whether you opt for the simplicity of Photoshop effects, the creative control of custom brushes, the convenience of pattern libraries, or the advanced layering capabilities of the Appearance panel, the ability to introduce tactile qualities is an essential skill. By mastering these methods and exploring the wealth of available resources, you can imbue your designs with a unique character and professional polish, taking your artwork to the next level. Experimentation is key; don't hesitate to combine techniques and explore different blending modes and effects to discover novel textural possibilities.
tags: #illustrator #texture #overlay