Clip Studio Paint (CSP), formerly known as Manga Studio, offers a powerful suite of ruler tools that significantly enhance the illustration and design process. Among these, the Symmetrical Ruler stands out as a particularly ingenious feature, allowing for the creation of mirrored or radially repeated elements with remarkable ease. This guide delves into the intricacies of utilizing and, crucially, disabling the Symmetrical Ruler, empowering artists to achieve precise designs and maintain creative flexibility.
The concept of symmetry, defined as the quality of having exactly similar parts either facing each other or arranged around an axis, is fundamental to many artistic endeavors. The Symmetrical Ruler in CSP is a direct embodiment of this principle, proving invaluable for crafting logos, intricate patterns, and even character designs where bilateral or radial consistency is desired. As Liz Staley, a seasoned user and author of several books and courses on the software, notes, the ruler tools were a primary influence in her decision to adopt CSP, highlighting their inherent coolness and utility.
Accessing and Configuring the Symmetrical Ruler
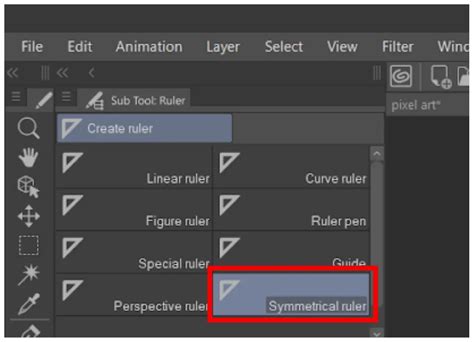
To begin leveraging the Symmetrical Ruler, navigate to the Ruler tool group, typically indicated by a red arrow in the software interface. Within the Sub Tool window, select the Symmetrical Ruler option. For fine-tuning its behavior, the wrench icon, located near the tool, opens the Sub Tool Detail window. This is where users can customize various aspects of the ruler's functionality.
A convenient feature of CSP is the ability to display specific options from the Sub Tool Detail window directly in the Tool Property window. By checking the box to the left of a setting, it will appear in the Tool Property window, marked with a blue fill and a small eye icon. Unchecked options remain grayed out and hidden.
Understanding Key Symmetrical Ruler Settings
The "Number of Lines" setting is central to the Symmetrical Ruler's operation. It dictates how many times a drawn element will be mirrored or repeated around the canvas. The minimum setting is 2, resulting in a single mirror image across the ruler's axis. The maximum setting extends to 16, creating 16 "wedges" of symmetry around the canvas.
Crucially, the "Line Symmetry" checkbox offers a distinction between mirrored and rotational symmetry. When "Line Symmetry" is enabled, the drawing is mirrored and "flipped" along the ruler. However, when this checkbox is unchecked, the ruler enters a mode of rotational symmetry. In this mode, the drawing is not flipped but simply rotated into each designated section around the ruler's center. This distinction is vital for achieving different stylistic outcomes, whether it's a perfect reflection or a repeating pattern radiating outwards.
The "Create at Editing Layer" checkbox determines where the ruler itself is generated. With this option active, the ruler is created on the currently selected active layer.
Practical Applications: From Faces to Intricate Designs
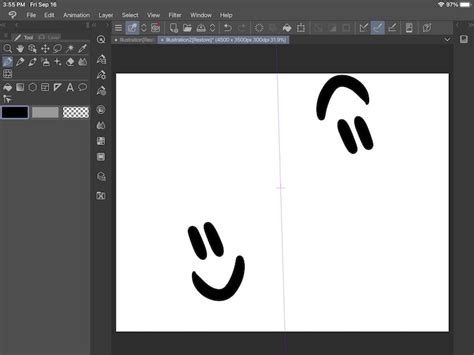
The Symmetrical Ruler's utility is perhaps best illustrated through practical examples. Liz Staley, despite not typically using it for character drawing, demonstrates its potential by inking a character's face. She begins by sketching only the left side of the face, then sets up the Symmetrical Ruler. By positioning the ruler along the center of the face, any line drawn on one side is automatically mirrored to the other. This process can be applied to almost any drawing tool, including direct drawing tools like lines, ellipses, and rectangles. The result is a perfectly symmetrical face, with the right side inked automatically based on the left.
This automatic mirroring can sometimes lead to unexpected results, as seen with the "anime nose" example, which, when mirrored, appeared as a "skeleton nose." Fortunately, addressing such imperfections is straightforward. If details that are not symmetrical are needed to achieve a more natural look, the ruler can be temporarily disabled without affecting the current drawing layer.
Creating Complex Patterns
For more elaborate designs, the Symmetrical Ruler's "Number of Lines" setting, particularly when set to an even number like 16, allows for the creation of intricate, repeating patterns. With "Line Symmetry" enabled, each "wedge" of the ruler mirrors into the next, creating a cohesive and complex radial design. This is ideal for generating abstract patterns, mandalas, or decorative elements.
How to Use the Symmetry Tool in Clip Studio Paint!
Turning Off and Managing Symmetry
A common scenario arises when an artist has finished utilizing the Symmetrical Ruler for its intended purpose and wishes to disable it to continue with more freeform drawing or inking on the same layer. While the ruler itself remains on the layer, its active influence can be temporarily suspended.
Hiding vs. Disabling
One method to "turn off" the ruler's effect without deleting it entirely involves the layer properties. In the Layer Property window, a triangular ruler icon is present. Clicking this icon reveals options to control the ruler's visibility and usability. Unchecking this option effectively hides the ruler and deactivates its function, though the ruler object persists on the layer.
However, it's important to distinguish this from truly disabling the ruler's functionality in a way that allows for individual, non-symmetrical edits. A more direct approach to turning off the ruler's influence involves a process that, as some users have noted, can be "unintuitive."
Disabling Eraser Symmetry
A surprising aspect of CSP's symmetry tools is that they can also affect the eraser. By default, when using the eraser tool with an active symmetrical ruler, only one part of a line might be erased, leaving its symmetrical counterparts untouched. To enable symmetrical erasing, one must navigate to the eraser tool's Tool Property window, click the wrench icon to access the Sub Tool Detail window, and locate the "Correction" section. Here, enabling the "Enable Snapping" checkbox will make the eraser tool obey the symmetry settings. Conversely, to revert to non-symmetrical erasing, this checkbox simply needs to be disabled. This feature, though not immediately obvious, provides granular control over how symmetry affects various tools.
Hiding Rulers Globally
For a complete disappearance of all rulers, including symmetrical ones, from the canvas, a global setting adjustment is available. Within Clip Studio Paint's preferences, under the "Rulers / Units" section, users can adjust the "Opacity of rulers, grids, and register marks." Setting this value to 0 will make all rulers, grids, and registration marks completely invisible and non-functional. While this effectively "hides" the ruler, it's a global setting affecting all rulers, not an individual symmetrical ruler.
Understanding Ruler Colors
The visual representation of rulers in CSP is dynamic, often changing color based on the software's preferences. Typically, an active ruler is displayed in purple, while a deactivated or "off" ruler appears in green. This color-coding serves as a quick visual cue to the ruler's current state.
The Symmetrical Ruler is a testament to Clip Studio Paint's commitment to providing powerful, yet accessible, tools for digital artists. Whether you are creating logos, intricate patterns, or character designs, understanding how to effectively implement and manage symmetry is crucial. By mastering the settings of the Symmetrical Ruler, including its various modes and how to toggle its influence, artists can unlock new levels of precision and efficiency in their creative workflows.