Getting started in Procreate, one of the most essential functions you can learn is adding text to your images. This capability, often overlooked in the initial learning curve, unlocks a vast array of creative possibilities, allowing artists and designers to integrate typography seamlessly into their digital artwork. Thanks to the advancement of mobile design technology, we can now use applications like Procreate and Affinity Designer to make all kinds of neat alterations to images, like adding text. Knowing how to add text in Procreate is just the tip of the iceberg though.
Adding Text to Your Canvas
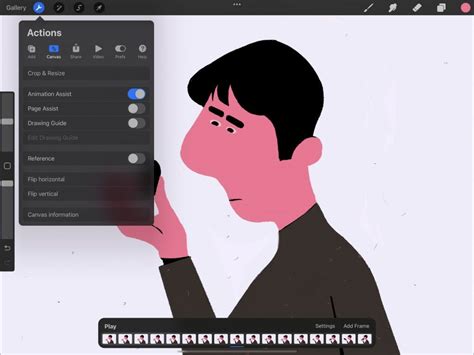
Adding text in Procreate is a straightforward process, designed to be intuitive for users of all levels. To begin, simply tap the little wrench icon, formally known as the Actions menu, located in the top-left corner of your screen. From the options presented, navigate to the "Add" tab and then select "Add Text" from the list. This action will immediately introduce placeholder text onto your document.
By default, the color of this newly added text will be determined by the color currently selected in your Color Panel. Upon startup, this default color is typically black. If you’d like to change the color of your text in Procreate, a crucial step is to ensure you have the entire text selected. This is achieved by triple-tapping on the text itself. Once the text is highlighted, you can then select your desired color from the Color Panel.
Manipulating and Resizing Text
Once your text is on the canvas, you'll likely want to reposition it. To move your text to different positions on the canvas, simply tap and drag anywhere outside of the text’s bounding box. The bounding box is a thin blue outline that wraps around your text item, visually indicating its boundaries.
To change the size of the text’s bounding box, you'll utilize the handles on either side of it, which are represented as little blue circles. Resizing your Text box will only change the shape of the container. This resizing capability can be particularly useful for determining whether you’d like your text to remain on a single line or to wrap onto multiple lines, thereby influencing its overall layout and flow within your artwork.
Editing and Styling Your Text
When you add new text to your canvas, a bounding box containing the word "Text" will appear. By default, this placeholder text is already highlighted and ready to be typed over. Double-tap the text to invoke the Text Entry Companion, which is where the primary text editing occurs. Once opened, you should be able to edit your text using the on-screen keyboard.
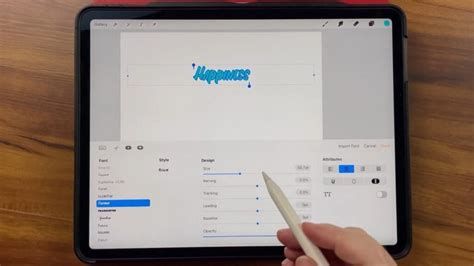
To make your text bigger or smaller in Procreate, you'll use the "Size" slider found within the "Edit Style" menu. Whenever you add text in Procreate, a default font is applied. However, you have extensive control over its appearance. To further adjust your text’s font, style, design, and attributes, tap the font name in the Text Entry Companion. This action opens the Edit Style panel, which is your central hub for typographic customization.
Font Selection and Variants
Within the Edit Style panel, you can review fonts in real-time, ensuring you find the perfect typeface for your project. Scroll through the list to browse all your installed typefaces. The name of each typeface is a direct preview of the appearance of that font, making selection easier. Fonts frequently include regular, italic, and bold versions. Tap any typeface in the list to see the available variants in the "Style" section. Many typefaces offer a variety of font weights and styles, providing you with a broad spectrum of creative choices.
Typographical Adjustments: Kerning, Leading, and Tracking
The Edit Style panel also provides granular control over various typographical settings. The "design sliders" control key attributes of your text, including size, kerning, tracking, leading, and baseline.
- Kerning: This allows you to increase or decrease the spacing between two specific letters. This is particularly useful for improving the visual appeal of certain letter combinations that might appear too close or too far apart.
- Leading: Leading represents the space between lines of text. Adjusting leading can significantly impact the readability and overall density of your text blocks.
- Tracking: Tracking adjusts the spacing between every letter in a selected block of text. Unlike kerning, which is pair-specific, tracking applies uniformly across a selection.
Advanced Text Attributes
Beyond basic spacing, the "attribute" section within the Edit Style panel controls a range of other stylistic elements. This includes alignment, capitalization, underlines, outlines, strikethroughs, and even verticality.
- All Caps: Enabling this setting will force your text to be in all caps, regardless of how much capitalization your text started with.
- Outline: This setting allows you to outline text in Procreate, transforming a solid font into an outlined version. This can create a distinct visual effect, making your text pop or integrate differently with background elements.
- Underline: Adds a stroke underneath your text.
- Alignment: The top four buttons in this section set paragraph alignment for your text, offering options like left, center, right, and justified alignment.
- Strikethrough: This is another toggle that applies a line through the text.
Vector Text vs. Rasterized Text
When you add new text in Procreate, it is initially created as "Vector Text." This means the text content is stored in a crisp, editable vector format. A significant advantage of vector text is that it can be resized up and down without any loss of quality. This is because vector graphics are based on mathematical equations rather than pixels, allowing them to scale infinitely without becoming pixelated or blurry.
Keep your text in crisp, editable vector form for basic edits. This preserves the sharp edges and clean lines that are characteristic of vector graphics. In the Layers panel, you can easily identify vector text by the distinctive ‘A’ symbol visible in the text layer thumbnail. You can also override the automatic naming of a vector text layer to better organize your project.
However, to use certain Procreate tools, you must rasterize your text. Rasterizing converts the vector text into a pixel-based image. This process is irreversible, meaning you lose the ability to edit the text as vector data once it's rasterized. To rasterize your text, simply tap the text layer in the Layers panel and select the "Rasterize" option. This is a crucial distinction to understand, as it impacts how you can further manipulate your text within Procreate.
Procreate for Beginners | Text | Editing Text | Vector vs Raster | Importing Fonts in Procreate
Beyond Basic Text: Advanced Techniques
Knowing how to add and style text in Procreate is fundamental, but the application offers even more advanced features for text manipulation. Thanks to some of the additional features in Procreate, we can do all kinds of neat things with text, such as:
- Add drop shadows: This can give your text depth and make it stand out from the background.
- Change its perspective: Manipulate the text to appear as if it's viewed from an angle, adding a dynamic element to your design.
- Fill it with an image: This powerful technique allows you to use any image as the fill for your text, creating unique and visually striking typographic effects.
- Make a dripping paint effect: Mimic the look of paint running down your text for a gritty or artistic feel.
Animating Text in Procreate Dreams
For those working with Procreate Dreams, the animation capabilities extend to text as well. You can add keyframes to alter and animate your text like other types of content. To do this, tap where on the timeline you would like to start the keyframes for your text. This opens up possibilities for dynamic text animations, bringing your artwork to life. It's important to note that changing your text after adding keyframes works best if you keep the same amount of text or less, to avoid unexpected animation behaviors. On the Timeline, you can locate the text you want to delete or modify.
Final Thoughts on Text in Procreate
The ability to add and manipulate text is a cornerstone of digital design, and Procreate provides a robust set of tools to achieve professional results. From simple text entry and styling to advanced vector editing and animation, Procreate empowers users to integrate typography effectively into their creative workflows. Understanding the distinction between vector and rasterized text, along with mastering the various styling options, will significantly enhance your ability to produce polished and impactful digital art.