Adding text to an image in Photoshop is a fundamental skill that can dramatically enhance your designs, from simple photo edits to complex graphic layouts. Photoshop offers a robust suite of tools and options for creating, editing, and stylizing text, allowing for both straightforward additions and intricate typographic effects. This guide will walk you through the various methods of incorporating text into your Photoshop projects, from basic single-line entries to text shaped by paths and even AI-powered image generation.
The Fundamentals of Text Creation in Photoshop
At its core, adding text in Photoshop involves selecting a type tool and then interacting with your image. The primary tools for this purpose are the Horizontal Type Tool and the Vertical Type Tool.
When you select either of these tools and click on your image, Photoshop creates a new text layer. This is a crucial concept: each piece of text you add resides on its own dedicated layer, offering immense flexibility for editing and manipulation without affecting other elements of your image.
You have the flexibility to create two main types of text: single-line text and paragraph text.
Single-line text: With single-line text, each line you enter is independent. The length of a line grows or shrinks dynamically as you edit it. If you wish to start a new line of text, you simply press the Enter key on your keyboard. This type of text is ideal for headlines, short labels, or any instance where text doesn't need to conform to a specific width.
Paragraph text: To create paragraph text, you click and drag with the type tool to define a bounding box or textbox. Any text you type will automatically wrap within these boundaries. This is perfect for longer blocks of copy, descriptions, or any content that needs to fit within a defined area. When you click with a type tool within an image, the tool enters edit mode, allowing you to enter and edit text. You must "commit" your changes to the type before you can perform other operations, such as selecting menu commands or using other tools.

Committing Your Text Changes
After typing your desired text, you need to "commit" the changes to finalize the text entry and exit edit mode. There are several ways to do this:
- Click the Commit button (a checkmark icon) in the Options bar.
- Press the Enter key on the numeric keypad.
- Click in the image, outside the textbox, if you created paragraph text.
- Select a different tool in the toolbox.
If you are working in Photoshop Elements and do not create a new text layer (which can happen in certain older workflows or specific settings), your type may appear as masked text.
Essential Text Formatting Options
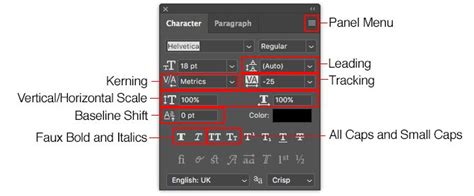
Once your text is in place, Photoshop offers a wealth of options to refine its appearance. These controls are typically found in the Options bar at the top of the screen when a type tool is active, and more extensively within the "Character" and "Paragraph" panels.
- Font Family: This option applies a font family to new or existing text. Photoshop allows you to easily add new fonts by downloading them and dragging them into the program to link them up.
- Character Spacing: This sets the space between the characters of new or selected text, allowing you to adjust kerning and tracking for optimal readability and aesthetic appeal.
- Font Style: You can apply a bold style to new or existing text, or an italic style. Photoshop also offers "faux" bold and italic options, which simulate these styles if they are not inherent to the font.
- Text Alignment: This specifies text alignment, letting you align text to the left, center, or right. The Paragraph panel offers more advanced alignment options, including justification.
- Warp Text: This feature warps text on the selected layer, allowing you to apply creative distortions like arcs, waves, or flags to your text.
Advanced Text Techniques in Photoshop
Beyond basic text entry, Photoshop provides specialized tools and techniques for more creative applications of typography.
Text on a Path or Shape
You can add text that conforms to the shape of a path or a predefined shape.
Text on Shape Tool: This tool allows you to add text within or around specific shapes. You select the Text on Shape tool and then click on a shape within your image. The cursor icon changes to depict text mode, allowing you to add text. After adding text, you click Commit. This is useful for adding text within a logo element, a button, or any graphic shape.
Text on Selection Tool: This allows you to add text on the outline of a path created from a selection.
- First, create a selection in your image using any of Photoshop's selection tools (e.g., Marquee Tool, Lasso Tool).
- Select the Text on Selection tool.
- Place the cursor on the object in the image and drag the cursor till you get your desired selection.
- To add text to the image, hover the mouse over the path when the cursor icon changes to depict text mode.
- Type your text.
- After you have completed adding text, click Commit. The text will now follow the contour of your selection.
Text on Custom Path Tool: This tool gives you the freedom to draw your own custom path and then add text along it.
- Select the Text on Custom Path tool.
- Draw a custom path over the image by clicking and dragging.
- Click at any point along the path to add text. The text will flow along the path you've drawn. You can then move the text along the path or adjust the path itself.
Wrap TEXT Into CIRCLES & CURVED SHAPES 🤯 (in Photoshop!)
Masked Text Effects
The Horizontal Type Mask Tool (and its vertical counterpart) is a unique feature that doesn't create a text layer but rather a selection in the shape of your text. This selection can then be used to mask other layers, revealing parts of them through the text.
- Choose the Horizontal Type Mask Tool.
- Click in your image and type your text.
- Instead of a text layer, a selection outline in the shape of your text appears.
- You can then copy and paste this selection onto a new layer, or use it to mask another layer. For instance, you could place an image layer below your text layer and then use the text selection to reveal parts of that image through the text, creating a "cutout" effect with the text.
Enhancing Text with Layer Styles
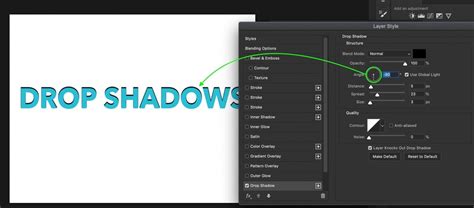
Photoshop's Layer Styles offer a powerful way to add depth, dimension, and visual flair to your text without complex manual work. You can access these by right-clicking on your text layer and selecting "Blending Options" or by going to Layer > Layer Style.
Drop Shadow: This effect puts a moveable shadow behind your text, creating the illusion of depth as if the text is lifted off the background. The shadow's position, color, opacity, and blur can all be customized.
Bevel & Emboss: This style can make your text appear 3D, giving it a raised or indented look, simulating light hitting its edges. You can control the depth, size, and shading of the bevel.
Color Overlay / Gradient Overlay / Pattern Overlay: These options allow you to change the color of your font by applying a solid color, a gradient, or a pattern over the shape of the text. Gradients can add subtle or dramatic color transitions, while patterns can introduce texture.
Stroke: Adds an outline around your text, allowing you to control its thickness, color, and position (inside, outside, or center of the text boundary).
Outer Glow / Inner Glow: These effects add a soft or hard glow around the outside or inside edge of the text, respectively, which can make the text pop or create a mystical appearance.
Removing Text from an Image
Sometimes, the goal is not to add text, but to remove it from an existing image. Photoshop offers several effective methods for this:
Spot Healing Brush Tool: This intuitive tool is excellent for removing small blemishes or unwanted elements, including text.
- Select the Spot Healing Brush Tool (it looks like a band-aid).
- Adjust the brush size to be slightly larger than the text you want to remove.
- Simply paint over the text. Photoshop analyzes the surrounding pixels and automatically blends them to cover the text, often with remarkable results.
Content-Aware Fill: For more complex removals, especially where the background is intricate, Content-Aware Fill is a powerful AI-driven feature.
- Make a selection around the text you want to remove using a selection tool.
- Go to Edit > Content-Aware Fill.
- Photoshop will analyze the surrounding area and attempt to intelligently fill the selected area with content that matches the background. You can often refine the sampling area within the Content-Aware Fill workspace.
Clone Stamp Tool: This traditional tool gives you manual control. You Alt-click (Windows) or Option-click (Mac) on a source area of the image to sample pixels, and then paint over the text to replace it with the sampled content. This requires more precision but offers complete control.
Leveraging AI for Image Creation and Text Integration
More recent versions of Photoshop, particularly Photoshop Elements 2026 and later, introduce powerful generative AI features that can revolutionize how you create and integrate elements, including text.
Generative Fill (and similar AI features): These AI tools allow you to input a text prompt and receive a fully rendered image or element in seconds. This is incredibly useful for:
- Creating mood boards: Quickly generate visual concepts.
- Mockups: Visualize product placements or design ideas.
- Adding imagination to design workflows: Seamlessly incorporate elements that would be difficult or time-consuming to create manually.
For example, you could prompt Photoshop to "Add a hot air balloon in the sky" or "Insert a person sitting on the bench," and the AI will attempt to generate and integrate these elements into your existing image, automatically matching lighting and shadows. This eliminates the need for extensive photo-bashing or manual compositing for many scenarios.
Workflow Tips and Troubleshooting
- Keyboard Shortcuts: While typing, standard keyboard shortcuts for tool selection or menu commands generally don't work because Photoshop reserves the keyboard for inputting text. To exit text editing mode, you can use the Commit button, select another tool, or use Ctrl + Enter (Windows) or Cmd + Enter (Mac).
- New Layer for Text: If you encounter issues with the type tool not working as expected, try creating a new blank layer before adding your text. This can often resolve conflicts or permission issues.
- Accessing Text Tool Options: If you don't see the expected text options, ensure you have a type tool selected. For advanced options, open the "Character" and "Paragraph" panels (Window > Character, Window > Paragraph).
- Saving Your Work: Remember to save your Photoshop files frequently. Go to File > Save As to choose a file name and location. Saving as a .PSD (Photoshop Document) preserves all layers and editing capabilities.
By mastering these tools and techniques, you can effectively incorporate text into your Photoshop projects, transforming them from simple images into compelling visual narratives. Whether you're adding a simple caption or crafting intricate typographic designs, Photoshop provides the power and flexibility to bring your vision to life.