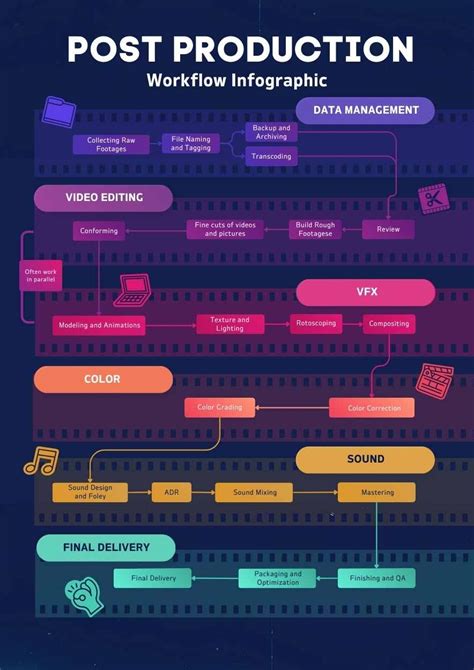
In the fast-paced world of video post-production, efficiency and collaboration are paramount. DaVinci Resolve, a leading software in editing, visual effects, motion graphics, color correction, and audio post-production, offers powerful tools to streamline these processes. Among its most impactful features for team-based workflows is the Project Server, which, when combined with a shared PostgreSQL database, allows multiple users to work on the same project simultaneously. This guide will walk you through the essential steps of setting up a DaVinci Resolve Project Server, enabling features like bin and timeline locking, clip locking, in-app chat, and cost-effective storage solutions, even with readily available hardware like an off-the-shelf SSD.
The Power of Collaboration: Why Use a Project Server?
Traditionally, post-production has followed a linear workflow, where each artist hands off their work to the next. This sequential process can introduce errors, create mountains of change logs, and significantly slow down project turnaround. DaVinci Resolve's collaborative capabilities, powered by its Project Server and shared PostgreSQL databases, shatter these limitations.
The primary reasons for setting up a PostgreSQL database for DaVinci Resolve, as opposed to the default disk database, are twofold:
- Seamless Project Access: If you need to open the same project in another edit bay within the same facility without the cumbersome process of exporting and importing projects.
- Multi-User Collaboration: To leverage DaVinci Resolve's advanced multi-user collaborative workflow features, allowing simultaneous work across different creative disciplines.
This setup eliminates the need for constant conforming, as all collaborators are working from the same project file. Furthermore, it allows teams to get help from other creatives, thereby turning around projects faster.
Chapter 1: Setting Up the Project Server and Shared PostgreSQL Database
The foundation of any collaborative DaVinci Resolve workflow is a robust project server that hosts a shared database. This ensures that all team members can access and work on the same project simultaneously.
Picking the Right Computer for Your Project Server
The computer designated to run the DaVinci Resolve Project Server will perform three critical tasks: acting as a video editing station, a file server, and, most importantly, the project server that hosts the shared PostgreSQL database. For many, a powerful machine like an M1 Max MacBook Pro is an excellent choice due to its performance capabilities.
Crucially, the computer acting as the project server must remain powered on and available whenever other computers in the network need access to the shared project. It needs to be on-premise and reside within the same local network. While high-speed fiber connections might allow for remote access via VPN, this scenario is beyond the scope of this tutorial.
Downloading and Installing the Project Server Software
To begin, navigate to the Blackmagic Design support page. You can find links to download the DaVinci Resolve Project Server software there. This is a standalone application. The easiest way to locate the latest version is by clicking on the DaVinci Resolve and Fusion software icon box and scrolling down to the latest downloads section. Follow the on-screen prompts to complete the installation, much like any other application, and then reboot the computer.
Upon launching the project server for the first time, you'll notice its interface resembles the project manager within DaVinci Resolve. However, it's a stripped-down version, solely focused on database management.
It's vital to use the version of PostgreSQL that comes bundled with the DaVinci Resolve Project Server. This is an older, but specifically tested and compatible version. Resist the temptation to download the newest PostgreSQL version independently; as has been discovered through trial and error, this will not work with DaVinci Resolve.
Creating and Sharing a New Database
Within the Project Server application, click the icon in the header section to create a new database. Similar to disk databases, naming rules prohibit spaces. Therefore, it's recommended to use underscores to ensure readability. For a subtle visual enhancement, you can right-click to load a small image, such as a 200x200 pixel JPEG, to help quickly identify each database at a glance.
Once your database is created, you need to share it. Click the "Enable Sharing" button at the top. This action will prompt you to authorize the configuration of the PostgreSQL server. Simply enter your administrator credentials. You will then see blue left and right arrows, indicating that the database is now successfully shared across the network.
Generating and Utilizing Access Keys
Blackmagic Design provides a helpful cheat sheet text file that can be generated by clicking the top-right icon. This file contains the IP address of the project server and the necessary login information, saving you the trouble of manually recalling these details. If you're curious about this information, you can open the access key file with a text editor. Alternatively, you can view the project server's IP address by navigating to "File" in the project server's menu and selecting the network interface dropdown.
The primary purpose of this access key file is to be sent to any computer that requires access to the shared database. To illustrate, imagine running upstairs to a son's computer that will act as an assistant client computer.
How to Create and Use PostgreSQL Database with DaVinci Resolve 15 Tutorial
Before adding this access key to the client machine, it's good practice to ensure that all collaborating computers are running the same version of DaVinci Resolve. While they don't all need to be the paid Studio version, they must share the same version number. The free and paid versions are typically released simultaneously. You can download the latest versions from the Blackmagic support page. For reference, this tutorial uses version 17.4.3.
On the assistant client computer, after launching DaVinci Resolve, click the upper-left icon in the project manager to show and hide databases. Then, simply drag the access key file into the project manager window. With a bit of flair, you'll see the shared database appear. It's important to note that the project server does not store the actual footage or media assets. It only manages the databases that contain project information, which in turn points to your media assets. The footage can reside wherever you choose.
Chapter 2: Sharing Storage for Collaborative Editing
With the project server and shared database in place, the next crucial step is to make your media accessible to all collaborators. This section details how to share a single SSD for collaborative editing, ensuring one central copy of the footage.
Connecting Computers and Setting Up Shared Volumes
For a basic setup, connecting two Macs using a readily available gigabit Ethernet cable is sufficient, even for on-set use. If your workstations are in close proximity, a Thunderbolt cable can be used to bridge them for significantly faster speeds. Simply plug the Cat 6 Ethernet cable into both computers. On a MacBook, you might need a Thunderbolt to Ethernet adapter. You don't need a specialty cross-over cable as in older networking days; an off-the-shelf Ethernet cable will typically provide around 75-95 Megabytes per second of real-world video data transfer.
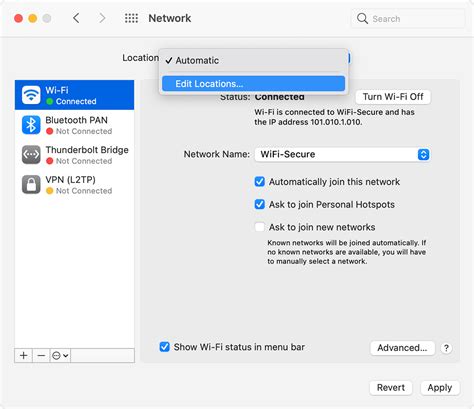
Once both computers are connected, go to System Preferences > Network. Allow them to connect over DHCP with a self-assigned IP address. DHCP is an automatic process that assigns unique IP addresses to computers. While this can change over time, for long-term use, you might consider setting a manual static IP address. However, this DHCP method allows for a quick start with minimal networking knowledge.
Sharing an SSD via File Sharing
Assume you have an SSD containing all your footage. It's advisable to use the fastest drive possible; NVMe SSDs like Samsung T7s or SanDisk Extreme Pros are excellent choices and widely accessible.
To share this drive, plug it into the project server computer. Again, go to System Preferences, then click "Sharing." Check the box for "File Sharing" and click the "+" button to add the volume or SSD you wish to share. You can also drag the drive directly from the desktop into this window. This action will share the drive using the SMB protocol.
Under the "Users" section, ensure your user account on this computer has "Read & Write" access to the drive. "Read & Write" permissions mean precisely what they imply: you can view files and make modifications or edits. Keep this in mind for later when we discuss bin locking.
On the client assistant computer, open Finder. Click the "Go" dropdown menu and select "Network." The keyboard shortcut for this is Command + Shift + K. Locate the editor server computer that was shared and click "Connect As." Enter the login information as if you were logging into the server computer directly.
An alternative method for connecting is to go to the bottom of the "Go" menu and select "Connect to Server," or use the Command + K shortcut. When using "Connect to Server," you can directly enter the local IP address of the server computer (your MacBook) by typing smb://... followed by the address to mount the drive more quickly. The advantage here is that you can also bookmark the server computer's IP address using the "+" icon for future easy access.
Chapter 3: DaVinci Resolve Collaboration Features in Action
With the project server and shared storage set up, we can now dive into the collaborative features within DaVinci Resolve itself. These features are designed to facilitate seamless teamwork and prevent conflicts.
Enabling Collaboration and Understanding Live Save
Ensure you have the same version number of DaVinci Resolve running on all machines. If "Dynamic Project Switching" is enabled, disable it. This is a simple right-click action. Dynamic Project Switching allows you to have multiple projects open simultaneously, which can be useful for tasks like copying and pasting between projects or queuing up a batch of deliverables. However, dynamic project switching is not compatible with shared PostgreSQL projects.
Create a new project within the project manager and open it. Go to the "File" menu and select "Enable Collaboration." Save the project. From this point forward, "live save" is automatically enabled for every click or change you make.
You can now add footage to your project on the client computer. For optimal performance over a low-bandwidth solution like Gigabit Ethernet, it is highly recommended to create proxy files. One favored codec for this is Blackmagic RAW 12:1 compression, which offers a good balance of being relatively small in size while maintaining high quality. It consumes approximately 370 megabits per second. For an even smaller proxy, a 2K resolution file with H.265 compression uses only about 10 megabits per second. This not only ensures smoother playback over the Ethernet cable but also significantly reduces hard drive space requirements, making project archives easier to transfer over the internet.
If your computer lacks recent hardware with H.265 decoders, ProRes Proxy and DNxHR LB at 2K resolution are viable alternatives, consuming around 40 megabits per second. Both are battle-tested workhorse codecs. ProRes Proxy is generally preferred for Mac workflows, while DNxHR is more suited for Windows. Essentially, you will edit using these proxy files and then export using the original, full-resolution media. The proxy files link behind the scenes and are utilized when the "Use Proxy Media if Available" checkbox is selected under the "Playback" menu. Unchecking this option reverts you to the raw clips.
It's also worth noting that each client computer can independently manage its own cache files for optimal performance. You can set the location for these cache files in the project settings, under "Master Settings" and then "Working Folders."
Handling Offline Media and User Identification
If, by chance, you encounter "Offline Media" on the assistant computer, it indicates an issue where Resolve is not correctly interpreting the file path. This can be easily relinked using the broken chain link icon on the Edit page, by navigating to the closest folder where you know the media resides.
One more point regarding offline media: some newer cameras shoot in 10-bit formats that are not supported in the free version of DaVinci Resolve. Instead of displaying "Not Supported," these files may appear as "Offline."
The "Identity Badges" in the lower right corner allow you to change your display name from the default computer hostname to something more personal. By clicking the person icon, you can also choose your preferred color. This color coding is incredibly helpful as it visually indicates which bin another project member is currently working on. If you need access to a locked bin, you can click the chat window in the lower right to message that person directly within DaVinci Resolve, eliminating the need for external communication apps like Slack or Microsoft Teams, and even working without an internet connection.
Understanding Bin, Timeline, and Clip Locking
Bin locking is a feature that enhances collaborative workflows, similar to what Avid Media Composer excels at. DaVinci Resolve elevates this by extending collaboration beyond just editorial to finishing, mixing, and color grading. This is achieved through bin, timeline, and clip locking, with the specific type of locking depending on the page you are currently working on.
The locking mechanism prevents version conflicts. The first person to access a bin, timeline, or clip is granted read and write permissions. All other users will have read-only access. As soon as a project member clicks away from their timeline, bin, or clip (on the Color or Fusion pages), it becomes unlocked, allowing others to gain full access.
This system is invaluable for project organization. An assistant can have their dedicated working folders or bins, and the editor can have theirs. The first person to open a bin gains read-write access. You can ascertain who has this full access by observing the colored icon associated with other creatives' computers.
If an assistant needs to add graphics to an editor's timeline, they can still do so while the editor is cutting. They can duplicate the timeline (a feature for which many users wish for a keyboard shortcut) or copy and paste clips into their own timeline within their own bin, which they have full access to. The same principle applies to an audio engineer working on the Fairlight page, as both the Edit and Fairlight pages operate on an entire timeline simultaneously.
In contrast, a colorist or VFX artist can work on individual clips within the Color or Fusion pages. Both can work on the same shot concurrently because Fusion and Color manage changes independently. The power of this system lies in its ability to foster effective, simultaneous collaboration across multiple disciplines.
To refresh changes made by another creative, click the refresh icon in the upper right of the timeline viewer to obtain the latest color grade. This is a manual refresh, ensuring that changes don't unexpectedly alter your view during a supervised session. You can also update a specific clip in the timeline or refresh by clicking the bin in the Media Pool.
If you wish to maintain read and write access to a particular bin, perhaps to prevent another user from inadvertently locking it, you can manually lock it. Even after you leave the bin, you will retain exclusive read-write control. To do this, right-click and select "Lock Bins." A lock icon will appear, indicating that no one else can modify it. You can manually unlock the bin just as easily with the right-click option. It's generally not advisable to keep a bin manually locked for extended periods, as unforeseen circumstances could render it inaccessible.
Conversely, if you are the first to enter a bin and do not intend to make changes (perhaps you are just browsing), you can Option-click the bin. This action allows someone else to enter and make the necessary modifications.
Timeline Comparison and Project Management
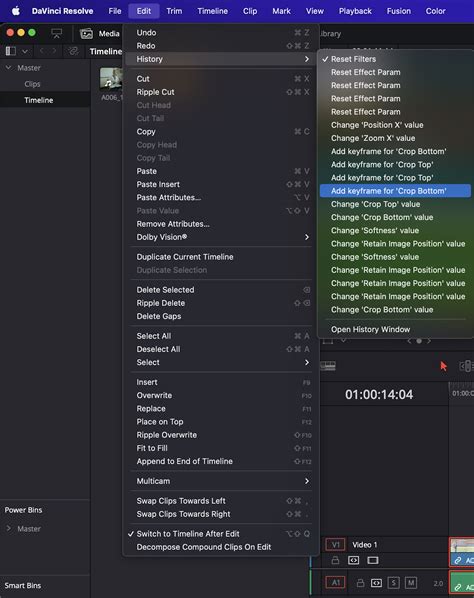
Timeline comparison is a useful feature, though not exclusive to collaborative projects in Resolve. It presents a stacked visual representation of differences between two versions of a sequence. To use it, go to the Media Pool, right-click the timeline you want to compare against, and select "Compare with Current Timeline." You can adjust the zoom level using the slider on the right, open a difference index on the left, and right-click to accept changes from one timeline to the next. Close the window by clicking the button in the lower right.
How to Create and Use PostgreSQL Database with DaVinci Resolve 15 Tutorial
It's highly probable that you will create test databases within the PostgreSQL Project Server that you may later wish to delete. Blackmagic Design has implemented safeguards to prevent accidental deletion of essential data. To remove a database, right-click it within DaVinci Resolve Project Server and select "Disconnect from Project Server." At this stage, the database is not permanently deleted. You will need a tool like PG Admin 4, which can be downloaded for free. Install PG Admin 4 like any other application and set up a secure password. Click "Servers," and then enter the password "DaVinci" to gain access. From here, you can navigate to and delete the desired database from the system entirely.
Chapter 4: Advanced Collaboration and Storage Solutions
DaVinci Resolve continues to evolve, offering increasingly sophisticated tools for collaboration and flexible storage options.
Blackmagic Cloud and Organizations
DaVinci Resolve is recognized as the world's only complete post-production solution that enables everyone to work together on the same project simultaneously. Blackmagic Cloud, introduced in later versions, revolutionizes collaboration through cloud-based workflows. By creating a Blackmagic Cloud ID, users can log into the DaVinci Resolve Project Server and set up project libraries. Any number of collaborators can be assigned to a project, using Blackmagic Cloud to share projects. Multiple individuals can indeed work on the same timeline. When changes are made, they can be reviewed and accepted within the viewer; changes are only applied upon acceptance. A single click can relink files, update timelines, or view changes.
Creating a Blackmagic Cloud ID is straightforward and free. Once logged in, you can establish your DaVinci project library, choosing a server location close to you and naming your library. You can then create or import projects into Blackmagic Cloud, preparing for collaborative work.
For larger organizations, the "Organizations" app allows for defining a single entity or company within Blackmagic Cloud. This facilitates the creation of groups or teams, enabling swift project or presentation sharing with an entire group rather than individually. Organizations also support single sign-on, allowing your IT department to authorize access for staff and freelancers.
Additionally, companies can opt to purchase Blackmagic Cloud storage or a dedicated server for their project libraries. This addresses the challenges of managing single licenses or dongles in larger enterprises. Assigning license keys to individual users can lead to them retaining access even after a project is completed, and dongles require physical management. Furthermore, it can be difficult to attribute the cost of a single license to a specific project. Organizations solve this by allowing companies to buy or rent DaVinci Resolve Studio, simplifying the allocation and removal of licenses within large groups and enabling cost allocation against projects. New licenses can be assigned in seconds.
Flexible Storage and Media Management
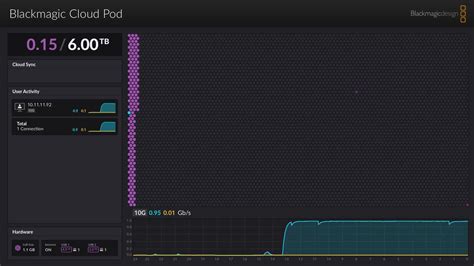
The flexibility of DaVinci Resolve extends to its storage solutions. You are not mandated to purchase expensive, proprietary storage or hire an extensive IT department for management. DaVinci Resolve offers the freedom to utilize cloud storage via a Blackmagic Cloud ID or network storage solutions like the Blackmagic Cloud Store.
The Blackmagic Cloud Store models are high-capacity, extremely fast network disks designed to handle the large media files common in Hollywood feature films. Their advanced flash memory architecture efficiently manages numerous simultaneous users.
On-set to cloud workflows have historically locked users into restrictive subscriptions and costly cloud storage. Blackmagic Cloud empowers you to control your workflow, with charges based on monthly usage. On set, camera originals can be copied to your local Blackmagic Cloud Store, where sound can be synced, and a timeline created. The Blackmagic Proxy Generator monitors these new clips and automatically generates proxies. While these are synced via Blackmagic Cloud, you can concurrently color grade the clips and publish the timeline.
Blackmagic Proxy Generator and Presentations
The Blackmagic Proxy Generator, available free with DaVinci Resolve, automates the creation of proxies from camera originals. Simply select a size and type (H.264, H.265, or ProRes) for your proxies and designate folders as "watch folders." Any original media placed there, even within a file tree, will have proxies generated and placed in subfolders. DaVinci Resolve automatically links these proxies to the original media.
Several Blackmagic cameras now support creating small H.264 proxy files alongside camera originals during recording. These small proxy files can upload to Blackmagic Cloud in seconds, making your media available back at the studio in real-time for editors to begin their work. The ability to transfer media directly into the DaVinci Resolve media bin while editors are working is revolutionary and unprecedented. Editors working anywhere in the world will receive the shots.
For multi-camera shoots, the new multi-source feature on DaVinci Resolve's Cut page displays each camera angle in a multiview.
Blackmagic Presentations and Security
Currently in public beta, Presentations is accessible using your Blackmagic Cloud ID. It allows you to receive feedback on your work in progress without the complexities of VPNs or the security risks associated with shipping files. You can publish a timeline or clip directly from DaVinci Resolve into Presentations, or manually upload and then authorize a list of Blackmagic IDs to review. Presentations can be accessed at any time, even within a video conference or chat window. Shared markers and comments are automatically and bidirectionally linked with DaVinci Resolve.
When security is paramount, and you need to adhere to accreditation regulations using VPNs and firewalls, or when setting up a collaborative workgroup within a private network, the DaVinci Resolve Project Server application provides complete control. Version 18 of the software introduced a significant speed increase for opening and saving projects, and for sharing them across a private network. Projects can be shared with editors, colorists, VFX artists, and audio engineers on and off-site, allowing them to continue working remotely or while traveling.
Automatic bin and timeline locking prevent multiple users from overwriting each other's work. One user can create bins for organizing footage, add metadata, and create string-outs while another works in a different bin. DaVinci Resolve includes built-in chat functionality, enabling team members to discuss shots, review tasks, and share creative ideas without leaving the software. The innovative timeline comparison tool allows for a visual inspection of the differences between two versions of a timeline, showing exactly where footage has been added, deleted, moved, or trimmed. DaVinci Resolve permits the creation of private or shared markers; personal markers are visible only to you, while shared markers can be seen by other project collaborators.
Each user in a collaborative project can generate and manage their own cache files and set their own monitoring preferences to optimize their specific system's performance. While editors are busy creating timelines and adding effects, colorists and their assistants can select individual clips and begin grading them simultaneously. DaVinci Resolve features "live save," which allows multiple users to continuously save small, incremental changes to the project's database in real-time.
DaVinci Resolve is the industry's go-to solution for editing, visual effects, motion graphics, color correction, and audio post-production, compatible with Mac, Windows, and Linux. It includes large search dials in designs featuring only the specific keys needed for editing. The Editor panel is specifically designed for multi-cam editing for news cutting and live sports replay, with buttons for extremely fast camera selection and editing. A full-sized, traditional QWERTY editor keyboard in a premium metal design, featuring a metal search dial with clutch and extra edit, trim, and timecode keys, complements the powerful color panel that offers comprehensive control for creating cinematic images, including controls for refined color grading and adding windows. For sound engineers facing tight deadlines, the incredibly fast audio editing capabilities are invaluable. Used by Hollywood and broadcasters alike, these large consoles simplify mixing large projects with a massive number of channels and tracks. The Fairlight studio console offers legs at either 0º or 8º angles for flat or slightly angled working surfaces, providing quick access to virtually every Fairlight feature. Additionally, a blank 1/3rd wide bay is available for custom console configurations.