Adobe Photoshop, a titan in the realm of digital image manipulation, can initially appear daunting, especially to newcomers. The sheer number of tools and features can be overwhelming, leading some to consider abandoning the endeavor. However, persistence is key, and understanding one of its most fundamental and powerful features - layers - unlocks a world of creative possibilities. The adage "There's no such thing as too many layers" rings particularly true in Photoshop, as layers are the very backbone of advanced image editing and compositing. This guide aims to demystify layers, offering an in-depth exploration suitable for both novices and experienced users seeking to leverage their full potential.
Understanding the Core Concept of Layers
At its heart, a layer in Photoshop is akin to a transparent sheet of acetate stacked upon others. Imagine painting a red background on one sheet, then adding a yellow circle on a second transparent sheet placed above the first. Subsequently, you could add blue text on a third transparent sheet layered on top of the yellow circle. This stacking principle is precisely how Photoshop layers function. Each layer contains distinct image elements - pixels, text, shapes, or adjustments - that can be independently manipulated without affecting other parts of the composition. Where a layer contains no content, the underlying layers are visible, creating the illusion of depth and complexity. This fundamental concept allows for intricate compositions to be built incrementally, with each element residing on its own controllable plane.
The Layers panel, typically found in the bottom right of the Photoshop workspace, is the central hub for managing these transparent sheets. It lists all layers in an image, ordered from top to bottom, with the "Background" layer usually residing at the very bottom.
Navigating the Layers Panel
The Layers panel (accessible via Window > Layers or by pressing F7) is an indispensable tool for any Photoshop user. It provides a visual overview of your project's structure, displaying each layer as a distinct row.
- Active Layer Identification: The layer you are currently working on, known as the active layer, is highlighted in the panel, ensuring that all edits and adjustments are applied to the correct element. It's crucial to always verify which layer is active before making changes to avoid unintended modifications.
- Visibility Control: Each layer has an "eye" icon next to it. Clicking this icon toggles the layer's visibility, allowing you to hide or reveal its content. This is invaluable for isolating elements, comparing variations, or simply decluttering your view.
- Layer Order and Hierarchy: Layers are arranged in a stack, and their order dictates how they interact visually. Layers higher in the stack obscure those below them where they overlap. You can easily rearrange this order by clicking and dragging layers up or down within the panel. This ability to reorder is fundamental for creating visual hierarchy and achieving the desired composition. Keyboard shortcuts like
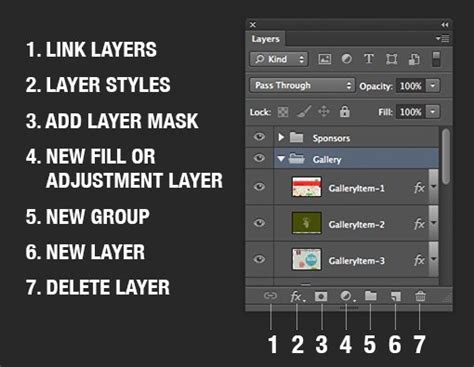
Ctrl/Cmd + [to move a layer down andCtrl/Cmd + ]to move a layer up can significantly speed up this process, especially when dealing with numerous layers. - Layer Management Icons: The bottom of the Layers panel houses a suite of icons for various layer management tasks:
- Create New Layer: This icon allows you to add a new, blank layer to your project, providing a fresh canvas for new elements.
- Delete Layer: Dragging a layer to the trash icon effectively removes it from your composition.
- Layer Group: This feature enables you to organize related layers into folders, preventing clutter and improving project manageability.
- Add Layer Mask: Essential for non-destructive editing, this icon adds a mask to the selected layer.
- Add Adjustment Layer: This icon allows you to create special layers that apply color and tonal adjustments to the layers below.
Types of Layers in Photoshop
Photoshop offers a diverse range of layer types, each serving specific purposes:
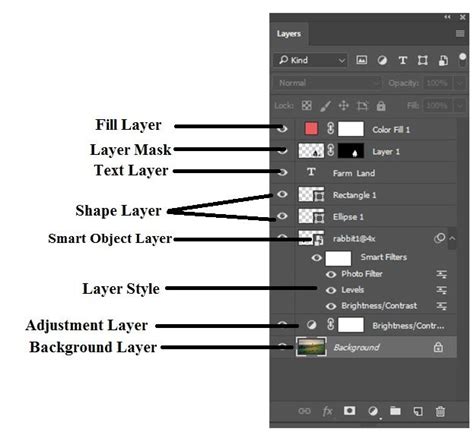
- Ordinary Pixel-Based Layers: These are the most common type, containing pixel data that forms the image itself. When you drag and drop an image into Photoshop or use the Type tool, new pixel-based layers are often created automatically.
- Background Layer: This is the default layer created when you open a new document. It is always locked and positioned at the bottom of the layer stack. Due to its locked nature, it cannot be moved or have layer effects applied directly.
- Shape Layers: These vector-based layers are ideal for creating geometric shapes, custom designs, and illustrations. Because they are vector-based, they can be scaled infinitely without losing quality.
- Fill Layers: These layers allow you to apply solid colors, gradients, or patterns as a distinct layer. They offer a non-destructive way to add fills to your design.
- Type Layers: Created using the Type tool, these layers contain editable text. Like shape layers, type is vector-based, allowing for scalable text.
- Adjustment Layers: These powerful layers apply color and tonal adjustments to all the layers beneath them. They are non-destructive, meaning they don't alter the original image data and can be modified or deleted at any time. Examples include Brightness/Contrast, Hue/Saturation, and Curves.
- Layer Groups: As mentioned, these function as folders, allowing you to bundle multiple layers together for better organization. This is particularly useful in complex projects with many elements.
- Smart Objects: These are special container layers that can hold raster or vector data. A key benefit of Smart Objects is their ability to preserve the source content of an image or vector, allowing for non-destructive filtering and transformations. Filters applied to Smart Objects become "Smart Filters," which can be re-edited or removed later.
- Video Layers: In more recent versions of Photoshop, layers can also contain video, enabling basic video editing, animation, and motion graphics work.
- 3D Layers: Photoshop also supports the manipulation and import of 3D objects, with capabilities extending to 3D printing preparation.
Essential Layer Operations
Mastering several fundamental operations will significantly enhance your workflow within Photoshop:
Creating New Layers
There are multiple ways to create new layers:
- New Layer Button: Click the "Create New Layer" icon at the bottom of the Layers panel.
- Keyboard Shortcut: Press
Ctrl + Shift + N(Windows) orCmd + Shift + N(Mac). - Via Copy/Cut: Select an area of your image and choose
Layer > New > Layer via CopyorLayer > New > Layer via Cut. This creates a new layer containing only the selected pixels.
Naming Layers
"Name your layers" is a mantra for efficient Photoshop work. Double-clicking a layer's name in the Layers panel opens an editable field, allowing you to assign descriptive names. This practice saves immense time and confusion, especially in complex projects.
Moving and Rearranging Layers
As previously discussed, layers can be moved up and down the stack by clicking and dragging. Multiple layers can be selected and moved together, and keyboard shortcuts (Ctrl/Cmd + [ and Ctrl/Cmd + ]) offer rapid reordering.
Linking Layers
You can link layers together so that they move as a single unit. Select the layers you wish to link (using Ctrl/Cmd + click), then click the "Link Layers" icon (a chain symbol) at the bottom of the Layers panel. Unlinking is achieved by selecting the linked layers and clicking the icon again.
Hiding and Locking Layers
The eye icon controls visibility. Locking layers, indicated by a padlock icon, prevents accidental modifications. Clicking the padlock icon toggles the lock. There are also specific lock options available (transparent pixels, image pixels, position) accessible by clicking the padlock icon in the "Lock" section of the layer.
Transforming Layers
To resize, rotate, or warp the content of a layer, select the layer and choose Edit > Free Transform (or press Ctrl + T/Cmd + T). A transform border will appear around the content. Hold Shift while dragging corners to maintain proportions and avoid distortion. Dragging inside the border moves the content. Confirm transformations by clicking the checkmark in the options bar.
Merging and Flattening Layers
When you are completely finished editing certain layers, you can reduce file size and simplify your project by merging them.
- Merge Down: Select a layer and choose
Layer > Merge Down(orCtrl + E/Cmd + E). This merges the selected layer with the one directly below it. - Merge Visible: To merge all currently visible layers, go to
Layer > Merge Visible(orCtrl + Shift + E/Cmd + Shift + E). - Flatten Image: This option merges all layers into a single background layer. It's generally recommended to avoid flattening unless absolutely necessary, as it discards all layer information.
Advanced Layer Techniques for Non-Destructive Editing
The true power of Photoshop layers lies in their ability to facilitate non-destructive editing, allowing for flexibility and reversibility of changes.
Layer Masks
Layer masks are a cornerstone of non-destructive workflows. They allow you to selectively hide or reveal parts of a layer without permanently deleting pixels.
- Creating a Mask: Select the layer you want to mask, then click the "Add Layer Mask" icon at the bottom of the Layers panel. A white thumbnail will appear next to the layer thumbnail, representing the mask.
- Using the Brush Tool: Painting with black on the mask conceals the layer's content, while painting with white reveals it. Shades of gray create semi-transparency. This allows for smooth transitions and selective application of effects.
- Opacity and Flow: When using the Brush Tool on a mask, the
Opacitysetting controls the transparency of the paint (and thus how much of the layer is revealed or hidden), andFlowcontrols the rate at which paint is applied.
Photoshop Layer Masks Explained in 2 Minutes
Adjustment Layers
Adjustment layers are a superior method for altering the color and tone of an image compared to applying adjustments directly to pixel layers.
- Application: When you add an adjustment layer (via the icon at the bottom of the Layers panel or
Layer > New Adjustment Layer), it affects all layers below it by default. - Clipping Masks: To limit an adjustment layer's effect to just the layer directly beneath it, you can "clip" it. Hover your pointer between the adjustment layer and the layer below it, hold down
Alt/Option, and click when the cursor changes to a downward-pointing arrow. This creates a clipping mask, ensuring the adjustment only impacts that single layer. - Customization: Adjustment layers come with their own masks, allowing you to selectively apply the adjustment to specific areas of the affected layers. Popular adjustment layers include "Curves," which offers precise control over tonal ranges (highlights, shadows, midtones) and color balance.
Layer Styles
Layer styles are pre-defined, modifiable effects that can be applied to layers, most commonly text.
- Accessing Styles: Double-click the blank area to the right of a layer's name in the Layers panel, or right-click the layer and select "Blending Options."
- Common Styles: Styles include "Drop Shadow," "Bevel and Emboss," "Stroke," "Color Overlay," and more.
- Non-Destructive Nature: Applied layer styles are non-destructive and can be edited or removed at any time, provided the file is saved in a layered format like PSD. Each effect within a layer style can also be toggled on/off individually using its respective eye icon.
Smart Objects for Non-Destructive Filters
When you convert a layer into a Smart Object (right-click the layer and choose "Convert to Smart Object"), you enable the application of filters as "Smart Filters." These filters are non-destructive, meaning you can re-edit their settings, change their order, or even delete them later without degrading the original image quality. This is particularly useful for experimenting with different filter effects.
Organizing Your Layers for Efficiency
As projects grow in complexity, effective organization becomes paramount.
- Use Groups: Create layer groups (
Ctrl/Cmd + G) to bundle related elements. This significantly cleans up the Layers panel. - Color-Coding: Assign colors to layers and groups by right-clicking them in the Layers panel. This visual cue helps quickly identify and select related elements.
- Logical Arrangement: Arrange layers in a logical order, placing the most important or foreground elements at the top and background elements at the bottom.
By embracing the principles of layering and utilizing the diverse tools Photoshop provides, you can move beyond basic image editing to create sophisticated, dynamic, and professional-quality graphics and compositions. The initial learning curve is well worth the immense creative control and flexibility that layers offer.