Clip Studio Modeler is a powerful tool designed for artists, illustrators, and designers looking to integrate 3D assets seamlessly into their creative workflow. Beyond simple modeling, it offers core features such as importing, editing, posing, and rendering 3D objects, making it an important extension of Clip Studio Paint. Whether you’re interested in creating dynamic comics, animations, or conceptual artwork, mastering this software can significantly enhance your creative output and save time on complex visualizations.

Getting Started with Clip Studio Modeler
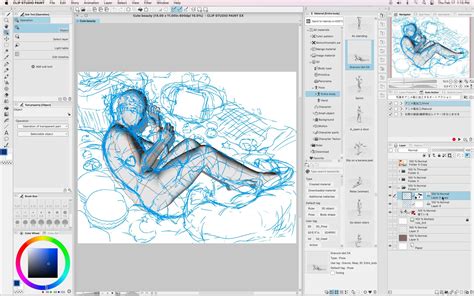
To get started, install Clip Studio 3D Modeler through Clip Studio’s asset manager. After launching, you’ll be greeted with a customizable workspace featuring panels for geometry, materials, bone registration (for rigging/posing), and a timeline for animation. The intuitive interface allows you to import existing OBJ files, build new models from primitives, or even scan physical models to bring them into the digital space.
Importing and Creating 3D Models
The process of bringing 3D models into Clip Studio Paint is straightforward. You can import external 3D models, with OBJ files being a commonly supported format, ensuring compatibility with many third-party modeling tools. For those who prefer to build from scratch, Modeler allows you to construct new models using primitive shapes.
When you first create a canvas and need to work with a 3D model, navigate to the material tab. Here, you will find several options, with the bottom two representing older model versions and the upper ones being the newer versions. These new models can be differentiated by their distinct body types. Simply click on the desired model and drag and drop it onto your canvas.
Managing Body Parts and Textures
Within the Modeler, a folder system is employed to organize your 3D assets. The folder where all [Body parts folders] are stored is crucial. You can import and manage multiple [Body parts folders] within a [Body folder]. The [Visible/Invisible] toggle for [Body parts folder] allows you to switch between displaying and hiding corresponding body parts in the [Document] window. It's important to note that only one type of each body part can be displayed at a time. Double-clicking a folder name enables you to rename it.
Preset surface materials for 3D files are also managed within the software. A dedicated folder exists for managing textures that are pasted using tools like the [Paste texture] tool. These textures are applied to the body parts. Textures are created by pasting a texture onto the body using the [Paste texture] tool. The displayed shape settings will vary depending on the imported model. Clicking on these will bring up the [Body] dialog box.
You also have the ability to duplicate items selected from the [List]. Textures found in [Body parts folders] and the [Additional texture folder] can be duplicated. Similarly, items selected from these folders can be deleted.
Manipulating and Posing 3D Models
The posing system in Clip Studio Modeler is particularly valuable. You can pose human or animal figures by manipulating bone structures, adjust camera angles for references, and record keyframes for simple animations.
Navigating the 3D Space
Once a 3D model is on your canvas, a set of tools becomes available for controlling camera angles, movement, and rotation. It's a common misconception that these tools move the model itself. In reality, these controls manipulate the camera's position, not the model's. The grid below the model will remain static, demonstrating that the model is not moving, but rather the viewpoint is shifting.
To actually move or rotate the model within the 3D space, you'll use a different set of icons or the central sphere. This is especially helpful when creating poses that require body rotation.
- Movement Tools: One set of tools allows you to move the model sideways or rotate it in a full 360-degree turn.
- Scaling: The outer circle of the sphere is used to make the model larger or smaller. Dragging outwards increases the size, while dragging inwards decreases it. A specific icon exists to reset the model's size to its original scale.
- Rotation Axes: The axes provided allow for precise rotation. Clicking on an axis and dragging along its line will rotate the model accordingly.
Customizing Body Shapes
Clip Studio Modeler allows for extensive customization of a 3D model's body shape to match your character designs.
- Height Adjustment: A slider enables you to change the height of the 3D figure. As you adjust the height, the "head to body ratio" slider automatically recalibrates to ensure proper proportions. You can disable this automatic adjustment if you wish to modify the head size independently.
- Body Shape Sliders: Within the adjustment area, 2D sliders allow for further customization of the body shape. Moving a slider to the right can result in a fatter body, while moving it to the left creates a slimmer physique. These sliders can be used to achieve various body types, from lean and muscular to fuller figures.
- Individual Part Customization: The software goes beyond whole-body adjustments by allowing you to customize each individual body part separately. By navigating through a body diagram, you can select specific parts. In the adjustment area, moving the cursor will modify the highlighted body part. Moving the slider upwards increases the length of the body part, while moving it downwards shortens it. Left and right movements function similarly to the full-body adjustments, affecting width. For instance, you can make shoulders wider or lengthen legs and hands.
- Resetting Body Shape: A button labeled "initial body shape" allows you to reset all body shape changes, including height, to their original settings.
The body shape customization is not limited to adult figures. You can create a wide range of body types based on age and unique character traits, including fantasy creatures like goblins and monsters. By disabling the "head to body ratio with height" setting, you can create characters with disproportionately large heads, which is useful for drawing figures like chibis or goblins. Even if the 3D model doesn't perfectly match your intended character, it serves as an excellent vessel for creating a base upon which to draw.
Saving and Reusing Custom Body Shapes
Once you have customized a body shape to your satisfaction, it's highly recommended to save it as a material for future use. A material property box will appear where you can name the material. Then, under "material image," click "select file" and choose the image of the 3D model you just saved. Finally, select a location to save the material. Clicking "OK" finalizes the process. You can then access this saved body shape material from its saved location by simply dragging and dropping it onto your canvas.
Posing Techniques
Posing a 3D figure is a crucial step in preparing it for your artwork. When you hover over the 3D model, different parts of the figure will be highlighted in blue.
- Basic Posing with Dots: Seven dots will appear when you click on the 3D model. These dots are used to make basic movements of the limbs and torso. Clicking and dragging a dot will move the corresponding body part.
- Leg Control: Specific dots control the movements of the legs.
- Torso Control: A dot in the torso influences the entire body, causing it to move in accordance with the dot's movement.
- Facial Direction: One dot dictates the direction your 3D figure's face will look.
- Head Tilt: The dot for manipulating the head has a single line, allowing you to tilt the head.
- Detailed Posing with Spheres: Within the highlighted parts, double-clicking on a specific area will reveal a sphere. This sphere allows for more detailed manipulation of that body part. This method of posing respects anatomical limits; for example, a leg will only move to a position that is humanly possible. Similarly, the forearm has a sphere with only one line of manipulation, as it can primarily bend rather than twist. Twisting the arm requires manipulating the upper arm. The same principle applies to thighs and lower legs.
An Introduction to Clip Studio Modeler
- Tip for Natural Posing: For more natural head posing, it's advised to first manipulate the neck and then adjust the head.
- Posing Hands: Posing hands can be done by double-clicking on highlighted sections of the fingers and palm, using the sphere for manipulation.
- Easier Hand Posing: An easier method for posing hands involves accessing the display object list and the subtool detail box, where you can select [pose] or click "show detailed setting" under pose in the tool property. This section offers various default poses for closed fists, open hands with spread fingers, and stiff open hands.
- Locking Fingers: Above the hand setup, you'll find lock icons for individual fingers. Clicking a lock prevents that finger from being manipulated until it's unlocked.
- Saving and Reusing Poses: If you create a body or hand pose you wish to reuse, you can register it. This process is similar to saving body shapes, involving naming the material, selecting a material image, choosing a save location, and clicking "OK." The registered pose can then be dragged and dropped onto your 3D model.
Applying Pre-made Poses
Clip Studio Paint provides a wealth of default poses available in the material tab under 3D > pose. You can simply click on a desired pose, drag it, and drop it onto your 3D model. It's important to drop the pose directly onto the 3D model; otherwise, it might create a new 3D model with that pose. The same applies to hand poses; ensure you drop them onto the hands of the 3D figure. To apply a hand pose to only one hand, select that specific hand before dropping the pose.
The Clip Studio Assets store also offers a vast collection of poses. You can search for the pose you're looking for and download it. Downloaded poses will be saved in the material tab under "download," from where you can drag and drop them.
Utilizing Pose Scanner
The pose scanner feature allows you to extract a pose from an image and apply it to your 3D model. Navigate to File > Import > Pose Scanner or click the pose scanner icon and select your desired image. While the pose is often replicated accurately, minor adjustments may be necessary. This is an exceptionally quick method for posing a 3D figure.
Manga Perspective and Collision Correction
Clip Studio Paint offers a "manga perspective" feature that dramatically enhances the visual impact of poses. When enabled, body parts closer to the camera appear larger, creating dynamic perspectives. This feature can make a pose look significantly more compelling.
An additional setting called "collision correction" works in conjunction with manga perspective. Enabling this corrects overlapping body parts and adjusts limbs when manga perspective is active, ensuring a cleaner look.
There's also a general perspective slider within the camera options. Increasing the value of this slider applies perspective to the entire body, not just the parts closest to the camera.
Enhancing Your 3D Models with Lighting and Effects
Light Source Control
Clip Studio Paint features a "light source" tool that allows you to change the direction of light hitting your 3D model. This can be used as a reference for your artwork or to create specific lighting effects. In the tool property panel, you can extend the light source to reveal a sphere representing light and shadow. Dragging this sphere allows you to set the light's direction. You can also change the color of the light.
Flipping and Mirroring Models
The "flip" tool is a straightforward yet highly useful function that mirrors a 3D model. This is particularly beneficial in group compositions where you have multiple 3D models in the same pose. By flipping a model, you can create the illusion of a different pose without needing to find a new one. For example, if you have several figures in a running pose, flipping one and making minor adjustments can make it appear as a distinct pose.
Integrating 3D Models into Your Drawing Workflow
Drawing from 3D Models
Once your 3D model is posed and angled to your satisfaction, you can begin drawing from it. You have two primary options: keep the 3D model on a separate canvas and create a new canvas for drawing, or draw directly above the 3D model.
Specifying Camera Angles
In addition to the manual camera controls, there's an option to "specify camera angle from the preset." Clicking this reveals numerous preset camera angles, allowing you to quickly set the camera to view the model from various perspectives, such as the back or a side profile. When working with multiple models, ensure you select the specific model whose camera angles you wish to adjust before choosing an angle. Icons are available to help you choose between different 3D objects.
Using 3D Models for Composition and Visualization
3D models in Clip Studio Paint can significantly improve your character's pose and help create sample compositions for your art. They provide a rough visualization of the final product before you even start drawing, helping to avoid time-consuming and costly mistakes.
As a designer, 3D modeling is often seen as a way to quickly prototype interior layouts or visualize spaces before committing to full drawings. For those who want to bridge artistic creation with interior design, exploring tools dedicated to 3D floor planning can bring even more value. These tools allow you to move beyond individual objects to entire rooms, giving context to your work and providing realistic spatial solutions for both art and practical design scenarios.
Pros and Cons of Using 3D Models
A significant advantage of using 3D models is their ability to aid in adjusting composition and character posture. They offer a clear understanding of the overall shape of an object and help in establishing perspective when drawing. When drawing characters in complex environments, using 3D models of buildings or as a base for background drawings is highly beneficial.
However, it's important to use high-quality 3D models and poses. Low-quality assets can lead to wasted time and effort. Proficiency in basic posing, anatomy, and composition is still essential.
Importing and Managing Models and Poses
Clip Studio Paint offers a wide variety of 3D models in its asset store, including human and non-human characters, as well as props and scenery. While CSP includes basic 3D models, downloading from the asset store often provides superior quality.
Both 3D models and poses can be downloaded separately from the Clip Studio Paint Asset Store. It's crucial to import the 3D model first. If you import a pose without a corresponding model, CSP may default to a basic male model, leading to an amusing outcome if the pose is intended for a female character.
Tracing Tips for 3D Models
When tracing 3D models, it's not always necessary to trace every detail. Instead, aim to alter the body and stance to avoid a stiff appearance. Start by tracing the simple body shape and then inspect parts that appear "off" and edit them. Using AI-generated images as a reference while tracing can greatly assist in understanding character perspective and pose.
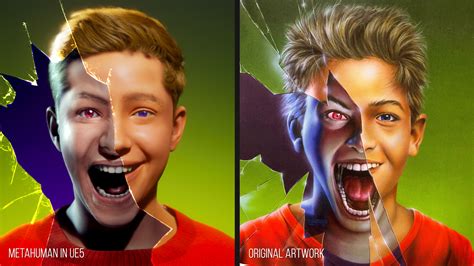
Advanced Workflows with AI
The integration of 3D models with AI tools opens up new possibilities. You can generate a wide range of character designs and postures by employing a 3D model in combination with AI. For instance, using Clip Studio Paint to paint over a 3D model and then uploading the image to an AI service for image-to-image generation can yield unique results.
Ultimately, 3D models are an excellent tool for artists. They can be used for designing backgrounds, characters, and as drawing guidelines. A 3D model can serve as a base for AI-generated images, significantly decreasing workload and working time for artists.
Conclusion
Clip Studio Modeler, as an extension of Clip Studio Paint, provides artists and designers with a robust set of tools for integrating 3D assets into their workflow. From importing and customizing models to posing, lighting, and even leveraging AI, the software empowers creators to visualize complex scenes, prototype designs, and ultimately enhance the quality and efficiency of their artistic output. Mastering its features can lead to more dynamic comics, engaging animations, and compelling conceptual artwork, bridging the gap between 2D illustration and 3D visualization.