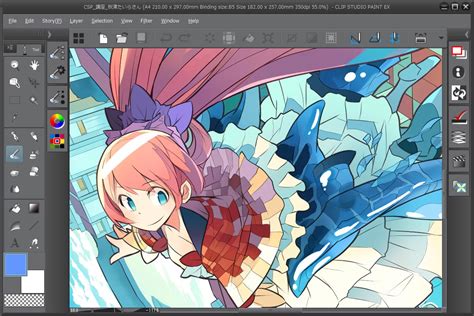
Clip Studio Paint (CSP) has rapidly ascended in popularity, establishing itself as a powerhouse digital art software, particularly favored by anime, manga, and illustration artists. This comprehensive guide delves into the myriad features of CSP, offering a structured approach to learning its capabilities, from fundamental tools to advanced techniques. Whether you're a complete novice or a seasoned digital artist, this tutorial aims to equip you with the knowledge to create with confidence.
Getting Started with Clip Studio Paint
Upon launching Clip Studio Paint, you'll first encounter the Clip Studio launcher. While it might initially appear complex with its array of menus and buttons, persistence reveals its intuitive design. The launcher provides access to Clip Studio Paint itself, as well as the Modeler app, which is invaluable for posing 3D models to use as drawing references. Furthermore, the launcher facilitates artwork synchronization across devices and allows for the download of brushes and other assets. For those looking to streamline their workflow, a quick reference guide for commonly used shortcuts is highly recommended.
Understanding File Format Compatibility
A standout feature of Clip Studio Paint is its exceptional file format compatibility. Notably, CSP can both open and save Photoshop files (.PSD), even those with hundreds of layers. This seamless integration is a significant advantage for artists who work across different software. Beyond Photoshop compatibility, CSP supports all standard image files like JPG, PNG, and TIFF, as well as vector files such as AI, EPS, and SVG, simplifying import and export processes.
Navigating the Workspace: Essential Tools
Efficient navigation is key to a productive art session. The Hand tool, often defaulting to the Rotate tool in the Tool palette, is essential for moving your canvas around the workspace. Expanding the Sub tool menu reveals the Hand tool for panning. The Rotate tool is particularly useful for angling the canvas to achieve better pen stroke accuracy.
For those with larger screens, the Navigator palette offers a wealth of functionalities. Beyond the crucial "Flip Horizontal" feature, it provides an at-a-glance thumbnail view of your artwork, allowing you to periodically step back and assess your work, especially when focusing on intricate details.
Mastering the Flip Horizontal Shortcut
The ability to flip your canvas horizontally is paramount for identifying and correcting subtle drawing errors. While accessible through the Edit menu (Edit → Rotate → Flip canvas → Flip Horizontal), this method is cumbersome for frequent use. Creating a custom shortcut is far more efficient. Navigate to CLIP STUDIO PAINT → Shortcut Settings, then under View → Rotate/Flip, select "Flip Horizontal" and click "Edit shortcut." Assigning a key combination, such as Command + F, can significantly expedite your workflow.
Exploring Clip Studio Paint's Brushes and Tools
Clip Studio Paint boasts a diverse range of brushes and tools, catering to various artistic styles. The Pen, Pencil, Brush, and Airbrush tools are fundamental for drawing and painting. Generally, the Pen tool is ideal for line art, while the Pencil tool excels at sketching. However, the flexibility of CSP allows for creating line art with the Pencil tool as well; the ultimate goal is the result, so use the tools that feel most natural.
The Brush tool offers a more painterly feel, while the Airbrush is perfect for smooth gradients. The Blend tool is another indispensable tool for painting, offering natural blending capabilities that mimic traditional media like watercolors and oils.
Customizing Brushes and Sub Tools
Each tool in CSP is accompanied by a comprehensive Sub tool palette, acting as an editing menu for its numerous functions. To access this, select a tool and then click the arrow at the top of the Tool palette. This is where you can fine-tune brush settings such as size, shape, and texture. Experimentation is key; make small adjustments, draw, observe the feel, and repeat. While the software offers a vast array of brushes, beginners will find that the default brushes are more than sufficient for creating compelling art.
The Smart Bucket Tool: Effortless Coloring
The Smart Bucket Tool is a powerful feature that dramatically speeds up the coloring process. It intelligently recognizes line art, allowing you to fill areas with color quickly. For optimal results, it's recommended to keep your color layers separate from your line art. To enable filling on a separate layer, activate "Refer to other layers" within the tool's Sub tool palette. You may need to ensure your line art shapes are closed or adjust the tool's settings for accurate recognition, but the time saved once configured is substantial.
Adjusting Line Width with Precision
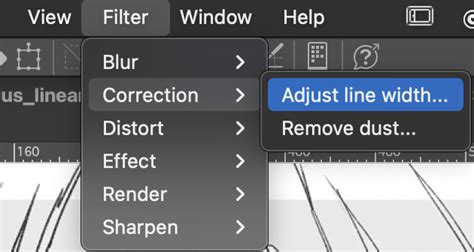
Clip Studio Paint offers an incredible tool for adjusting line width after a stroke has been made. Under Filters → Correct line → Adjust line width, you can make lines thicker or thinner. This feature is particularly beneficial for creating delicate illustrations or refining linework that might be challenging to achieve digitally.
Advanced Features and Workflow Enhancements
Clip Studio Paint is not just about drawing and painting; it also excels in specialized areas like comic creation and animation.
The Power of Layers and Clipping Masks
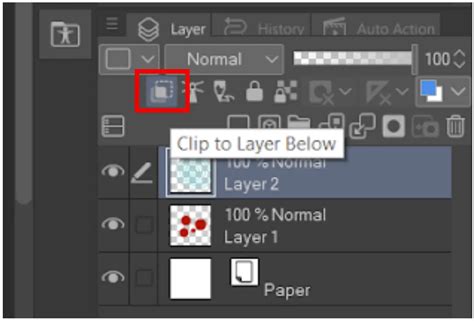
The layer system in Clip Studio Paint is robust and mirrors the functionality of Photoshop, a widely recognized industry standard. Layers allow for independent editing of different elements within your artwork. The "Clipping Layers" feature, equivalent to Photoshop's "Create Clipping Mask," is indispensable for digital painters. By clipping a layer to the one below it, you can ensure that any strokes made on the clipped layer are confined to the pixels of the layer beneath. Access this by right-clicking the layer you wish to clip and selecting "Clip to layer below."
Color Management and Exploration
CSP provides a comprehensive suite of color tools, including a color wheel, color palette, and color picker. You can also create custom color palettes and adjust color transparency. For those who appreciate a foundational approach to color theory, the HSV (Hue, Saturation, Value) color space, accessible via Window > Color Slider, is particularly useful. It encourages a focused consideration of each color property. While HSV is a preferred method for some, CSP also supports standard RGB and CMYK color spaces, as well as HLS color wheels.
Retouching and Blending Tools
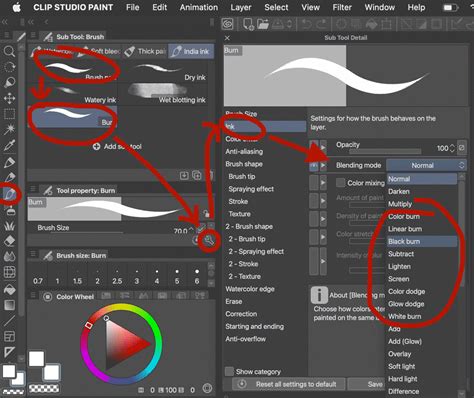
The Copy Stamp tool (akin to Photoshop's Clone Stamp) allows for seamless duplication and blending of artwork sections. This tool is located within the Blend tool's Sub palette. Furthermore, you can create custom brushes with various blending modes to emulate tools like Photoshop's Burn and Dodge tools. Duplicate an existing brush in the Sub tool palette, then access its properties by clicking the wrench icon. Within the Ink section, you can select different blending modes such as Multiply, Burn, Soft Light, Color Dodge, and Overlay, opening up a world of creative possibilities for painting.
Perspective Rulers for Accurate Layouts
Ensuring accurate perspective in your artwork is made significantly easier with Clip Studio Paint's Perspective rulers. Access this feature via the Layer menu > Ruler - Frame > Create Perspective Ruler, and then select the desired perspective view. This tool provides a foundational framework for constructing scenes with convincing depth.
Comic and Animation Production in Clip Studio Paint
Clip Studio Paint's specialized features make it a top choice for comic and animation creation.
Tools for Comic and Manga Creation
The software offers dedicated tools for comic and manga production, including a panel layout tool and a word balloon tool. Word balloons, essential for dialogue and thought bubbles, can be found towards the bottom of the Tool palette. The Sub tool palette offers various styles for these balloons. To begin a comic project, create a new canvas via File > New and select "Comic" from the Project list.
Animation Features
Clip Studio Paint is equipped with a robust set of animation tools, including a timeline, keyframe animation, and onion skinning. These tools work seamlessly, enabling the creation of smooth, traditional 2D animations. The onion skinning feature allows you to view multiple frames simultaneously, aiding in fluid motion. Frame-by-frame animation is fully supported. The timeline, typically located at the bottom of the screen, displays layers as vertical tracks and frames horizontally. You can even incorporate camera movements into your animations. Compared to other software, CSP often utilizes fewer system resources, making it a more accessible option for many artists.
Expanding Your Creative Toolkit with Assets and Cloud Sync
Clip Studio Paint's ecosystem extends beyond the core software with its extensive asset library and cloud synchronization capabilities.
Utilizing Clip Studio ASSETS
The Clip Studio ASSETS platform is a treasure trove of user- and officially-created materials, including brushes, textures, and 3D models. These are collectively referred to as "materials" within the software. Access them via the ASSETS tab in the Clip Studio Launcher. Browsing "popular" materials can lead you to highly downloaded and useful additions to your toolkit.
Cross-Device Synchronization
Clip Studio Paint's cloud service allows for seamless artwork and settings synchronization across multiple devices. To enable this, ensure you are logged into the same Clip Studio account on all devices. Open Clip Studio Paint, tap the Clip Studio logo in the top left, and select "Open Clip Studio." Navigate to "Manage Works" and enable syncing for the desired artwork. After a short syncing period, your artwork will be available on your other devices via Clip Studio > Manage works > Cloud.
Recording Your Creative Process
Clip Studio Paint offers the ability to record your drawing process as a time-lapse video. When creating a new file (File > New), you can opt to "record timelapse." The recording continues as you save and reopen your work, allowing for uninterrupted capture of your entire creative journey. Once finished, you can export the time-lapse video via File > Timelapse > Export timelapse.
Learning Resources and Community Support
The availability of tutorials and a supportive community are crucial for mastering any software. Clip Studio Paint excels in both these areas.
Official Tutorials and Instructional Videos
Clip Studio Paint provides a wealth of official tutorial articles and instructional videos. These resources are designed to guide users from beginner to advanced levels, ensuring that everyone can learn at their own pace.
Community-Driven Learning
The Clip Studio Paint community is renowned for its willingness to share knowledge. Numerous artists create and share tutorials, offering diverse perspectives and techniques. Resources like Reuben Lara's clear and informative tutorials, Brian Allen's practical drawing and inking guides, and Kendrys Diaz's focused lessons on 3D tools and manga art are invaluable. David Arroyo's step-by-step comic page creation series and Chris Martinez's inking demonstrations further enrich the learning landscape.
Advanced users can benefit from resources like Brian Allen's webinar on CSP tricks, Tim Michael's insights into the G-pen, and Robert Marzullo's digital painting tutorials, including specific lessons on perspective. Matt Chee offers quick tips and tricks for working smarter, while custom brush creation tutorials, like the one provided by a Smith Micro Influencer, showcase the software's adaptability. Kendrys Draws also provides timely tutorials on software updates, such as the Colorize tools and tone manipulation.
Numerous content creators offer specialized tutorials covering various aspects of digital art within CSP. Sinix Design provides practical digital painting exercises, while Naoki Saito Illust Channel2 caters to beginners with easy-to-use functions. NIRO breaks down anatomy into digestible shapes, and Whyt Manga shares character design tips. YeeJ Chan offers coloring insights, and Marc Brunet demonstrates advanced anime cel-shading techniques. For background art, evuu provides guidance on perspective, color palettes, and rendering shiny objects. REM Creates shows how to transform photographs into line art for manga, and kuroshiro explores advanced uses of the lasso tool. Comic artists like Nadiaxel offer specific advice for creating Webtoons, including canvas setup, text, word balloons, and 3D model integration.
The sheer volume of accessible tutorials ensures that artists can continuously learn and refine their skills within Clip Studio Paint, regardless of their experience level or artistic focus. The emphasis on practical application and diverse teaching styles within the community makes Clip Studio Paint an exceptionally well-supported digital art environment.