The GIMP Clone Stamp tool is a powerful feature that allows users to replicate pixels from one area of an image to another. This capability makes it invaluable for a variety of image editing tasks, from removing unwanted blemishes and distractions to replicating patterns and textures. For new users, however, understanding its nuances can sometimes present a challenge, leading to initial frustration. This tutorial aims to demystify the GIMP Clone Stamp tool, providing a step-by-step guide for effective use, particularly for those new to the software.
Understanding the Clone Stamp Tool's Purpose
At its core, the Clone Stamp tool functions like a digital stamp. It allows you to select a source area within your image, essentially defining the "stamp," and then apply that sampled content to a different area. This is distinct from simply copying and pasting, as the Clone Stamp tool samples pixels in real-time, adapting to the brush strokes and allowing for seamless integration.
The primary use cases for the Clone Stamp tool include:
- Removing Imperfections: This is perhaps its most common application. Whether it's a stray hair, a dust spot on a photograph, or an unwanted watermark, the Clone Stamp tool can effectively cover these distractions by sampling from surrounding clean areas.
- Replicating Patterns: If you have a repeating texture or pattern, the Clone Stamp tool can be used to extend it or fill in gaps.
- Repairing Damaged Areas: In cases of damaged or faded photographs, the Clone Stamp tool can be used to recreate missing details by sampling from intact parts of the image.
Essential Preparations for Effective Cloning
Before diving into the mechanics of the Clone Stamp tool, it's crucial to set up your GIMP workspace for optimal results. A common pitfall for new users is attempting edits directly on the original image layer, which offers no flexibility for adjustments or corrections.
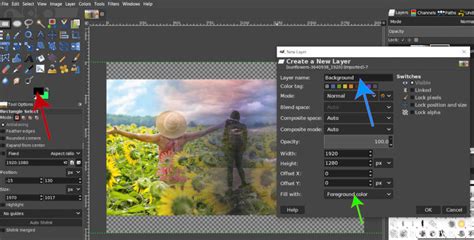
The Importance of New Layers
"The best way to handle cloning and healing is to apply all your edits to a new layer, or even to multiple new layers in larger projects. This gives you the ultimate flexibility later on if you need to adjust your edits, and you won’t have to start from scratch if something goes wrong. Many beginner image editors skip this step when they’re still learning, but it’s a good habit that you should form as early as possible!"
To create a new layer:
- Navigate to the Layer menu and select New Layer….
- Alternatively, use the keyboard shortcut Ctrl + Shift + N (or Command + Shift + N on a Mac).
- In the "New Layer" dialog box, give your layer a descriptive name (e.g., "Clone Edits").
- Ensure the "Fill with" option is set to Transparency.
- Click OK.
This new, transparent layer will serve as your canvas for cloning operations, ensuring that your original image remains untouched and your edits can be easily modified or discarded.
Activating and Configuring the Clone Stamp Tool
Once your new layer is in place, you can proceed to activate the Clone Stamp tool and adjust its settings.
Selecting the Tool
You can select the Clone Stamp tool in a few ways:
- Toolbox Icon: Locate the icon that resembles a stamp in the GIMP toolbox.
- Menu Navigation: Go to Tools > Paint Tools > Clone.
- Keyboard Shortcut: Press the C key.
Understanding Tool Options
After selecting the Clone Stamp tool, the "Tool Options" panel will display various settings. For effective cloning, pay close attention to these:
- Source Section: This is critical. Ensure the Sample merged option is enabled. "This tells GIMP to sample all the visible layers in your image when cloning. Without this enabled, you would just clone the empty pixels from your new layer and nothing would happen." Enabled "Sample merged" allows the tool to pick up pixels from all visible layers, including your original image, even though you are painting on a new, transparent layer.
- Aligned Mode: "If you want multiple clone brush strokes to mesh smoothly together, turn on Aligned mode in the Tool Options menu." When "Aligned" is checked, the source point moves relative to your brush as you paint. If it's unchecked, the source point remains fixed, which can be useful for repetitive stamping but less so for seamless blending.
The Core Cloning Process: Setting the Source and Painting
The Clone Stamp tool requires two fundamental steps to function: setting a source point and then painting with that source.
Setting the Source Point
"Both tools also require you to set a source point before you can start using them since they need to know which pixels they should be cloning/healing from."
- Hold down the Ctrl key (or Command on a Mac).
- While holding Ctrl, click on the part of the image you want to sample (the source). This is the area whose pixels you wish to duplicate.
- Release the Ctrl key.
You will notice that your brush cursor now reflects the sampled area.
Painting with the Cloned Pixels
- Move your cursor to the area where you want to apply the cloned pixels.
- Click and drag your mouse to "paint" with the sampled source. "Then you simply ‘paint’ using the brush the way you would with any other brush-based tool in GIMP."
How to Use Clone Tool in GIMP - GIMP Tutorial for Beginners
Adjusting Brush Settings
"You can adjust brush size, brush edge hardness, and opacity to create the effects you need."
- Brush Size: Controls the diameter of the brush tip. Larger brushes cover more area but can be less precise.
- Brush Hardness: Affects the edge of the brush stroke. Harder edges create distinct lines, while softer edges blend more smoothly.
- Opacity: Determines the transparency of the cloned pixels. Lower opacity allows underlying layers to show through, which is useful for subtle blending.
Troubleshooting Common Issues
New users often encounter problems that can halt their progress. Understanding these common issues and their solutions is key to mastering the tool.
"Nothing Happens" When Cloning
This is a frequent complaint among beginners. The "nothing happens" phenomenon can stem from several factors:
- Incorrect Layer Selection: Ensure you are painting on your new, transparent layer (or whichever layer you intend to edit on). If you are trying to paint on the original image layer and it has a mask applied, this can also cause unexpected behavior.
- "Sample Merged" Not Enabled: As previously mentioned, if "Sample merged" is not checked in the Tool Options, the tool will sample from the empty, transparent layer you are painting on, resulting in no visible change.
- No Source Point Set: The tool requires a source point to be defined by holding Ctrl and clicking. If this step is skipped, the tool has no pixels to clone.
- Masks Interfering: In some cases, a layer mask might be active and preventing painting. "i noticed this mask thing… it was using as a sample. under brush it said clipboard mask. i changed it to a big black circle brush and now its painting." If you suspect a mask is the issue, check the Layers panel for any mask icons and ensure the correct brush is selected for painting on the layer itself, not the mask.
The "Barred" Symbol
"Have a 'barred' symbol blocking the use of the clone stamp." This symbol often indicates that the tool you are currently trying to use is not the active one. GIMP, by default, often returns to the Zoom tool.
- Solution: "In Gimp, you can't actually 'deactivate' tools. Instead, as you first go into Gimp you will notice it is already automatically on the zoom tool… To return to the zoom tool, simply click on it, or hold Ctrl and scroll up and down to view your image closer or further away. You can do this while you are using any tool and it will automatically return to the zoom tool." This means that even if you see a barred symbol, simply re-selecting the Clone Stamp tool (by pressing
Cor clicking its icon) should resolve the issue.
Color Mismatch
"Probably, as you move away from the original source image, you will find that the color of the source area no longer matches the part you are trying to clone over." This is a natural occurrence when cloning across areas with different lighting or color casts.
- Mitigation:
- Frequent Source Resetting: Regularly redefine your source point (Ctrl + click) to pick up colors closer to your target area.
- Adjusting Brush Opacity: Using a lower opacity can help blend the cloned colors more subtly.
- Color Balance Adjustments: For more significant color discrepancies, you might need to use GIMP's color adjustment tools (e.g., Levels, Curves, Hue-Saturation) on the cloned layer after the initial cloning is done.
Advanced Techniques and Considerations
Once you are comfortable with the basic operation, you can explore more advanced uses of the Clone Stamp tool.
Cloning Patterns from GIMP's Library
"GIMP comes with several pre-supplied patterns, but you can also make your own." Instead of sampling pixels from the image, you can use predefined patterns to fill areas.
- With the Clone Stamp tool selected, look for the "Pattern" option in the Tool Options panel.
- Click the pattern tile to expand the menu of available patterns.
- Select the desired pattern.
- Unlike when cloning pixels, you do not need to hold down Ctrl to set a source point. Simply paint directly onto your image.
This is useful for adding textures or filling backgrounds with repeating elements.
Aligning Your Clones
The "Aligned" mode in the Tool Options is crucial for creating smooth, continuous cloning. When aligned, the source point moves in sync with your brush. If you were to stop brushing and start again without resetting the source, the new cloning would begin from the same relative position to your last brush stroke. This is ideal for seamlessly extending textures or filling large areas without abrupt starts and stops.
Iterative Refinement
"After a few false starts and a lot of use of the Undo command (use Ctrl + Z or Command + Z for the fastest results), you’ll eventually be able to hide the watermark entirely." Don't be afraid to use the Undo command frequently. GIMP's powerful undo history (accessible via Ctrl + Z or Command + Z) allows you to backtrack and correct mistakes without losing significant progress.
The GIMP Clone Stamp tool, while seemingly straightforward, possesses a depth that rewards practice and experimentation. By understanding the importance of layers, correctly configuring tool options, and mastering the process of setting source points and painting, users can effectively tackle a wide range of image editing challenges. The initial learning curve may feel steep, as "This program is so hard to use until you figure out how to use it. not intuitive at all," but with consistent application, the Clone Stamp tool will become an indispensable part of your GIMP toolkit.