Text threading in Adobe InDesign is a fundamental technique for managing the flow of text across multiple frames and pages, essential for creating professional multi-page documents like brochures, magazines, and books. While it might seem intuitive to use the Type tool for text manipulation, threading actually requires a different approach, utilizing the Selection tool to link frames together. This process allows for dynamic text flow, ensuring that content seamlessly moves from one container to the next, even as document layouts evolve. Understanding the nuances of text threading, from basic linking to its application on master pages, can significantly streamline editing and proofing workflows.
Understanding the Overset Text Indicator
When working with text frames in InDesign, you'll frequently encounter the concept of "overset text." This occurs when the amount of text in a story exceeds the capacity of its containing text frame. The visual cue for overset text is a small, red plus sign located in the lower-right corner of the text frame. This symbol is a clear indicator that there is more text within the story than can be displayed within that specific frame. While one immediate solution is to simply resize the text frame to accommodate all the text, this approach is not always feasible or desirable, especially in complex layouts where precise frame dimensions are crucial. In such scenarios, text threading becomes the indispensable solution, enabling the overflow text to continue into another designated frame.

The Core Process: Threading Text Frames
Threading text frames together is the primary method for managing overset text and creating a continuous flow of content across your document. Contrary to what one might expect, the Type tool, which is used for direct text input and editing, is not the instrument for establishing these links. Instead, the Selection tool, represented by the black arrow, is the key to initiating and managing text threads.
To begin threading, you first need at least two text frames: one containing text and another that is empty and intended to receive the overflow. The process starts by identifying the "Out Port" of the first text frame. This is a small box located in the lower-right corner of the frame. When you click on this Out Port with the Selection tool, you'll notice a small triangle appear, signifying that you've initiated the threading process. This action essentially "loads" a cursor, preparing it to link to the next frame.
Next, you navigate to the empty text frame you wish to thread to. With the loaded cursor, you simply click anywhere within this second frame. Upon clicking, the two frames become linked, and the text from the first frame will automatically flow into the second. A small triangle will then appear in the "In Port" of the second frame, indicating that it is now receiving text from a preceding frame. The Out Port of the first frame will also show a small triangle, confirming its role as the source of the threaded text.
Visualizing Text Threads
While the small triangles in the In and Out Ports provide a subtle indication of threading, it's often beneficial to have a more explicit visual representation. Adobe InDesign offers a feature to "Show Text Threads," which greatly enhances clarity when working with complex threading. To activate this view, navigate to View > Show Text Threads. Once enabled, whenever you select any text frame that is part of a thread, InDesign will display a visible line connecting it to the subsequent frame(s) in the chain. This visual aid is invaluable for understanding the complete flow of your text story and for troubleshooting any unexpected layout issues.
How to Show Text Thread In Adobe InDesign
Populating Threaded Frames with Content
Once your text frames are threaded, you'll want to see how your content fills them. A quick way to populate your frames with sample text is by using InDesign's "Fill with Placeholder Text" command. To do this, select the first text frame in your thread (or any frame within the thread, though starting from the first is common practice) and then go to Type > Fill with Placeholder Text. This command will automatically fill the selected frame and any subsequent threaded frames with generic placeholder text. The amount of text generated will be sufficient to fill the existing frames, and if new frames were added in the threading process, they might remain empty until more text is introduced or the preceding frames are resized.
If you need to re-establish the visual connection of the text threads after filling with placeholder text, simply select any frame within the thread using the Selection tool. The thread lines will reappear, demonstrating the established link.
Creating Extended Text Threads
The process of threading can be extended beyond just two frames. You can create a chain of multiple threaded frames to accommodate extensive amounts of text. To add a third frame to an existing thread, ensure the Selection tool is active. Go to the second frame in your thread and click on its Out Port box. This will again load the cursor, preparing it to link to a new frame. You can then draw this new frame on the current page or even on a different page of your document. This action automatically creates the third frame and links it to the second frame in one seamless step.
It's important to note that if this third frame is newly created and linked, it might initially appear empty. This is because the "Fill with Placeholder Text" command, when applied to a chain, typically fills up to the end of the last existing frame in the thread. To populate this new frame, you can either continue typing manually or adjust the size of the preceding frame(s) to force more text to flow into the newly added frame. Resizing the second frame, for instance, by making it smaller with the Selection tool, will push excess text into the third threaded frame.
Threading in Reverse: A Flexible Approach
A common misconception is that text threading in InDesign only works in a forward direction, from earlier frames to later ones. However, InDesign's threading mechanism is flexible enough to allow for backward linking as well. This is particularly useful when you need to establish a primary text frame that might span multiple columns or is intended to hold a headline, and then thread subsequent content from it.
To thread backwards, select the first frame in an existing thread using the Selection tool. Then, click on its In Port box. This action will load the cursor, ready to link to a preceding frame. You can then draw a new frame that will become the actual first frame in the sequence. This new frame can then be positioned and sized appropriately, and the text from the original "first" frame will now flow into it, effectively reversing the direction of the thread from that point onwards. This capability offers significant control over layout design, especially when dealing with complex typographical requirements.
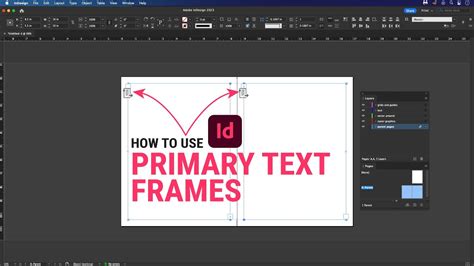
The Master Text Frame: Automation and Efficiency
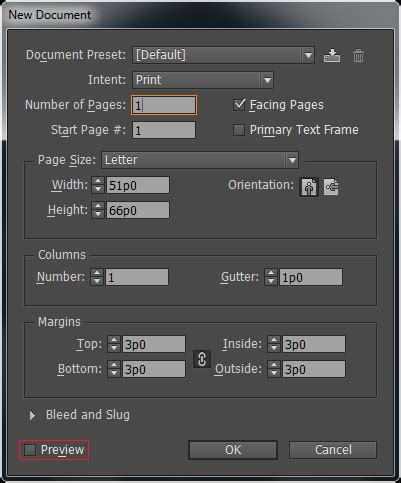
InDesign's Master Pages offer a powerful way to automate the creation and threading of text frames, ensuring consistency across your document. One method to leverage this is by utilizing the "Master Text Frame" option when creating a new document. When you check the Master Text Frame checkbox in the New Document dialog, InDesign automatically generates a single, large text frame on each page of your document. This frame typically spans from margin to margin. While this feature might not be used by all designers, it can be incredibly efficient if your intention is to quickly fill entire pages with text, as it sets up a foundational text container for each page from the outset.
Manually Threaded Text Frames on Master Pages
Beyond the automatic Master Text Frame, you can also manually create and thread text frames directly on your Master Pages. This provides more granular control over the placement and linking of frames that will appear on your document pages. To do this, open the Pages panel by going to Window > Pages. Double-click on the desired Master Page option (e.g., "A-Master"). Within the Master Page spread, you can then use the Type tool to create one or more text frames. If you create multiple frames on the Master Page, you can thread them together using the Selection tool, just as you would on a regular document page. Once you've set up your threaded frames on the Master Page, they will automatically appear on all document pages that utilize that master.
Interacting with Master Page Text Frames
A key characteristic of elements placed on Master Pages is that they are typically locked when viewed on the actual document pages. This is to prevent accidental modifications to your master layout. Consequently, when you want to type into or edit text within frames that have been threaded together on a Master Page, you cannot do so directly by simply clicking on them.
To gain edit access to these master page text frames on your document pages, you need to perform a special keyboard command: Command-Shift-click (on a PC, this is Ctrl-Shift-click) on the specific frame you wish to edit. This action "breaks" the link to the master page for that particular frame, allowing you to interact with it as if it were a standard document page text frame. You can then begin typing or making edits within that frame, and the changes will be reflected across all document pages using that master, subject to the threading.
Placing External Text Files
While typing directly into InDesign or using placeholder text is useful, in real-world projects, you'll often be working with text files created in other applications, such as Microsoft Word. InDesign provides a seamless way to import these external text files into your threaded frames.
To do this, go to File > Place. Navigate to the location of your text file (typically .txt or .rtf formats are well-supported) and click Open. This action will load your text file onto a "loaded cursor," which visually appears as a cursor with your text content attached. You then simply click inside the first text frame where you want the imported text to begin flowing. InDesign will automatically place the text and thread it through any subsequent linked frames as needed, respecting the existing thread structure.
When importing text, it's crucial to consider the potential impact of revisions. Having text threaded can make global edits easier, as changes in one frame can automatically propagate through the entire story. However, in some cases, extensive editing might cause text to flow in unexpected ways, potentially disrupting carefully arranged graphic elements. It's a balancing act, and designers often weigh the benefits of threaded text against the potential complexities of future revisions. Fortunately, if you initially choose not to thread frames but later decide it's necessary, you can always thread them together by clicking the Out Port of one frame and then clicking into the next. Conversely, if you need to unthread frames while retaining the content within each, you can utilize the "Split Story" script, accessible via Windows > Utilities > Scripts.
Advanced Text Flow Management
The ability to manage text flow through threading is a cornerstone of efficient InDesign document creation. It's not just about connecting frames; it's about controlling how your narrative unfolds visually. Consider a scenario where a long article needs to appear across multiple pages. By threading text frames sequentially, you ensure that as you edit or add content, the text automatically reflows, maintaining the integrity of your layout. This dynamic behavior is a significant advantage over static text placement.
The concept of threading also extends to more complex layouts involving multiple columns. You can thread frames across columns on the same page, or thread from the last column of one page to the first column of the next. This meticulous control over text flow is what allows designers to create publications that are both aesthetically pleasing and highly functional.
Considerations for Different Document Types
The application of text threading can vary depending on the type of document being created. For a simple flyer, threading might be minimal, perhaps just linking two frames on a single page. However, for a multi-chapter book or a detailed magazine layout, sophisticated threading across numerous pages and columns becomes essential. Understanding the purpose and intended audience of your document will guide how extensively you employ text threading. For instance, a children's book might have fewer, larger text frames with ample white space, while a technical manual might require dense text blocks threaded across many pages to convey detailed information efficiently.
How to Show Text Thread In Adobe InDesign
Troubleshooting Common Threading Issues
Despite its power, text threading can sometimes present challenges. One common issue is an incomplete thread, where a frame is expected to receive text but remains empty. This often happens if the "Fill with Placeholder Text" command was used before the thread was fully established, or if the preceding frame's content doesn't actually overset. Verifying the thread visually using View > Show Text Threads is the first step in troubleshooting.
Another potential problem arises when accidentally typing into a frame instead of using the Selection tool to initiate threading. As mentioned, using the V shortcut for the Selection tool can inadvertently insert the letter "V" into a text frame if the Type tool is active. Always ensure you have the correct tool selected before attempting to manipulate frame links. If you find yourself in such a situation, simply switch to the Selection tool and correct the frame connection.
Sometimes, the issue might be with the content itself. If a text file contains unusual formatting or hidden characters, it can sometimes interfere with the threading process. Cleaning up the source text before placing it into InDesign can often resolve these types of problems.
The Impact of Threading on Editing and Proofing
Text threading significantly impacts the editing and proofing process. When text is threaded, changes made to the content in one frame automatically update in all subsequent linked frames. This is a major time-saver, as you don't need to manually adjust text flow in each individual frame. For example, if you need to shorten a paragraph, the excess text will automatically be redistributed to the next frame in the thread. Conversely, if you add more text, it will flow forward, potentially creating new overset text that you can then address by adding more frames to the thread or resizing existing ones.
However, this automatic flow can also present challenges during proofing. A small edit might cause a significant amount of text to shift, potentially pushing other elements out of place or creating awkward line breaks. Therefore, it's crucial to proofread thoroughly after making any edits to threaded text. Using InDesign's Story Editor (Edit > Story Editor) can also be beneficial, as it provides a more focused environment for reviewing and editing large blocks of threaded text without the visual distractions of the layout.
Beyond Basic Threading: Advanced Techniques
While the core functionality of text threading is straightforward, InDesign offers advanced ways to manage text flow that go beyond simple sequential linking. For instance, you can create complex threading structures where text flows across multiple columns on a master page and then continues onto document pages. This requires careful planning and a good understanding of how master pages interact with document pages.
Furthermore, scripting in InDesign can automate repetitive threading tasks. For designers working with very large documents or those who frequently create similar layouts, custom scripts can be developed to automatically create and thread text frames based on predefined rules. This level of automation can dramatically speed up the design and production process.
The Future of Text Flow in Design Software
As design software continues to evolve, we can expect further advancements in text flow management. Features that offer more intelligent text wrapping, adaptive layouts that respond dynamically to content changes, and even AI-powered suggestions for optimizing text flow are likely to emerge. However, the fundamental principles of text threading, as implemented in Adobe InDesign, will likely remain a core competency for designers, providing a robust and reliable method for controlling the visual presentation of text in complex documents. Understanding these foundational techniques ensures that designers can adapt to new technologies while maintaining a strong grasp of essential layout principles.