In the realm of digital image editing, Adobe Photoshop offers a vast array of tools designed to refine and enhance photographs. Among these, the Dodge and Burn tools stand out as particularly powerful, allowing for precise control over the tonal qualities of an image. These tools, rooted in traditional darkroom techniques, enable editors to selectively lighten (dodge) or darken (burn) specific areas, thereby sculpting light and shadow to create depth, dimension, and visual interest. While their direct application can be destructive to pixel data, understanding their purpose and employing non-destructive workflows unlocks their immense potential for both amateur and professional users.
Understanding the Core Functionality: Dodge and Burn Explained
The fundamental purpose of the Dodge and Burn tools in Photoshop is to alter the brightness of selected areas within an image. This selective adjustment is crucial for enhancing visual appeal, guiding the viewer's eye, and adding a sense of realism or artistic flair.
The Dodge Tool is used to lighten specific areas of an image. Its name originates from traditional darkroom practices where photographers would "dodge" light, essentially holding it back from reaching certain parts of the photographic paper during exposure. This limited exposure resulted in those areas appearing lighter in the final print. In Photoshop, the Dodge Tool replicates this by increasing the brightness of the pixels you paint over.
Conversely, the Burn Tool is used to darken specific areas. This is analogous to the darkroom technique of "burning," where photographers would expose certain areas of the photographic paper to more light, leading to darker tones in the final image. The Burn Tool in Photoshop achieves this by decreasing the brightness of the painted pixels.
These tools are invaluable for a multitude of editing tasks, including:
- Portrait Retouching: Softening harsh shadows on faces, subtly highlighting facial features, or reducing the appearance of blemishes by selectively lightening or darkening.
- Landscape Editing: Enhancing the drama of a sunset by darkening the sky, bringing out details in shadowed valleys, or adding luminous highlights to water or foliage.
- Product Photography: Creating a sense of three-dimensionality by accentuating contours and forms through precise shadow and highlight placement.
- Black and White Conversion: Adding richness and contrast to monochromatic images that might otherwise appear flat or lacking in depth.
The Historical Roots: From Darkroom to Digital
The concepts of dodging and burning are not new to the digital age. They are techniques that have been fundamental to photographic image creation since the early days of film photography. In the traditional darkroom, photographers would meticulously control the exposure of specific regions of a print by physically blocking or allowing light to reach the photographic paper.
For dodging, an object (like a piece of card or even a hand) would be held between the enlarger's light source and the paper. By moving this object, the photographer could selectively shield areas, preventing them from receiving full exposure and thus resulting in lighter tones in the final print. This allowed for bringing out detail in highlights or preventing shadows from becoming too dark.
Burning involved the opposite: increasing the exposure of specific areas. This was often done by using a small aperture or even a hole in a piece of card to direct more light onto a particular part of the print. This technique was used to deepen shadows, add contrast, or emphasize certain elements by making them darker.
The Photoshop Dodge and Burn tools are digital emulations of these analog processes, offering a far more accessible and controllable way to achieve similar results. They allow editors to replicate the subtle nuances of light and shadow that were once only achievable through hours of darkroom work.
What is dodging and burning in Photography?
Practical Application: Using the Dodge and Burn Tools in Photoshop
To effectively utilize the Dodge and Burn tools, understanding their settings and how they interact with your image is key.
Locating the Tools
The Dodge and Burn tools are typically found grouped together in the Photoshop toolbar, often alongside the Sponge Tool (which is used for adjusting color saturation). The keyboard shortcut to access them is 'O'. You might need to click and hold on the icon to reveal the Burn and Sponge tools if they are not immediately visible, depending on which tool was used last.
Key Settings and Options
When either the Dodge or Burn tool is selected, a context-sensitive Options Bar appears at the top of the Photoshop interface, offering several crucial settings:
- Brush Settings (Size and Hardness): Like other brush-based tools, you can adjust the size of the brush tip to affect larger or smaller areas. The hardness of the brush determines the softness or sharpness of the transition between the adjusted area and its surroundings. Softer brushes are generally preferred for natural-looking edits, especially when working with subtle tonal transitions.
- Range: This is a critical setting that dictates which tonal values the tool will affect. The options are:
- Shadows: Affects the darkest areas of the image.
- Midtones: Affects the middle range of brightness.
- Highlights: Affects the brightest areas of the image.Choosing the appropriate range ensures that your adjustments are applied precisely where intended, preventing unintended over- or under-exposure in other tonal areas.
- Exposure: This slider controls the strength of the effect applied with each brush stroke. A lower exposure setting (e.g., 3-5%) allows for gradual, subtle adjustments, which is highly recommended for maintaining control and avoiding harsh, unnatural changes. Higher exposure values result in more dramatic and immediate lightening or darkening.
- Protect Tones: When this checkbox is enabled, it helps to preserve the saturation of the image in the areas where you are applying Dodge or Burn. Without it, darkening an area might also increase its saturation, and lightening might decrease it. "Protect Tones" aims to isolate the brightness adjustment.
- Airbrush Effect: Toggling this icon on simulates an airbrush, meaning the effect builds up gradually on an area as you paint over it, stopping only when the Exposure value is reached. This can aid in blending but is often not necessary with careful, low-exposure brushing.
Workflow Recommendations for Effective Use
To maximize the benefits of the Dodge and Burn tools while minimizing the risk of damaging your original image, several best practices should be followed:
Non-Destructive Editing: The most significant drawback of the direct Dodge and Burn tools is that they are "destructive," meaning they directly alter the pixel data of the layer they are applied to. If you make a mistake or later decide to change the edit, you cannot easily revert the changes without losing the original pixel information. Therefore, working non-destructively is paramount.
- Duplicate Layer: Always start by duplicating your background layer or creating a "Stamp Layer" (Shift + Ctrl + Alt + E on Windows, Shift + Option + Command + E on Mac) which captures a composite of all visible layers.
- Dedicated Dodge & Burn Layer: A highly effective method is to create a new, empty layer above your image layers. Set this layer's Blend Mode to Overlay. Then, fill this new layer with 50% gray (Edit > Fill > Content: 50% Gray). When this layer is set to Overlay, the 50% gray is neutral and invisible, but painting with white on this layer will lighten the image below, and painting with black will darken it. This allows for complete control and easy modification or deletion of the Dodge and Burn effects.
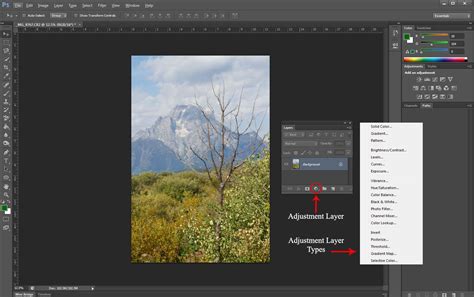
- Adjustment Layers: While not directly using the Dodge and Burn tools, creating Curves or Levels adjustment layers and then masking them to selectively affect specific areas can achieve similar results with full non-destructive editing capabilities.
Start with Low Exposure: It is far better to build up an effect gradually with multiple passes of a low exposure setting (e.g., 5-10%) than to apply a strong effect all at once. This provides greater control and allows for more nuanced adjustments.
Zoom In for Precision: For detailed work, especially on portraits or intricate areas, zoom into your image to ensure you are painting precisely where you intend to.
Use a Soft Brush: Generally, a soft-edged brush will create smoother transitions and more natural-looking results, especially when working with shadows and highlights.
Plan Your Edits: Before you begin, consider what you want to achieve. Think about how light and shadow naturally fall on your subject. Sketching out your intended dodge and burn areas on a separate layer or even a piece of paper can be helpful in visualizing the final effect and directing the viewer's attention. For instance, darkening the edges of a frame can draw the viewer's eye towards the center of interest.
Checking for Over-Editing
One of the challenges with Dodge and Burn is the ease with which an image can be over-edited, leading to blown-out highlights (pure white) or crushed shadows (pure black), resulting in a loss of detail. A useful technique to check for this is to use a Threshold adjustment layer.
- Add a new Threshold adjustment layer (Layer > New Adjustment Layer > Threshold).
- Observe the black and white representation of your image.
- Use the slider in the Properties panel. Moving the slider to the left will reveal more dark pixels, and moving it to the right will reveal more light pixels.
- Check areas around the values 8 (for darks) and 249 (for lights). If large areas of your image become solid black or white at these settings, it indicates that detail has been lost in those regions due to excessive burning or dodging.
- Once you've checked, you can hide the Threshold layer by clicking its eye icon.
Advanced Techniques and Considerations
Beyond the basic application, advanced users can leverage Dodge and Burn for sophisticated image manipulation:
- Creating Depth and Form: By carefully darkening areas that would naturally be in shadow and lightening those that would catch light, you can sculpt the form of a subject, making it appear more three-dimensional. This is particularly effective in portraiture and still life.
- Directing the Viewer's Gaze: Our eyes are naturally drawn to lighter areas and areas of contrast. By selectively lightening or darkening specific elements, you can guide the viewer's attention to the most important parts of your image.
- Enhancing Texture: Subtle applications of Dodge and Burn can emphasize the texture of surfaces, whether it's the rough bark of a tree, the weave of fabric, or the contours of a face.
- Alternatives to Direct Tools: As mentioned, using a 50% gray layer with the Overlay blend mode is a highly recommended non-destructive alternative. Other methods include using the Brush Tool with a low opacity and Flow on a new layer, or employing the localized adjustments available within Curves and Levels adjustment layers via layer masks.
The Importance of Balance
While the Dodge and Burn tools offer immense power, their effective use lies in subtlety and balance. Overuse can lead to an unnatural, plastic-like appearance, diminishing the photograph's impact. The goal is often to enhance, not to create artificial effects, unless that is the explicit artistic intention. By understanding the tools' origins, mastering their settings, and employing non-destructive workflows, photographers and designers can harness the power of light and shadow to transform their images.
In essence, the Dodge tool allows you to selectively lighten areas, bringing out details in shadows and adding luminosity to highlights. The Burn tool works in opposition, darkening areas to deepen shadows, add contrast, and create a sense of depth. Together, they provide a granular level of control over the tonal range of an image, enabling editors to refine and perfect their compositions with artistic precision.