Photoshop's Pen Tool, though initially perceived as intimidating, stands as a cornerstone of precise image manipulation. It empowers users to create custom shapes, meticulously isolate objects, and achieve professional-grade results that even advanced automated selection tools can struggle to match. While modern Photoshop versions offer sophisticated AI-driven selection features like the Object Selection Tool, the Pen Tool remains unparalleled for its ability to deliver perfectly crisp and accurate edges, especially when dealing with subjects that have hard lines. This article delves into the intricacies of using the Pen Tool, from its fundamental operations to advanced techniques, ensuring users of all skill levels can harness its full potential.
Understanding the Pen Tool's Core Functionality: Paths and Anchor Points
At its heart, the Pen Tool in Photoshop functions by creating vector paths. Unlike pixel-based tools that directly draw on the image, the Pen Tool constructs a series of anchor points and the lines or curves connecting them. These paths are not immediately visible as part of your image layer; instead, they are stored separately, accessible through the Paths Panel. This vector nature means that paths can be scaled and manipulated without any loss of quality, retaining sharp edges regardless of the size.
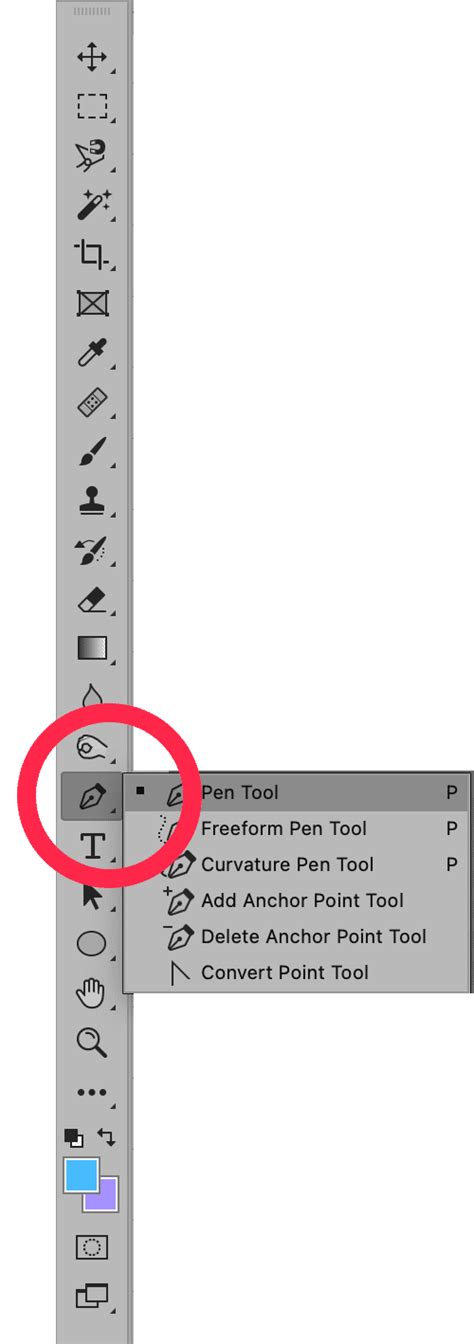
To begin, select the Pen Tool from the toolbar, or simply press the 'P' key on your keyboard. The fundamental action involves clicking on your image to establish an anchor point. Subsequent clicks create additional anchor points, forming straight line segments between them. To close a path, hover over the initial anchor point until a small circle appears next to the Pen Tool icon, then click.

When working with curves, the process involves clicking and dragging the mouse before releasing it. This action generates "handles" that extend from the anchor point. These handles are tangential to the curve being formed, and their manipulation directly influences the curvature of the path. The direction and length of these handles dictate the flow of the curve.
Navigating the Paths Panel: Managing Your Creations
The Paths Panel is your central hub for managing all paths created within your Photoshop document. If you don't see it readily available, you can access it by navigating to Window > Paths. When you start drawing with the Pen Tool, a "Work Path" will automatically appear in this panel. To retain your path for future use, it's crucial to save it. Double-clicking on "Work Path" allows you to rename and save it, preventing it from being overwritten by subsequent path creations.
Paths stored in the Paths Panel can be transformed into selections, modified, and reused. To convert a path into an active selection on your layers, you can either right-click on the path in the Paths Panel and choose "Make Selection," or hold down the CMD (or Ctrl on Windows) key and click on the path's thumbnail. This action will activate a marching ants outline around your path on the canvas, indicating an active selection.
Essential Pen Tool Settings and Shortcuts for Enhanced Workflow
Photoshop's Pen Tool offers several settings that can significantly improve your workflow and precision. Within the Pen Tool's options, accessible via a cogwheel icon, you can customize the outline color of your path. This is particularly helpful if the default color clashes with the image's dominant hues.
The "rubber band" option provides a visual preview of the next path segment before you commit to placing an anchor point. When enabled, you see a ghosted line extending from your cursor, showing where the next segment will go after you release the mouse button. This offers a dynamic preview and aids in visualizing the path's flow.
Another useful setting is the cursor type. You can switch from the standard Pen Tool icon to a "precise" cursor, which appears as a subtle crosshair. This can be less obstructive and provide a clearer view of your anchor points.
Mastering keyboard shortcuts can dramatically speed up your work with the Pen Tool:
- Dragging Anchor Point: While creating or editing a path, hold down the
Spacebarto reposition an anchor point without altering its handles. - Creating Independent Curves: When drawing curves, handles are typically symmetrical. To create a sharp transition or a completely different curve from an existing point, hold down
Alt(orOptionon Mac) and click on the anchor point. This breaks the symmetry, allowing you to manipulate each handle independently. - Refining Handle Points: Holding
Cmd(orCtrlon Windows) and dragging a handle point allows for precise adjustments to curves. - Swapping Between Smooth and Corner Points: To convert a smooth anchor point into a sharp corner, or vice versa, hold down
Alt(orOptionon Mac) and click on the anchor point. - Starting a New Path: Holding
Cmd(orCtrlon Windows) and clicking on the canvas without releasing the mouse button allows you to start a new path. These separate paths can later be combined into a single, more complex path.
Beyond the Standard Pen Tool: Curvature and Freeform Options
While the standard Pen Tool offers unparalleled control, Photoshop also provides the Curvature Tool and the Freeform Pen Tool, which cater to different drawing styles and needs.
The Curvature Tool is designed to automatically create smooth curves between anchor points. This is ideal for subjects with very few straight lines. You simply click to place points, and the tool intelligently generates the curves. If you need to refine the curves, you can hold Cmd (or Ctrl on Windows) and move the anchor points. Double-clicking an existing anchor point with the Curvature Tool will convert it into a sharp corner, and another double-click will revert it to a curve.
The Freeform Pen Tool allows you to draw paths as if you were using a pen or pencil on paper. Anchor points are automatically generated as you drag the cursor. This tool is useful for quick, organic selections, though it generally requires more refinement than the standard Pen Tool.
Advanced Techniques: Vector Masks, Combining Paths, and Refining Selections
The true power of the Pen Tool is amplified when combined with vector masks and other Photoshop features.
Creating Vector Masks
A vector mask, created using a Pen Tool path, offers a non-destructive way to isolate objects. After you've drawn your path, you can create a vector mask by holding Cmd (or Ctrl on Windows) and clicking the "Add vector mask" icon in the Layers Panel. This action directly converts your path into a mask. The advantage here is that you can easily refine the mask later by selecting the path and using tools like the Direct Selection Tool to adjust its points and curves.
Modifying Existing Paths
Once a path is created, it's not set in stone. The Direct Selection Tool (a white arrow) is crucial for fine-tuning. Clicking on a path segment with this tool reveals its anchor points and handles. You can then drag these points to reposition them or adjust the handles to alter the curve's shape. Multiple anchor points can be selected simultaneously and moved using the arrow keys for precise alignment.
To add more detail or correct an imprecise area, the Add Anchor Point Tool allows you to click on a path segment to insert a new anchor point. Conversely, the Delete Anchor Point Tool lets you remove existing anchor points. The Convert Point Tool is invaluable for smoothly transitioning between straight lines and curves by manipulating the handles of an anchor point.
Master The Pen Tool In Under 30 Minutes - Photoshop Tutorial
Combining Multiple Paths
For complex objects with internal shapes or "holes" (like the hollow of a handle or the eyelet of a shoe), you can combine multiple paths into a single vector mask. After creating the initial outline path, select the Pen Tool, and in the options bar, choose "Subtract Front Shape" from the "Path Operations" dropdown. Then, draw additional paths for the areas you wish to exclude. These paths will be incorporated into the mask, creating the desired cut-out effect.
Refining Selections with Color and Blend Modes
When refining edges, especially to avoid an overly "cut-out" look, you can create a clipping mask and sample a color from the area near where you want to refine. By changing the blend mode of this new layer to "Color," you can adjust the color without affecting the texture of the original object, providing a more natural integration.
Practical Applications: From Product Shots to Complex Compositions
The Pen Tool's applications extend far beyond simple background removal. It's indispensable for:
- Product Photography: Precisely isolating products from busy backgrounds for e-commerce listings.
- Retouching: Creating clean selections for color correction, compositing, or special effects on specific areas of an image.
- Graphic Design: Drawing custom shapes and vector elements for logos, icons, and illustrations.
- Web Design: Creating precise selections for slicing images for web use.
The ability to create custom shapes and paths means you can then use these to add shading on specific details, draw intricate lines, or even generate complex patterns. The non-destructive nature of working with paths and masks ensures that your original image data remains intact, allowing for endless revisions and experimentation.
While automated tools have their place, the Pen Tool, with its inherent precision and the control it offers over every curve and line, remains a fundamental skill for any serious Photoshop user. The initial learning curve is a worthwhile investment for the power and accuracy it unlocks, transforming how you approach image selection and manipulation.