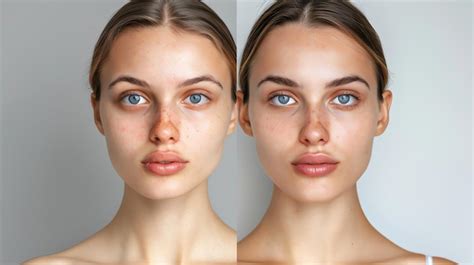
Photo retouching is an essential post-production process that significantly enhances the visual appeal of images. It involves refining photographs to eliminate imperfections, smooth skin textures, and adjust subtle details, ultimately presenting a polished and professional final product. In today's digital age, where billions of photos are captured daily, the ability to make images stand out is paramount. Highly retouched images are more likely to capture attention and leave a lasting impression. This tutorial delves into the fundamental techniques of face retouching within Adobe Photoshop, a leading software in image manipulation, aiming to equip users with the skills to achieve professional-looking results.
Understanding the Importance of Subtle Adjustments
A crucial principle in photo retouching is the art of subtlety. While the goal is to enhance an image, over-editing can lead to an artificial and unrealistic appearance. The most impactful results are often achieved through minor, carefully considered changes. This approach ensures that the subject's natural features are preserved while imperfections are discreetly addressed. The amount of retouching applied should also be dictated by the intended use of the image; a photograph for a magazine cover might undergo more extensive refinement than a personal portrait shared online. Professional skin retouching in Photoshop, when done with a light touch, helps photography draw attention by bringing in minor changes that avoid distractions such as flyaway hair, wrinkles, and blemishes, contributing to a more captivating image.
Step 1: Setting Up Your Document for Retouching
The initial phase of any retouching project involves preparing your workspace correctly. This ensures a non-destructive workflow, allowing for flexibility and easy correction of any mistakes.
- Launch Photoshop: Begin by opening Adobe Photoshop on your computer.
- Open Your Image: Navigate to
File > Openand select the photograph you intend to retouch. ClickOpento load it into the workspace. - Duplicate the Background Layer: To preserve the original image, it's vital to work on a duplicate layer. In the Layers panel, right-click on the "Background" layer and choose
Duplicate Layer. Rename this new layer to "Retouch" and clickOK. This ensures that all subsequent edits are applied to a separate layer, leaving the original untouched.
Step 2: Removing Blemishes and Imperfections
Blemishes, such as pimples, acne, or minor skin irregularities, can detract from the overall quality of a portrait. Photoshop offers several tools to effectively remove these distractions while maintaining a natural skin texture.
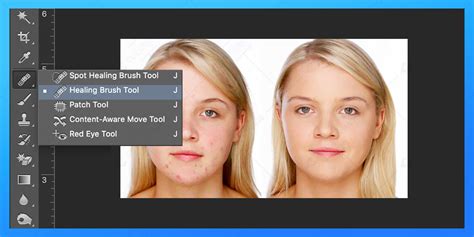
- Select the Spot Healing Brush Tool: From the Photoshop toolbar, select the
Spot Healing Brush Tool(keyboard shortcutJ). In the options bar at the top of the screen, ensure that theTypeis set toContent-Aware. This setting allows Photoshop to intelligently analyze the surrounding pixels and seamlessly blend the repaired area. - Remove Blemishes: Position your cursor over a blemish. Adjust the brush size by using the square bracket keys (
[and]) so that it is slightly larger than the imperfection you wish to remove. Click once on the blemish. Photoshop will automatically sample the surrounding skin and replace the blemish with a smoothed, natural-looking texture. For optimal results, when removing blemishes, keep the process natural, targeting issues like pimples, acne, or other minor skin concerns. - Alternative: Using the Healing Brush Tool: For more control, the
Healing Brush Toolcan be used. First, hold down theAltkey (orOptionkey on a Mac) to create a source sample from a clean area of skin near the blemish. Then, click on the blemish to heal it. This method allows you to explicitly choose the area from which Photoshop will sample pixels for the repair.
Step 3: Smoothing Skin for a Natural Look
Achieving smooth skin without losing its natural texture is a delicate balance. The frequency separation technique is a powerful method for this, allowing for independent editing of skin tone and texture.
- Create a New Layer for Smoothing: Click the
New Layerbutton at the bottom of the Layers panel and name it "Smooth Skin". - Convert to Smart Object: Right-click on the "Smooth Skin" layer and select
Convert to Smart Object. This allows for non-destructive application of filters. - Change Blending Mode: Change the blending mode of the "Smooth Skin" layer from
NormaltoVivid Light. - Invert the Layer: Go to the
Imagemenu, thenAdjustments, and selectInvert. This will make the layer appear dark. - Apply High Pass Filter: Navigate to
Filter > Other > High Pass. Adjust theRadiusslider until the underlying skin texture and details become subtly visible but not overly pronounced. The goal is to isolate the texture. ClickOK. - Apply Gaussian Blur: Go to
Filter > Blur > Gaussian Blur. Adjust theRadiusto a value that softens the skin tones and blurs out minor imperfections without completely obliterating the texture. A good starting point might be a radius of around 10 pixels, but this will vary depending on the image resolution and desired effect. ClickOK. - Add a Layer Mask: With the "Smooth Skin" layer still selected, click the
Add Layer Maskbutton at the bottom of the Layers panel. - Invert the Layer Mask: Press
Ctrl + I(orCmd + Ion a Mac) to invert the layer mask. This will hide the smoothing effect, making the layer appear dark again. - Select the Brush Tool: Choose the
Brush Tool(keyboard shortcutB) from the toolbar. Ensure you are using a soft-round brush. Set theOpacityto around 100% and theFlowto around 100%. - Paint Over the Skin: Make sure the layer mask thumbnail is selected in the Layers panel. Using a white brush, carefully paint over the areas of the skin that you want to smooth. Avoid painting over crucial details like eyes, eyebrows, lips, and hair, as this can make them appear unnaturally soft. The white brush reveals the smoothing effect applied by the "Smooth Skin" layer. If you over-smooth an area, switch to a black brush to hide the effect.
Modern Frequency Separation: So Much Easier! - Photoshop
Step 4: Enhancing Facial Features and Final Touches
Once the basic retouching and skin smoothing are complete, attention can be turned to enhancing specific facial features and applying final adjustments to bring the portrait to its full potential.
- Sharpening the Image: To bring back some of the definition that might have been lost during the smoothing process, a sharpening step is beneficial.
- Create a Stamp Visible Layer: Press
Ctrl + Alt + Shift + E(orCmd + Option + Shift + Eon a Mac) to create a merged copy of all visible layers. Name this new layer "Sharpen". - Convert to Smart Object: Right-click on the "Sharpen" layer and select
Convert to Smart Object. - Apply Camera Raw Filter: Right-click on the "Sharpen" layer and select
Convert to Smart Object. Then, go toFilter > Camera Raw Filter. Within the Camera Raw Filter, navigate to theDetailtab and adjust theSharpeningslider to enhance fine details like eyes and hair. Be cautious not to over-sharpen, which can result in a grainy or artificial look. ClickOK.
- Create a Stamp Visible Layer: Press
- Dodging and Burning for Dimension: The
Dodge Tool(to lighten areas) andBurn Tool(to darken areas) are classic techniques used to add depth and dimension to a face. They can be used to subtly enhance cheekbones, define the jawline, or add highlights to the brow bone and under the eyes.- Create two new layers. Set the blending mode of the first layer to
Soft Lightand name it "Dodge". Set the blending mode of the second layer toSoft Lightand name it "Burn". - Select the
Brush Tool(B), set the color to white for the Dodge layer and black for the Burn layer. Set the brush opacity to a low percentage (e.g., 10-20%). - On the "Dodge" layer, paint with white on areas you want to lighten, such as the tops of cheekbones or the bridge of the nose. On the "Burn" layer, paint with black on areas you want to darken, like under the cheekbones or along the jawline. This technique, when applied subtly, can significantly improve the three-dimensionality of the portrait.
- Create two new layers. Set the blending mode of the first layer to
- Color Adjustments: Minor color adjustments can greatly improve the overall feel of the image.
- Hue/Saturation: Use a
Hue/Saturationadjustment layer to subtly boost or adjust colors. For instance, you might slightly increase the saturation of the skin tones or adjust the hue of certain colors to make them more pleasing. - Color Balance: A
Color Balanceadjustment layer can be used to fine-tune the color cast of the image, ensuring that skin tones appear natural and healthy.
- Hue/Saturation: Use a
- Eye Enhancement: Eyes are often the focal point of a portrait.
- Brightening the Whites: Use the
Dodge Toolon a low exposure setting to subtly brighten the whites of the eyes, making them appear more alert. - Enhancing the Iris: Select the iris and use a
CurvesorLevelsadjustment layer to slightly increase contrast or brightness. A subtle sharpening layer applied only to the iris can also make them pop. - Adding Eyeliner/Lashes: For more dramatic effects or to correct uneven makeup, you can create a new layer, set it to
Soft LightorMultiply, and use a fine brush to paint in subtle eyeliner or enhance eyelashes. Always clean up with the eraser tool to maintain a natural look.
- Brightening the Whites: Use the
Advanced Techniques and Considerations
While the above steps cover the core of basic face retouching, several advanced techniques can elevate your work further.
- Frequency Separation: As demonstrated in Step 3, this technique is fundamental for professional skin retouching. It separates the image into layers representing color (low frequency) and texture (high frequency), allowing for independent editing. This is crucial for smoothing skin while preserving its natural texture.
- Liquify Tool: The
Liquifyfilter (Filter > Liquify) is powerful for subtle reshaping of facial features. It can be used to slightly slim a face, adjust the jawline, or refine the shape of the nose. However, extreme use of Liquify can quickly lead to unnatural results. - Localized Curve Layers: Applying
Curvesadjustment layers to specific areas of the image (often masked) can provide precise control over luminosity and contrast, helping to sculpt the face and enhance features. - Working with Low-Resolution Images: It's important to note that retouching low-resolution images can be challenging. These images often lack sufficient detail, leading to blurry or pixelated results when significant adjustments are made. Ideally, retouching should be performed on high-resolution files.
- Photoshop for Mobile: For quick edits on the go, Adobe Photoshop offers mobile applications for iPhone and iPad. These apps provide access to tools like the
Spot Healing tool, allowing for basic blemish removal even when away from a desktop computer.
Lightroom vs. Photoshop for Retouching
While Photoshop is the industry standard for in-depth retouching, Adobe Lightroom offers a complementary and often more efficient workflow for initial adjustments. Lightroom excels at non-destructive editing, managing large photo libraries, and applying basic enhancements like exposure, contrast, color balance, and basic skin tone adjustments. It's particularly useful for batch editing, allowing you to apply consistent settings across multiple photos shot under similar conditions. Photoshop, on the other hand, provides granular control for advanced retouching tasks, compositing, and detailed manipulation that Lightroom cannot match. Many professionals use Lightroom for initial global adjustments and then export images to Photoshop for detailed retouching.

By mastering these techniques, you can transform ordinary photographs into extraordinary portraits, ensuring your images capture attention and convey a polished, professional aesthetic. Remember that consistent practice and an understanding of subtle adjustments are key to achieving natural-looking and impactful results in Photoshop face retouching.
tags: #photoshop #face #retouching