DaVinci Resolve stands as a titan in the realm of color grading software, offering filmmakers unparalleled control over their visual narratives. While many users are accustomed to working within the familiar RGB color space, which provides granular adjustments across red, green, and blue channels, a powerful yet often underutilized tool lies within: the HSL (Hue, Saturation, Luminance) color model. This tutorial will demystify the HSL qualifier and curves in DaVinci Resolve, demonstrating how to leverage them for sophisticated secondary corrections, from subtle skin tone enhancements to dramatic color transformations, ensuring your footage achieves a polished and professional look.
Understanding the HSL Color Model
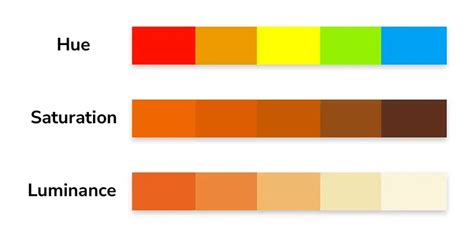
At its core, HSL represents colors through three primary components: Hue, Saturation, and Luminance. Unlike RGB, which describes color by the intensity of red, green, and blue light, HSL offers a more intuitive way to think about color characteristics.
- Hue: This refers to the pure color itself - the difference between red, orange, yellow, green, blue, and violet. It's essentially the position on the color wheel.
- Saturation: This describes the intensity or purity of a color. A highly saturated color is vivid and pure, while a desaturated color appears more muted and closer to grayscale.
- Luminance (or Lightness): This component determines how bright or dark a color is, ranging from pure black to pure white.
In DaVinci Resolve, when you select the HSL color space for a node, you are essentially remapping the controls. The familiar R, G, and B channels are repurposed: R now controls Hue, G controls Saturation, and B controls Luminance. This shift allows for a different approach to color manipulation, enabling precise adjustments based on these color attributes.
The HSL Qualifier: Precision Secondary Color Grading
The HSL qualifier is a cornerstone of secondary color grading in DaVinci Resolve. It acts as a highly precise filter, allowing you to isolate specific colors or ranges of colors within your image for targeted adjustments. This is particularly invaluable for beginners who often struggle with making localized changes without affecting the entire image.
Isolating Colors with the HSL Qualifier
The fundamental principle behind the HSL qualifier is its ability to "key out" or select a color based on its Hue, Saturation, and Luminance values. This means you can pinpoint a specific shade of blue in the sky, a particular skin tone, or even a product color, and then apply adjustments solely to that selected area.
Here's a breakdown of how to use the HSL qualifier:
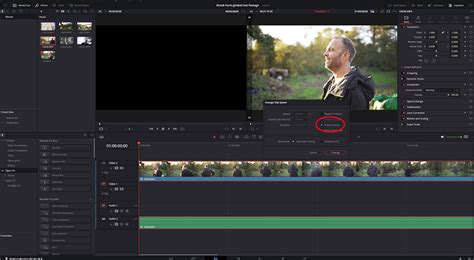
- Add a New Node: Navigate to the Color page in DaVinci Resolve. In the Nodes panel, add a new serial node by pressing
Alt + S(orOption + Son a Mac). This ensures your HSL adjustments are non-destructive and can be easily managed. - Access the Qualifier Panel: Locate the Qualifier panel, typically found below the node editor.
- Sample Your Target Color: Within the Qualifier panel, you'll find a "Picker" tool. Use this tool to click on the specific color or area in your image that you wish to isolate. For instance, if you're correcting skin tones, sample a healthy mid-tone area on the cheek or forehead.
- Refine the Selection: After sampling, you'll see the selection represented graphically. Now, use the Hue, Saturation, and Luminance sliders to fine-tune the range of your selection.
- Hue Slider: Adjust this to capture the desired color range, ensuring you're not inadvertently selecting similar colors in the background (e.g., yellow objects if you're selecting skin).
- Saturation Slider: This helps to narrow down the selection by dropping colors with similar saturation levels.
- Luminance Slider: Use this to exclude very bright or very dark areas, focusing your selection on the mid-tones.
- Soften the Edges: To avoid a harsh, "cut-out" look, it's crucial to soften the edges of your mask. Increase the "Blur Radius" slider. A good starting point is often between 1 and 3, but this will vary depending on the shot.
- Apply Adjustments: With your selection precisely defined, you can now apply any color grading adjustments (exposure, contrast, color balance, etc.) to the isolated area. These changes will only affect the keyed-out region, leaving the rest of the image untouched.
Common Applications of the HSL Qualifier
- Skin Tone Correction: One of the most frequent uses of the HSL qualifier is to correct problematic skin tones. Mixed lighting conditions (warm and cool lights, color reflections) can often render skin looking yellow, gray, or flat. By keying out the skin tones, you can precisely adjust their hue, saturation, and luminance to achieve a more natural and appealing look. Remember to sample mid-tones and avoid extreme highlights or shadows for the most accurate results.
- Color Swapping: The HSL qualifier is exceptionally effective for changing the color of specific objects. Whether you need to turn a blue sky into a pink sunset, make green leaves appear yellow, or recolor a product for branding purposes, the qualifier allows for clean and precise color swaps. After isolating the target color, you can then use the Color Wheels to adjust the new color's saturation and luminance to seamlessly integrate it into the shot.
- Subject Isolation: To make a subject "pop" from its background, you can use the HSL qualifier to isolate the subject and then subtly adjust its brightness, saturation, or even apply a slight color shift. Conversely, you might key the background and slightly desaturate or darken it to draw more attention to the foreground.
Pitfalls to Avoid with the HSL Qualifier
- Global Changes: The HSL qualifier is a tool for local, isolated edits, not for global adjustments. Attempting to make broad changes with it will likely lead to undesirable results and a loss of control.
- Insufficient Mask Refinement: Many beginners jump straight into grading after sampling a color, neglecting to tighten the mask using the Hue, Saturation, and Luminance sliders. This often results in unwanted colors being affected. Always take the time to refine your selection and remove stray colors.
- Overdoing Softness: While softening edges is important, setting the blur radius too high can cause the mask to "grow" and pull in background areas, compromising the isolation. Aim for a subtle blend.
- Excessive Adjustments: Just because you can make drastic changes doesn't mean you should. Overly brightened subjects, extreme color shifts, or heavily desaturated backgrounds can look artificial and detract from the overall quality of the footage. Subtlety is often key.
Perfect Skin Tones EVERY TIME in DaVinci Resolve 17 | Quick & Easy Tutorial
HSL Curves: Fine-Tuning Color with Precision
Beyond the HSL qualifier, DaVinci Resolve also offers HSL Curves, a powerful tool for making even more nuanced color adjustments. These curves provide a graphical representation of the relationship between different color components, allowing for highly specific manipulations.
Working with HSL Curves
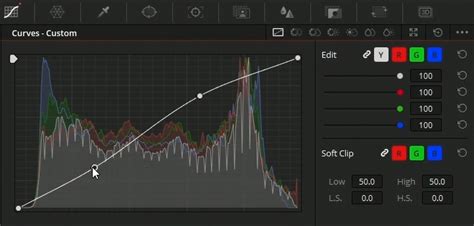
The HSL Curves panel, accessible within the Curves section of the Color page, presents several curve types, each offering a unique way to manipulate color:
- Hue vs. Saturation: This curve allows you to adjust the saturation of specific hues. For instance, if you have unwanted green reflections under an airplane's wings, you can select the green range on the horizontal axis and then decrease its saturation by pulling down the corresponding point on the vertical axis. This reduces the intensity of the green without affecting other colors.
- Hue vs. Luminance: This curve lets you adjust the brightness of specific hues. You could, for example, brighten a specific shade of red in a dress or darken a particular blue in a logo.
- Saturation vs. Hue: This curve allows you to see how saturation changes across different hues. It's less commonly used for direct manipulation but can be helpful for analysis.
- Luminance vs. Hue: Similar to Saturation vs. Hue, this curve visualizes how luminance varies with hue.
- Saturation vs. Luminance: This curve shows how saturation changes based on brightness levels.
- Luminance vs. Saturation: This curve visualizes how luminance changes with saturation.
Advanced Techniques with HSL Curves
While the HSL qualifier is excellent for isolating broad color ranges, HSL curves offer a way to create more complex and sophisticated adjustments. For example, you might want to desaturate a specific hue only in the mid-tones, leaving the highlights and shadows of that color unaffected. This level of control is where HSL curves truly shine.
When working with HSL curves, remember that the horizontal axis represents the input value (e.g., Hue, Saturation, Luminance), and the vertical axis represents the output value (e.g., Saturation, Luminance, Hue). By plotting points on these curves and manipulating them, you can achieve precise color transformations that would be difficult or impossible with other tools.
HSL vs. HSV: A Subtle but Important Distinction
DaVinci Resolve also offers the HSV (Hue, Saturation, Value) color space. While HSL uses Luminance (Lightness), HSV uses Value, which is closely related to brightness but can behave slightly differently. For colorists, the key takeaway is that switching to HSV can sometimes help in achieving more independent control over saturation and brightness.
For instance, increasing saturation in HSV might be less likely to inadvertently alter the perceived brightness of a color compared to HSL, depending on the specific implementation and the nature of the color itself. This can be particularly useful when trying to boost the vibrancy of an image without making it appear blown out.
However, it's important to be aware that transitioning between color models, including RGB to HSL or HSV, can sometimes lead to unexpected results. For example, transforming certain hues to others, like a bright blue to yellow, might not always yield the desired smooth transition, and can sometimes result in a loss of detail or saturation. This is an area where understanding the underlying color science and practicing with these different models becomes crucial.
Beyond the Basics: Color Space Transformations
The choice of color space in DaVinci Resolve isn't merely an academic exercise; it has practical implications for how your adjustments behave. While most users work in RGB, understanding that tools are sometimes designed around HSL or other models is important.
The software performs mathematical transformations "under the hood" as images are moved and manipulated between different color spaces, such as from the Y'CbCr used in video files to the RGB of your monitor. When Resolve's tools are designed around the HSL model, these transformations can influence how hues transition and how saturation and luminance are affected.
This is why, for instance, changing a bright blue to yellow might produce disappointing results. The inherent mathematical relationships within the color models can lead to these limitations. Being aware of these transformations helps you anticipate potential issues and employ workarounds, such as using multiple nodes or different keying techniques, to achieve your desired outcome.
Conclusion: Embracing HSL for Enhanced Grading
The HSL qualifier and HSL curves in DaVinci Resolve are not just advanced features; they are essential tools for any colorist looking to elevate their work. They provide a level of precision that allows for targeted corrections and creative manipulations that are simply not possible with basic RGB adjustments.
Whether you're refining skin tones, swapping out colors, isolating subjects, or making subtle stylistic adjustments, mastering HSL will undoubtedly enhance your grading capabilities. While the learning curve might seem steep initially, the power and flexibility offered by these tools make them a worthy investment of your time and effort, ultimately leading to more compelling and professional-looking footage. Don't hesitate to experiment with HSL in your next project and discover the transformative impact it can have on your visual storytelling.