The ICO file format, a seemingly simple yet enduring digital artifact, has been a cornerstone of visual identity for web and desktop applications for decades. From the ubiquitous favicons adorning browser tabs to the distinctive icons gracing your software, these small image files play a crucial role in user experience and brand recognition. Despite their widespread use, a curious gap exists in professional design software: neither Adobe Photoshop nor Adobe Illustrator offer direct native support for exporting to the ICO format. This oversight can be a perplexing hurdle for designers, particularly those new to the field, who may find themselves searching for straightforward methods to generate these essential files. This guide aims to demystify the process, providing detailed instructions and insights for creating pixel-perfect ICO files, primarily leveraging the capabilities of Adobe Photoshop.
The Enduring Relevance of the ICO File Format
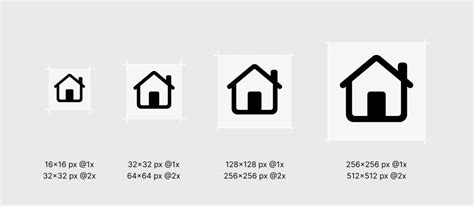
The ICO format is a unique container designed to store multiple image sizes and color depths within a single file. This multi-resolution capability is precisely what makes it so effective for icons, as it allows operating systems and browsers to select the most appropriate representation of the icon based on the display context - whether it's a tiny favicon, a medium-sized application icon, or a larger desktop shortcut. While newer formats like SVG are gaining traction for their scalability and vector-based nature, the ICO format remains deeply embedded in the digital ecosystem, particularly for legacy compatibility and widespread browser support.

The persistent reliance on ICO files stems from its long history and established integration into various platforms. Even as technology advances, the need to maintain backward compatibility ensures that the ICO format will likely remain relevant for the foreseeable future. This enduring presence necessitates that designers and developers understand how to effectively create and manage these files.
Why Photoshop for ICO Creation?
While Adobe Illustrator excels at vector graphics and is a strong contender for creating scalable assets like SVGs, Photoshop offers a distinct advantage when it comes to crafting ICO files. The primary benefit lies in the granular control it provides over each individual icon size. Unlike Illustrator, where scaling can sometimes lead to unintended sub-pixelation or loss of crispness, Photoshop allows designers to meticulously design and refine each resolution within the ICO file. This level of control is invaluable for ensuring that icons appear pixel-perfect and retain their intended detail, regardless of the size at which they are displayed.
This approach is particularly beneficial for icons that require intricate details. Larger resolutions can accommodate more complex designs, while smaller resolutions can be simplified to maintain clarity without sacrificing the overall aesthetic. This ability to tailor each size individually ensures a superior visual outcome across all display contexts.
Photoshop Icon Export Method: A Step-by-Step Approach
The following method prioritizes precision and control, allowing you to create ICO files with specific sizes embedded, ensuring optimal rendering across different applications and platforms. We will focus on generating an ICO file that includes the following common sizes: 16x16, 24x24, 32x32, 48x48, 64x64, and 96x96 pixels.
Step 1: Establishing a Template for Precision
To maintain consistency and ensure each icon size fits within its designated boundaries, it is highly recommended to create a template file. This template acts as a visual guide, providing a structured layout for each icon size.
You can download a pre-made PSD template file. This template is designed to offer a frame for each icon size, helping you visualize and position your designs accurately. While you can customize the sizes and their arrangement to suit your preferences, the provided layout offers a practical starting point. Once you have your template set up, it is crucial to save the PSD file and lock it. This preventative measure safeguards your template against accidental modifications, preserving its integrity for future use.
It's worth noting the existence of Artboards in Photoshop, which offer a similar functionality for managing multiple artboards within a single document. However, this method, developed prior to the widespread adoption of Artboards, has proven to be a preferred workflow for many. The explicit framing within the template provides a tangible boundary for each icon, which some designers find more intuitive than the abstract nature of Artboards. Should Adobe continue to enhance Artboard functionality, a future shift in workflow might be considered.
Step 2: Automating the Export Process with Photoshop Actions
To streamline the export of multiple icon sizes, the creation of a Photoshop Action is an indispensable step. This action will automate a series of tasks: cropping each artboard to the precise dimensions of its frame, saving the cropped image as a PNG, undoing the crop, and then repeating this process for all the defined icon sizes. While a written explanation can provide a general understanding, a visual demonstration is far more effective in illustrating the setup of a custom action.
One Click Size, Sharpen, Watermark, and Saving Photoshop Action
This automated workflow significantly reduces the manual effort involved in exporting each individual icon size, ensuring consistency and saving valuable time. By recording these steps, you create a reusable tool that can be applied to any icon project, further enhancing efficiency.
Step 3: Designing Your Masterpiece: Creating the Icon
With your template and automated export action prepared, you are now ready to embark on the creative process of designing your icon. While this guide focuses on the technical aspects of exporting to ICO, the artistic creation of the icon itself is a separate, albeit equally important, endeavor. A dedicated guide on icon design principles and techniques will be forthcoming, offering in-depth insights into crafting compelling visual elements. For now, you can proceed to the conversion stage once your individual icon designs are complete within their respective frames.
The Illustrator Icon Export Method: An Alternative Pathway
For designers who prefer to work within Adobe Illustrator, an alternative method exists for preparing assets that can eventually be converted into ICO files. Illustrator’s strength in vector graphics makes it a natural choice for creating scalable icons, and this method aims to leverage those capabilities.
Step 1: Setting Up Artboards for Scalability
The Illustrator approach involves utilizing artboards to manage different icon sizes. For the purpose of ICO creation, it is recommended to set up two primary artboards: one at 16x16 pixels and another at 24x24 pixels. This initial setup is designed to mitigate potential sub-pixelation issues that can arise when scaling graphics to larger dimensions. You can download a pre-made AI template file that facilitates this setup.
Step 2: Crafting Your Icon in Illustrator
Similar to the Photoshop workflow, the artistic creation of the icon itself is a critical step. This guide assumes you have already designed your icon within the Illustrator artboards. Further resources on icon design principles will be made available in separate guides.
Step 3: Exporting Artboards as Scalable PNGs
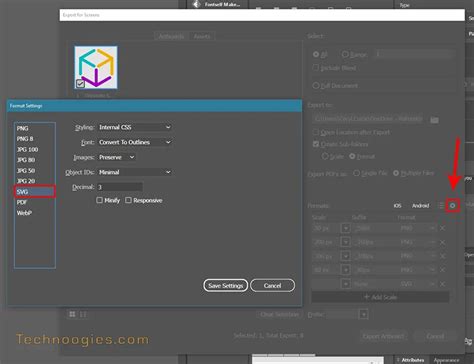
Once your icon designs are finalized on the artboards, the next step is to export them in a format suitable for conversion into an ICO file. Navigate to File > Export > Export for Screens or use the keyboard shortcut ⌥+⌘+E. In the subsequent dialog box, ensure that both artboards are selected for export. Crucially, you will want to export these artboards at multiple scales: 1x, 2x, 3x, and 4x. This ensures that you have a range of PNG assets that can be used to construct a comprehensive ICO file.
It's important to be aware that PNGs exported directly from Illustrator can sometimes exhibit display issues when used to create ICO files. If you encounter such problems, running these exported PNGs through an image optimization tool like ImageOptim is a recommended troubleshooting step. This can help to clean up any potential rendering artifacts and ensure a smoother conversion process.
Converting PNGs to ICO: Bridging the Gap
Regardless of whether you utilize Photoshop or Illustrator for your initial icon design, the final step involves converting your prepared PNG assets into the ICO file format. Fortunately, several methods exist to accomplish this, catering to different operating systems and user preferences.
Web Application Conversion: ICOConvert.com
For a universally accessible and straightforward solution, online converters offer an excellent option. ICOConvert.com is a free web-based tool that allows you to upload multiple PNG files and convert them into a single ICO file. While this service has certain limitations, it effectively handles the conversion needs for most standard icon creation tasks. The primary requirement for using this method is a stable internet connection and a web browser. The convenience of not needing to install any software makes it an attractive choice for many users.
The process typically involves uploading your individual PNG icon files (e.g., 16x16, 32x32, 48x48, etc.), and the website will generate a downloadable ICO file. Some converters also offer options to combine multiple images into a single ICO, ensuring that all desired resolutions are included.
Desktop Application Conversion (macOS): ImageMagick and Automator
For macOS users seeking a more automated and integrated desktop solution, a combination of ImageMagick and Automator can provide a powerful workflow. This method requires a bit more initial setup but offers greater control and efficiency for repetitive tasks.
Step 1: Installing ImageMagick
The first step involves installing ImageMagick, a robust command-line image manipulation suite. While the command-line interface might seem daunting to some, its capabilities are extensive. Installation can typically be done via a package manager like Homebrew. If you encounter difficulties during the installation or setup process, seeking assistance through online forums or documentation is advised.
Step 2: Creating an Automator Script
Once ImageMagick is installed, you can create an Automator workflow to automate the conversion process. This involves writing a custom Shell Script that utilizes ImageMagick commands to combine your PNG files into an ICO. The provided script can handle the conversion of up to 10 PNGs into a single ICO file. If you need to process a larger number of images, the script can be modified to accommodate additional file inputs.
Remember to replace placeholder paths in the script with your actual directory locations and ensure that the path to your ImageMagick installation is correctly specified. This automated script, when executed, will take your collection of PNG icons and efficiently package them into a multi-resolution ICO file.
Troubleshooting Common ICO Export Issues in Photoshop
Despite the availability of various methods, users may encounter specific challenges when attempting to export ICO files directly from Photoshop, particularly with older versions or specific configurations. These issues often stem from plugin compatibility or file size limitations.
The Missing ICO Plugin and CS6 Quirks
A common point of confusion arises from the absence of a native ICO export option in Photoshop. While a plugin for opening and saving as .ico files has existed for a long time, users, especially those with Adobe Photoshop CS6, have reported difficulties in making it functional.
One reported solution involves ensuring the plugin is correctly installed in the designated File Formats folder within the Photoshop CS6 directory. However, even with correct installation, issues can persist, particularly with images exceeding 256x256 pixels.
Workarounds and Solutions for CS6:
- 32-bit Version of Photoshop CS6: Some users have found success by using the 32-bit version of Photoshop CS6 instead of the 64-bit version. If you have Creative Cloud, both versions are often installed automatically. Look for "Adobe Photoshop CS6" in your start menu, distinct from "Adobe Photoshop CS6 (64 Bit)."
- Folder Permissions: A recurring problem relates to the "Read Only" attribute of the
File Formatsfolder. To resolve this, navigate toC:\Program Files\Adobe\Adobe Photoshop CS6 (64 Bit)\Required\Plug-Ins\File Formats, right-click on the folder, select "Properties," and ensure the "Read Only" attribute is unchecked. After disabling this setting, extract the plugin files again. This ensures that the plugin files are properly written and recognized by Photoshop. - Image Bit Depth: For the plugin to function correctly, especially with larger images, ensure that your source file is set to 8-bit per channel. You can check and adjust this under
Image > Mode. - Saving as ICO Directly: In some instances, users have found that they can save files as ICO without requiring a specific plugin, simply by using the "Save As" option. This method might be more reliable for certain versions or configurations.
Verifying Plugin Installation
Before proceeding with export attempts, it's wise to verify if the ICO plugin is installed correctly. On Windows, navigate to Help > About Plug-in > ICO (Windows Icon). On macOS, the location might differ slightly. If the plugin is listed, it is installed.
You might not see the ICO format listed in the "Save As" dialog if you are attempting to save a PSD file directly as an ICO. Instead, try opening a PNG image and then using the "Save As" option. The ICO format should then appear in the "Format" drop-down menu.
Image Size Limitations
A frequent cause of failure when saving as ICO is the image size. Many users discover that the plugin only works for images that are 32x32 pixels or smaller. If you are trying to save an image larger than this, you will need to resize it to 32x32 pixels or less before attempting to save it as an ICO.
Alternative Software for Conversion
When direct Photoshop export proves too problematic, alternative software offers a hassle-free solution. GIMP, a free and open-source image editor, can be used to export images as ICO files without the need for plugins or complex configuration. The workflow typically involves opening your PNG in GIMP and then using File > Export As... to select the ICO format. This bypasses many of the plugin-related issues encountered with Photoshop.
Advanced ICO Creation: Multi-Resolution Files
The true power of the ICO format lies in its ability to contain multiple image resolutions within a single file. This allows for dynamic scaling and optimal display across various contexts. Creating such multi-resolution ICOs involves a more deliberate process than simply saving a single image.
For instance, to create a comprehensive ICO file, you would typically:
- Design your icon at its largest intended size (e.g., 256x256 pixels).
- Save this master image.
- Then, resize the image to smaller dimensions (e.g., 64x64, 48x48, 32x32, 24x24, and 16x16 pixels).
- Save each of these resized versions as individual PNG files.
- Finally, use a conversion tool (either web-based or desktop) that supports combining multiple PNGs into a single ICO file.
This method ensures that your ICO file contains all the necessary resolutions, providing the best possible visual fidelity across all applications.
Assigning Icons to Hard Drives and Folders
Beyond their use in applications and websites, ICO files can also be used to customize the appearance of storage devices and folders within an operating system.
Assigning Icons to Hard Drives (Windows)
To assign a custom .ico file to a hard drive in Windows, you need to place the .ico file in the root directory of the drive. Alongside the .ico file, you must create a plain text file named Autorun.inf in the same root directory. This Autorun.inf file contains specific instructions for the operating system. A typical entry would look like this:
[autorun]icon=YourIconFileName.icoReplace YourIconFileName.ico with the actual name of your ICO file. When the drive is next accessed, Windows will read the Autorun.inf file and display the specified icon in File Explorer.
Customizing Folder Icons
While assigning icons to hard drives is a system-level function, customizing individual folder icons often involves operating system-specific features or third-party tools. In Windows, for example, you can right-click on a folder, select "Properties," go to the "Customize" tab, and then click "Change Icon…" to select a custom .ico file.
The Future of Icon Design and Distribution
While this guide focuses on the established ICO format, it's important to acknowledge the evolving landscape of icon design and distribution. Formats like SVG are increasingly favored for their scalability, editability, and smaller file sizes, especially for web use. However, the widespread adoption and legacy support of ICO mean it will continue to be a relevant format for the foreseeable future. As such, mastering the creation of ICO files remains a valuable skill for designers and developers alike. The methods outlined above, from leveraging Photoshop's precision to utilizing efficient conversion tools, provide a robust framework for generating high-quality ICO files for a diverse range of applications.