When embarking on a new project in Adobe Illustrator, a fresh document typically begins with a single artboard. However, the creative process often necessitates the inclusion of multiple artboards, especially for projects involving icon sets, sequential designs, or varied layouts. For graphic designers who engage with Illustrator on a daily basis, the ability to efficiently arrange and rearrange these artboards is not just a convenience but a fundamental aspect of their workflow. The strategic organization of your Illustrator artboards can significantly contribute to enhanced productivity and a more fluid creative process. Moreover, maintaining an orderly workspace ensures that your necessary work is readily accessible and logically presented. Fortunately, Adobe Illustrator offers robust tools and intuitive methods to move and manage your artboards, along with their associated content.
Understanding the Artboard Tool and Its Capabilities
The primary instrument for manipulating artboards in Adobe Illustrator is the Artboard Tool. This versatile tool allows for direct interaction with your artboards within the document window. To initiate artboard editing, you must first select the Artboard Tool, typically found in the left-hand toolbar or accessible via the keyboard shortcut Shift-O.
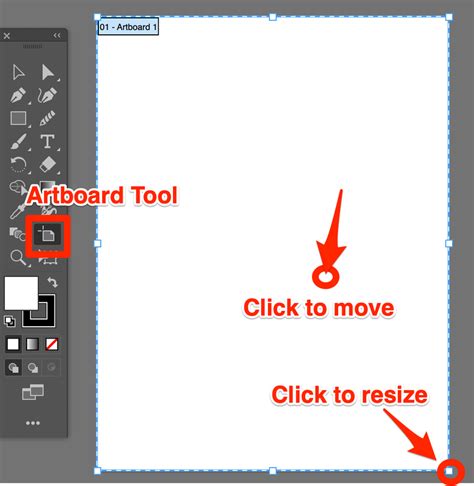
Once the Artboard Tool is active, you can engage with individual artboards. This includes selecting an artboard you intend to move, resize, or reorder. For those new to the concept, this is also the point at which you would create new artboards if your document currently only has one. To manually move an artboard, simply click and drag it to its desired new location within the document canvas. If you need to move multiple artboards simultaneously, you can achieve this by holding down the Shift key while selecting the artboards you wish to relocate. This allows for collective repositioning, saving significant time when dealing with complex layouts.
A crucial consideration when moving artboards with the Artboard Tool is to ensure that the content from other artboards does not overlap with the selected artboard you are moving. Overlapping elements can lead to confusion and unintended visual results. To prevent such scenarios, a proactive approach is to lock any objects that might interfere with your artboard movement. This can be done by selecting the object and then pressing Command + 2 (or Ctrl + 2 for Windows users). This action effectively locks the selected object, preventing it from being accidentally moved or interfering with your artboard manipulation. When an artboard is moved with locked objects present, Illustrator will often display a warning message, alerting you to the potential for overlap.
Leveraging the Artboards Panel for Comprehensive Management
Beyond the direct manipulation offered by the Artboard Tool, the Artboards panel provides a centralized and powerful hub for managing all aspects of your artboards. This panel offers a more systematic and detailed approach to organizing your workspace.
To access the Artboards panel, navigate to the Window menu in the Illustrator toolbar and select Artboards. If the panel is not immediately visible, you can drag it from the Window menu to your workspace or dock it alongside other panels for convenient access.
Within the Artboards panel, you will find a clear, list-based representation of all the artboards present in your document. Each artboard is typically listed with an automatic numerical designation (e.g., "Artboard 1," "Artboard 2"). This panel is where you can perform a wide array of organizational tasks: customize artboard properties, rearrange their order, resize them, remove unwanted artboards, shift their positions, and move them.
Customizing and Reordering Artboards in the Panel:
To change the order in which artboards appear in the panel, you can directly interact with the list. Click on an artboard to select it, and then use the arrow buttons located at the bottom of the panel to move it up or down in the sequence. Alternatively, you can employ a drag-and-drop method, similar to how you would reorder items in the Layers panel, to reposition artboards within the list. It's important to note that simply changing an artboard's position in the panel does not immediately alter its visual placement on the document canvas. This is where the "rearrange" functionality becomes essential.
Bulk Renaming for Clarity:
As you create and manage multiple artboards, Illustrator automatically assigns sequential numbers. However, when the visual arrangement of artboards deviates from their numerical order, it can lead to confusion. A quick and effective solution for this is bulk renaming.
To rename multiple artboards simultaneously, first select the Artboard Tool. Then, in the Artboards panel, select all the artboards you wish to rename by holding down the Shift key and clicking on each one. In the Control bar at the top of the Illustrator window, you will find a "Name" field. Here, you can enter a common prefix (e.g., "icon," "page," "section") for all selected artboards. Pressing Enter will apply this prefix, renumbering the artboards sequentially from first to last. This ensures that the artboard names logically correspond to their numerical order (e.g., "icon 1," "icon 2," "icon 3"). While this is a fast method, for maximum clarity, consider naming each artboard individually with a descriptive name that reflects its content.
Rearranging Artboards for Visual Harmony
The act of rearranging artboards is what synchronizes the order established in the Artboards panel with the visual layout on your document canvas. This is particularly crucial when you need to export artboards in a specific sequence or when presenting your work.
To rearrange your artboards, you first need to ensure their order is correctly set within the Artboards panel. Once the desired order is established in the panel, click the "Rearrange All Artboards" button, typically located at the bottom left of the Artboards panel.
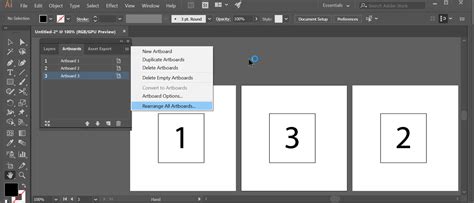
This action opens a dialog box where you can define the layout settings for your artboards. You have the flexibility to choose from various layout options, such as "Grid by Row," "Grid by Column," "Arrange by Row," and "Arrange by Column." Within this dialog, you can also modify the spacing between artboards and adjust the number of columns or rows, allowing you to create a spatially organized arrangement. Crucially, ensure that the "Move Artwork with Artboard" option is checked. This setting guarantees that all content associated with an artboard moves along with it, preserving the integrity of your design elements. After adjusting these settings, click "OK" to apply the changes.
A helpful tip for controlling the positioning during rearrangement is to utilize the reference point icon in the Control bar. By default, artboards are often positioned relative to the top-left corner. Changing this reference point before rearranging can influence the overall placement of the artboard grid.
After executing a rearrangement, you may find that the automatic numbering no longer aligns with the new visual order. In such cases, it's advisable to re-enter the bulk renaming process described earlier to ensure your artboard names accurately reflect their current sequence.
Creating Individual Artboard Sizes for Specific Needs
For projects like icon sets or individual design elements, it's often beneficial to have artboards precisely sized to fit each element. This streamlines the export process and ensures that each asset is contained within its own defined space.
To create individual artboard sizes, you can use the Artboard Tool. After selecting the Artboard Tool, you can click or double-click on your artwork within the document window. This action allows you to directly resize the selected artboard to encompass your artwork. For instance, if you have an icon, you can use the Artboard Tool to resize the artboard so it perfectly frames that icon. This is an efficient way to quickly set up artboards for exporting individual assets.
Scaling Artwork for Margins:
When creating artboards for individual elements, especially icons, it's good practice to avoid having the artwork positioned too close to the artboard edges. This provides a visual buffer and can be important for various output requirements. The "Transform Each" function offers a convenient way to scale all artwork on your artboards simultaneously.
To use this function, exit Artboard editing mode. Select all the artwork you wish to scale. Then, go to Object > Transform > Transform Each. In the dialog box that appears, set your desired scale percentage (e.g., 95%) and ensure proportional scaling is locked. You can also adjust the reference point to control how the scaling is applied. Clicking "OK" will scale all selected artwork uniformly.
A valuable tip for designers working with strokes is to check your scaling preferences before applying transformations. Go to Edit > Preferences (or Illustrator > Settings on macOS) and ensure that "Scale Strokes and Effects" is checked if you want these elements to scale proportionally with your artwork.
Advanced Techniques and Workflow Efficiency
The ability to manage artboards effectively in Adobe Illustrator extends beyond simple movement and resizing. For instance, cutting and pasting entire artboards is also possible. With the Artboard Tool selected, you can select one or multiple artboards and use the standard Control-X (cut) or Control-C (copy) commands. Subsequently, you can use Control-V (paste) to insert them into your document.
Artboard tips in Illustrator
The organization of artboards can also influence how files are saved, particularly when exporting to formats like PDF. The order established in the Artboards panel dictates the page sequence in a multi-page PDF document. Therefore, if you intend to export a PDF with a specific page order, ensuring the artboards are correctly sequenced in the panel is crucial.
The concept of artboard management is deeply intertwined with overall workflow efficiency in Adobe Illustrator. While individual adjustments can be managed, the true power lies in leveraging bulk actions for renaming, resizing, and rearranging multiple artboards simultaneously. This not only saves considerable time but also reduces the potential for human error, leading to a more polished and professional final output. For designers who frequently work with numerous artboards, mastering these techniques is a fundamental step towards optimizing their creative process and enhancing their productivity within the Adobe Illustrator environment. This comprehensive understanding empowers designers to maintain a structured and efficient workspace, allowing them to focus more on the creative aspects of their projects.
tags: #illustrator #move #artboard