Exporting your finished video project from DaVinci Resolve is the final, crucial step in the editing workflow, ensuring your creation reaches its intended audience. While video export often takes center stage, the ability to isolate and export audio independently is a powerful feature for various professional and creative needs. This guide will delve into the intricacies of exporting audio-only files from DaVinci Resolve, covering essential settings, recommended formats, and practical applications.
Navigating the Delivery Page for Audio Exports
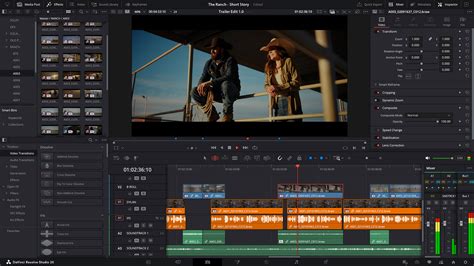
Upon completing your edit, adding sound effects, and implementing color grading, the next logical destination is the Delivery page. Unlike some editing software that might present a simple pop-up box for rendering, DaVinci Resolve dedicates an entire page to this process. On the left side of the screen, you'll find the render settings, offering a comprehensive suite of options. The central area features a preview monitor, allowing for a final review of your edit before initiating the render. It's important to note that while the scrubbing tool on the editing page allows for rapid traversal of the entire timeline, on the Delivery page, it primarily scrubs through individual clips. To the right is the render queue, where selected clips destined for rendering will be listed, and from which you'll ultimately initiate the render process. Beneath this, a timeline mirrors the one found on the edit page, but with a key limitation: no adjustments can be made here; tracks cannot be muted, nor clips disabled.
Understanding Render Settings for Audio
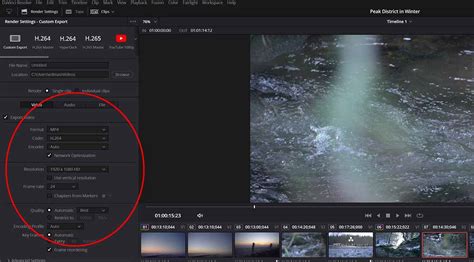
The render panel is your primary control center for defining the output of your project. For audio-only exports, specific settings become paramount.
Filename and Destination Location
Before diving into format specifics, you'll first set your "Filename" and "Destination Location." This straightforward step ensures your exported audio file is clearly identifiable and saved where you can easily access it.
Individual Clips vs. Single File Exports
The timeline typically comprises numerous clips, and the standard export process aims to combine these into one cohesive video file. However, circumstances may arise where rendering individual clips is necessary. This could be for creating low-resolution proxy files to edit on a less powerful laptop, or when a client specifically requests delivery of graded footage for individual clips. While not a recommended practice for regular workflows, DaVinci Resolve accommodates this by offering an "Individual Clips" option. When selected, Resolve will render each video clip separately instead of creating one large video file. Within this panel, you might also find options like "Filename Uses Source Name" and "Chapters from Markers." The latter is particularly useful for YouTube, enabling the division of a video into chapters based on markers placed on the timeline, enhancing navigation for viewers and providing a structured overview for clients. This feature exemplifies how modern Non-Linear Editing (NLE) platforms cater to the evolving needs of filmmakers by incorporating export-level chaptering.
Format and Codec for Audio
The "Format" and "Codec" parameters are where you define the technical specifications of your audio export. While these are not universally recommended as they depend heavily on project requirements and intended platforms, for online encoding, the preferred video format is often QuickTime with an H.264 codec, or the more efficient H.265 codec. However, when focusing solely on audio, the choices shift.
For audio-only exports, the recommended formats are MP4 or WAV. MP4 is often advantageous due to its broad compatibility and generally smaller file sizes compared to WAV, while also causing fewer upload issues across various platforms. WAV, on the other hand, offers uncompressed audio, providing the highest fidelity, which can be crucial for professional audio mixing and mastering.
When selecting "Audio only," you'll typically find options for codecs like AAC (Advanced Audio Coding) for MP4, which is a widely supported and efficient lossy compression format. If you choose WAV, you'll usually have options for uncompressed PCM (Pulse-Code Modulation).
You can also select your "Encoder," often allowing you to leverage your GPU for faster rendering if available.
Resolution and Frame Rate Considerations (for Audio Only)
When exporting audio only, the concepts of "Resolution" and "Frame Rate" as they apply to video become irrelevant. DaVinci Resolve intelligently omits these settings when the "Audio only" option is selected, streamlining the export process and focusing on the audio parameters. If you were exporting video with audio, you would ensure the resolution mirrors your timeline's size (e.g., 1080p for a 1080p timeline) to avoid warnings and maintain visual integrity. Similarly, the frame rate would correspond to your timeline settings (e.g., 24fps, 30fps).
Audio Settings: Mastering Track Selection
This is where the core of audio-only export configuration lies. By default, DaVinci Resolve might present options related to video. However, when you opt for an audio-only export, the interface will adjust to focus on audio parameters.
You'll encounter settings like "Output Track 1." If your project has a single audio timeline, the default setting of "Bus 1 Stereo" is often suitable. However, if your project utilizes multiple audio tracks-for instance, separate tracks for dialogue, music, and sound effects (like A1 and A2 on different tracks)-you'll need to select "All Timeline Tracks." This ensures that DaVinci Resolve exports all available audio elements from your timeline.
For more granular control, you can choose to export specific audio tracks. By clicking on "Output Track 1" and then selecting "Timeline Track," you can specify the exact track number you wish to export. For example, selecting "1" will export only audio track 1, while selecting "2" will export audio track 2, and so on. This is incredibly useful if you need to isolate a particular element, such as just the dialogue for ADR (Automated Dialogue Replacement) or a specific music track for licensing.
Exporting Specific Sections with In and Out Points
Just as with video exports, DaVinci Resolve allows you to export a specific section of your audio track. To achieve this, you'll set "In" and "Out" points. Navigate to where you want your audio export to begin and press the "I" key. Then, move to the desired end point and press the "O" key. This selection creates a defined range for export. When you add this to the render queue, DaVinci Resolve will render only that specific segment. This is invaluable for extracting short audio clips, sound bites, or specific musical cues without rendering the entire project. You can create multiple in and out points and add them to the render queue, with each segment rendering separately. This is particularly helpful when dealing with multiple deliverables for the same client or when needing to isolate various segments from a longer recording.
Finalizing the Export Process
Once all your audio export settings are configured, the process is straightforward.
Adding to the Render Queue
In the Render Settings panel, after defining your filename, destination, format, and audio track selections, click "Add To Render Queue." This action places your configured export job into the render queue panel.
Initiating the Render
Over on the render queue panel, you'll see your added job listed. To begin the export process, click the "Render All" button. DaVinci Resolve will then commence the audio export.
During the rendering process, Resolve will display the percentage of completion and an estimated time remaining, keeping you informed of the progress.
Export MP3 Audio File 🎧 | DaVinci Resolve
Why Export Audio Only? Practical Applications
The ability to export audio independently from video offers several significant advantages and practical applications:
- Efficiency: If you only require the sound component for use in another project, for external sound mixing, or for archival purposes, exporting audio alone is significantly more efficient. It results in smaller file sizes and faster render times compared to exporting a full video file.
- Sound Design and Mixing: Sound designers and audio engineers often need to work with isolated audio tracks. Exporting specific dialogue, effects, or music stems allows for detailed mixing and mastering in dedicated audio software (like Pro Tools, Logic Pro, or Ableton Live).
- Voiceovers and Narration: If you're producing content that requires narration or voiceovers, exporting the audio track separately allows for easy re-recording or modification of the voice track without affecting the video.
- Music Licensing and Use: If your project includes licensed music, you might need to provide just the music track for specific licensing agreements or for use in other promotional materials.
- Podcast and Audio-Only Content Creation: For those creating podcasts or purely audio-based content, DaVinci Resolve can serve as a powerful editing tool, with the ability to export high-quality audio files being essential.
- Client Review and Approval: Sometimes, a client might only need to review the audio quality or specific sound elements, making an audio-only export a quick and convenient way to provide that.
- Troubleshooting: If you encounter issues with audio playback or synchronization in a video file, exporting the audio separately can help in troubleshooting by isolating the audio component for analysis.
Frequently Asked Questions About Audio Export
Why should I only export the audio?Exporting audio alone is more efficient if you only need the sound to use in another project, for external purposes, or for dedicated audio work. It saves processing power and storage space.
Which format is better, MP4 or WAV for audio export?MP4 with AAC is generally better for broader compatibility and fewer upload issues across various platforms. WAV offers uncompressed, higher fidelity audio, which is preferable for professional audio mastering and when absolute sound quality is paramount. The choice depends on your specific needs.
How do I select the specific audio track I want to export?You can choose the desired audio track by navigating to the audio settings, clicking on "Output Track 1," and then selecting "Timeline Track." From there, you can specify the number of the audio track you wish to export.
Can I export a specific section of the audio track?Yes, you can set the in and out points on your timeline (using the "I" and "O" keys) to select a specific range of audio for export.
What should I do if the audio export does not work as expected?First, double-check all your export settings, ensuring the correct format, codec, and audio tracks are selected. Also, verify that the chosen storage location has sufficient space and that you have the necessary permissions to write to that directory. Sometimes, a simple restart of DaVinci Resolve can resolve minor glitches.
By mastering the process of exporting audio-only files in DaVinci Resolve, you unlock a versatile toolset that caters to a wide array of post-production needs, ensuring your audio is as polished and accessible as your video.