DaVinci Resolve, a powerful post-production software, offers robust tools for color grading and image manipulation. Among these tools, Look-Up Tables (LUTs) play a crucial role in transforming footage, providing a starting point for colorists, and enabling unique stylistic looks. This article will guide you through the process of importing LUTs into DaVinci Resolve, understanding their function, and applying them effectively to your video projects, from basic desktop use to the specialized environment of the iPad.
Understanding What LUTs Are and Why They Matter
LUT stands for Look-Up Table. At its core, a LUT is a type of file that mathematically maps one color space to another. This mapping allows for precise control over how colors are translated and displayed. LUTs are frequently applied when working with footage that has been shot in a high dynamic range (HDR) format, such as log or raw footage. By applying a LUT, you can convert this wide range of luminance and color information into a more manageable color space, like Rec.709, which is standard for broadcast and online delivery. This conversion provides the colorist with a foundational look, significantly streamlining the grading process.
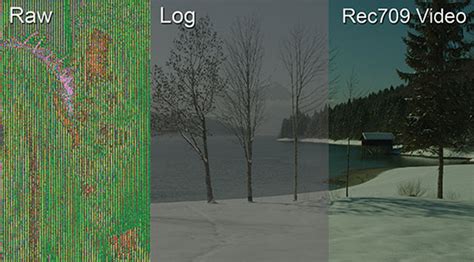
However, the utility of LUTs extends far beyond HDR footage conversion. They are not limited to use with high dynamic range footage; they can also be used to apply any kind of correction or stylistic effect you like. Whether you aim to emulate the look of a specific film stock, achieve a particular mood, or simply apply a quick color correction, LUTs offer a versatile solution. The image below serves as an illustration of the transformative power of a single LUT. On the left, you see log-c footage from an Arri Alexa camera, characterized by its flat and desaturated appearance. On the right, the same footage has a Rec.709 LUT applied, revealing a more vibrant and contrasty image ready for further grading.
Importing LUTs into DaVinci Resolve on Desktop
Adding a LUT to your DaVinci Resolve project is an incredibly straightforward process. This section will detail the steps for importing custom LUTs into the desktop version of DaVinci Resolve.
Locating and Opening the LUT Folder
The first step in importing LUTs is to identify and access the designated folder within DaVinci Resolve where these files are stored.
- Open Your DaVinci Resolve Project: Begin by opening your existing DaVinci Resolve project.
- Access Project Settings: Navigate to the project settings. This can be done by clicking on the "Project Settings" button, which is typically represented by a gear icon located in the lower right corner of the interface. Alternatively, you can find it within the "File" drop-down menu.
- Select Color Management: Within the Project Settings pop-up menu, locate and select the "Color Management" tab.
- Open LUT Folder: In the Color Management section, you will find a button labeled "Open LUT Folder." Click this button. This action will directly open the folder on your system where DaVinci Resolve looks for LUT files.
Transferring LUT Files
Once the DaVinci Resolve LUT folder is open, you can proceed to add your custom LUTs.
- Prepare Your LUTs: Open another finder window or navigate to your download folder where your LUTs are stored. LUTs for DaVinci Resolve are often referred to as "cube files" because the standard LUT file extension is
.cube. Ensure your LUT files are unzipped if they were in a compressed format. - Drag and Drop: Drag and drop the
.cubefiles of your desired LUTs directly into the DaVinci Resolve LUT folder that you opened in the previous step. - Create Subfolders (Optional but Recommended): To keep your LUT library organized, it is highly recommended to create a new folder within Resolve's main "LUT" folder specifically for all of your custom grades. This makes finding specific LUTs much easier in the long run.
Updating the LUT List
After transferring your LUT files, DaVinci Resolve needs to be informed of their presence.
- Close Folders: Close the finder windows for both your LUTs and the DaVinci Resolve LUT folder.
- Update Lists in DaVinci Resolve: Back in DaVinci Resolve, within the Project Settings and the Color Management tab, select the "Update Lists" button. This action scans the LUT folder and adds any new files to Resolve's internal library.
Applying LUTs to Your Footage
With your LUTs successfully imported, you can now begin applying them to your video clips to achieve desired color grades.
Applying LUTs to Individual Clips
The most common way to use LUTs is on a per-clip basis within the Color Page.
- Navigate to the Color Page: Open the Color tab in your editing workspace by clicking the "Color" tab button in the bottom menu.
- Enable Nodes: Ensure the Nodes panel is visible. If it's not, you may need to enable the Nodes overlay.
- Add a New Node: In the Nodes panel, right-click on an existing node or in an empty area to reveal your LUT options. You can select "Add Node" and then "Add Serial" to create a new, sequential node for your LUT.
- Apply the LUT: Right-click on the newly created node. You will see options to select LUTs under categories such as "1D Input LUT," "1D Output LUT," or "3D LUT." Navigate through these menus to locate and select the specific LUT you wish to apply to your footage.
- Utilize the LUT Browser: Alternatively, you can access your LUTs through the LUT Browser, which is typically found in the toolbar at the top left of the Color Page screen. This browser provides a visual and organized way to preview and select your imported LUTs.
Applying LUTs to All Footage (Timeline Node)
For a consistent look across your entire timeline, you can apply a LUT to the timeline node.
- Locate the Timeline Node: In the Color tab, find the timeline node graph. This is a node that affects all clips on the timeline.
- Apply LUT: Apply your desired LUT to this timeline node using the same right-click method described above. Any LUT applied here will affect every clip in your project unless overridden by individual clip nodes.
Adjusting LUT Intensity
Simply applying a LUT might not always yield the perfect result. Adjusting its intensity is often crucial for fine-tuning the look.
- Select the Node: After applying a LUT to a node, ensure that node is selected in the Nodes panel.
- Adjust Intensity: Most nodes in DaVinci Resolve have an opacity or "Mix" slider. By adjusting this slider, you can control the strength of the LUT's effect, blending it with the original footage to achieve the exact color grading you're looking for. A value of 100% means the LUT is fully applied, while lower values reduce its impact.
Creating Your Own LUTs in DaVinci Resolve
DaVinci Resolve also allows you to generate your own LUTs based on the color grades you create within the software. This is a powerful feature for creating custom looks or for sharing your unique grading styles.
- Grade Your Clip: First, apply your desired color grading to a specific clip in the Color tab.
- Generate 3D LUT: In the clips window of the Color tab, right-click on the clip for which you've created the grade.
- Select "Generate 3D LUT (CUBE)": From the context menu, select the option "Generate 3D LUT (CUBE)."
- Save Your LUT: This action will open a file browser, allowing you to save your newly created LUT. By default, it will likely point to the DaVinci Resolve LUT library. Choose a descriptive name for your LUT and save it. This process effectively captures the color transformations applied to your clip into a
.cubefile that can be imported and reused.
HOW TO Create your own LUTs in Davinci Resolve 18 Tutorial
Importing LUTs into DaVinci Resolve on iPad
For users working on the go or with an iPad, DaVinci Resolve also offers the capability to import and use LUTs. The process is similar in principle but adapted for the tablet interface.
- Ensure LUTs are Accessible: The first step is to ensure your LUTs are saved in the Files app on your iPad. If your LUTs are in a compressed
.zipfile, simply tap on the file in the Files app to unzip it. - Open Your DaVinci Resolve Project: As with the desktop version, you'll need to open an existing DaVinci Resolve project on your iPad.
- Access Project Settings: Look for the Project Settings button, which resembles a gear icon, usually found in the lower right corner of the screen.
- Navigate to Color Management: Within the Project Settings, find and select 'Color Management'.
- Open LUT Folder: Tap on the 'Open LUT Folder' option. This will open the directory where DaVinci Resolve stores LUTs on your iPad.
- Transfer LUTs: Navigate back to your Files app, locate the unzipped
.cubeLUT files, and copy or move them into the DaVinci Resolve LUT folder that you just opened. - Update Lists: Once the files have been moved or copied, switch back to DaVinci Resolve and tap 'Update Lists' within the Color Management settings.
Applying LUTs on iPad
Applying LUTs on the iPad follows a similar logic to the desktop version.
- Open the Color Page: Navigate to the Color Page by tapping the "Color" tab button in the bottom menu.
- Enable Nodes: Ensure the Nodes overlay is visible.
- Add a Node and Apply LUT: Right-click (or perform the equivalent tap-and-hold gesture) on a node in the Nodes panel, select "Add Node," then "Add Serial." Right-click again on the new node and navigate through the 3D LUT drop-down menu to find and select your desired LUT. You can also access LUTs via the LUT Browser.
- Adjust Intensity: After applying the LUT, make sure the node is selected and use the available sliders, typically an opacity or "Mix" control, to adjust the LUT's intensity and blend it with your footage for the desired effect.
The Creative Potential of LUTs in DaVinci Resolve
Importing and using LUTs in DaVinci Resolve, whether on desktop or iPad, is a straightforward process that opens up a world of creative possibilities. DaVinci Resolve film LUTs can help you enhance or influence the mood of your raw format videos with distinct color grades. With LUTs in DaVinci Resolve, you gain the power to control the mood and narrative of your visual work, helping you transform standard footage into your unique artistic vision. They serve as excellent starting points for color grading, allowing for quick stylistic changes, but remember that they are tools to be customized. Depending on your footage and desired outcome, you will often want to further customize the applied LUT to perfectly fit the look you're going for. Experimentation is key to unlocking the full potential of these powerful tools.