The human eye, a window to the soul, is often considered the most captivating element in a photograph. When captured and edited with skill, the eyes can reveal intricate details, mesmerizing flecks of color, and profound emotions, drawing viewers into the image. However, less-than-ideal shooting conditions, such as poor lighting, or incorrect camera settings can sometimes hinder the potential of an eye-catching shot. Photoshop offers a powerful suite of tools to refine and enhance these crucial focal points, transforming good photographs into truly compelling portraits. This guide delves into various techniques for eye enhancement, from subtle brightening to dramatic enlargement, suitable for both casual enthusiasts and seasoned professionals.
The Fundamentals of Eye Brightening
When discussing eye brightening in photography, the primary focus is on the iris, the most colorful and detailed part of the eye. Concentrating editing efforts here can significantly enhance a portrait's impact. As with most advanced image manipulation, working with layers is paramount for maintaining flexibility and non-destructive editing.
A foundational technique involves creating an adjustment layer to selectively brighten the eyes. Begin by duplicating your original photo; this can be achieved by navigating to Layer > Duplicate Layer or using the shortcut CTRL/CMD + J. Next, click on the "Create Adjustment Layer" icon (typically a half-filled circle) at the bottom of the Layers Panel and select "Curves."
Within the Curves adjustment, a subtle upward adjustment of the diagonal line can introduce light and vibrancy to the image. However, to apply this effect selectively to the eyes, it's crucial to invert the layer mask. Press Command + I or Ctrl + I to hide the effect initially.
The next step involves preparing your brush tool. Select the Brush tool from the side toolbar, ensuring the foreground color is set to white. Click the small carat (arrow) to the right of the brush thumbnail to access and select an appropriate brush style. For detailed work, a softer brush with a lower opacity is often preferred.
To precisely brighten the irises, zoom in closely on the eyes. Use your selected brush tool to carefully paint over the iris area. It is vital to paint only the iris. Brightening the sclera (the white portion of the eye) can lead to an unnatural and jarring appearance.
Fine-tuning the brightness is easily achieved by reopening the Curves Adjustment box and further adjusting the diagonal line. If the effect appears too intense, reducing the layer's opacity until the desired subtle sparkle is achieved is an effective solution. Most photographers agree that the eyes are the principal part of any portrait, and these subtle improvements can indeed give them extra sparkle.
Advanced Eye Retouching Techniques
Beyond basic brightening, Photoshop offers more sophisticated methods for eye enhancement. One such technique involves a combination of dodging and burning to add depth and dimension.
To begin this process, create a new layer by holding down Alt (or Option on Mac) and clicking the "Create New Layer" icon. Name this layer something descriptive, such as "Dodge Burn." Crucially, set the layer's blend mode to "Overlay" and check the box that says "Fill with Overlay-Neutral color." This neutralizes the layer, allowing dodge and burn effects to be applied without altering the underlying image's color or brightness initially.
With the Dodge tool selected, set the Range to "Midtones" and the Exposure to approximately 20%. Carefully paint over the iris to selectively lighten specific areas, enhancing its natural texture and color.
Conversely, switch to the Burn tool, maintaining the Range set to "Midtones" and Exposure at 20%. Use the Burn tool to subtly darken areas like the pupil, the very edge of the iris, and the eyelashes. This contrast helps to define and add depth to the eye.
To further refine the image, a new layer can be created for sharpening. Select the Sharpen tool and ensure "Sample All Layers" is checked in the Options bar. Set the Strength to around 20% and carefully paint over the eyelashes to selectively sharpen them, adding definition without over-processing the rest of the eye.
Achieving the Comic Eye Effect
Large eyes are a defining characteristic in many cartoons and comic book illustrations, imbuing characters with a distinct sense of expression and personality. Photoshop provides effective methods to achieve this stylized look, transforming photographic subjects into comic-esque figures.
The process begins with opening the target image in Photoshop. For optimal results, it's beneficial to have a clear overview of the main subject before diving into detailed edits.
While filters like "Liquify" can be used for resizing, a more controlled and effective method for enlarging eyes involves precise selection and layer manipulation.
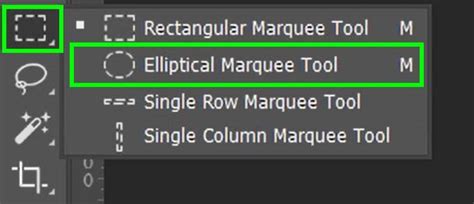
The initial step is to create a selection of the eye. The Elliptical Marquee tool is a suitable choice for this, allowing you to draw a roughly oval area around the eye. This selection serves as the foundation for all subsequent transformations.
Once the selection is made, duplicate it onto a new layer by pressing Command + J (Mac) or Ctrl + J (Windows). This effectively isolates the eye from the rest of the image, providing an independent layer for manipulation. It's also important to include the eyebrows in this selection, as they play a crucial role in maintaining facial harmony after the eyes are enlarged. Zooming out slightly can help assess the overall composition.
The transformation of the eyes can be initiated by pressing Command + T (Mac) or Ctrl + T (Windows) to activate the Free Transform tool. Before scaling, it's good practice to move the anchor point to the center of the eye. Then, by holding down the Alt and Shift keys simultaneously, you can scale the eyes proportionally to the desired size. Don't be afraid to enlarge them significantly; the goal is to achieve a pronounced comic-style appearance.
After enlarging the eyes, the immediate result might look somewhat jarring. To ensure the enlarged eyes harmonize with the rest of the facial features, careful editing of the edges is necessary. Name the duplicated eye layer something clear, like "Left Eye," for better organization.
Apply a layer mask to the eye layer. Using a soft brush with reduced opacity (around 30-40%) is ideal for softening any harsh edges that may have resulted from the enlargement. Carefully paint along the edges of the mask to blend the enlarged eye naturally into the surrounding skin. Avoid overly aggressive painting in softer facial areas to maintain a believable transition.
Once satisfied with the left eye, repeat the entire process for the right eye. Select it generously, duplicate it to a new layer, and name it "Right Eye." Apply a layer mask and use the same brush and opacity settings to carefully work on the contours, ensuring symmetry and a natural flow.
If finer adjustments are needed, the hardness of the brush can be increased. Pay particular attention to the contours of the eyebrows, as their position and shape are critical to the overall believability of the enlarged eyes.
A before-and-after comparison at this stage will clearly demonstrate the impact of the enlargement, highlighting how the larger eyes contribute to a character's enhanced expression and energy.
In essence, enlarging eyes for a comic effect in Photoshop relies on the strategic use of selection tools, careful layer management, and meticulous masking to achieve a stylized yet harmonious result.
Dilating Pupils for Enhanced Appeal
Beyond altering the overall size of the eyes, another subtle yet impactful retouching technique focuses on enlarging the pupils. The size of the pupil can significantly influence how appealing a subject is perceived. In some cultures, larger pupils are considered attractive, leading to the use of specialized contact lenses. Studies have even indicated a preference for images where pupils are dilated, though the reasons for this preference are not always consciously articulated by observers.
This technique involves making a selection of the pupil and then enlarging it. It's crucial to work on a high-resolution photograph where fine details within the eye are clearly visible.
Begin by zooming in very closely on one of the eyes. To select the pupil, drag from its center. Holding down the Alt or Option key while dragging will cause the selection to expand outwards from the center, which can be more precise.
To preview the effect of the enlargement, you can temporarily fill the selection with white. Pressing D on the keyboard resets the foreground and background colors to their defaults (black and white), and then you can use Alt/Option + Delete to fill with the foreground color. However, the edges of such a fill often appear too hard. To soften them, undo the fill (Ctrl/Cmd + Z) and then press Shift + F6 to bring up the Feather Selection dialog. Applying a small feather radius will soften the selection's edges.
Before transforming the selection, it is highly recommended to convert the layer into a Smart Object. This is done by right-clicking on the layer in the Layers Panel and selecting "Convert to Smart Object." This conversion ensures that any subsequent transformations or filter applications are non-destructive and can be re-edited later without loss of quality.
Now, press Ctrl/Cmd + T to activate the Transform tool. While holding Alt + Shift (or Option + Shift on Macs), enlarge the pupil to the desired size. Zoom out to assess the overall look. If the pupil appears excessively large or unnatural, you can easily scale it back down without degrading image quality, thanks to the Smart Object.
A common issue after enlarging a pupil is a loss of sharpness and the introduction of splotchy noise. To counteract this, go to Filter > Noise > Add Noise. Zoom in to observe the effect and adjust the noise amount. Aim for a subtle noise pattern that mimics natural grain from a camera. If the image is black and white, ensure the "Monochromatic" option is checked.
Because the filter was applied to a Smart Object, it becomes a "Smart Filter," which is fully editable. You can double-click the filter in the Layers Panel to adjust its settings or even lower its opacity through the blending options to minimize its impact.
The added noise often has a minimal, almost imperceptible effect when viewed at normal size, but it helps to restore a natural texture to the enlarged pupil.
However, the enlarged pupil can still appear somewhat artificial, like a simple painted dot. To enhance realism, it's essential to restore the reflections or catchlights within the eye. These highlights are crucial for conveying depth and life.
While experimenting with blend modes like "Overlay" might seem tempting, they can sometimes create a "double-pupil" effect. A more sophisticated approach involves using the "Blend If" settings within the Layer Style options. Right-click on the layer and choose "Blending Options." In the Layer Style window, locate the "Blend If" sliders. To soften the edges of the reflection, hold down the Alt/Option key and drag the white slider towards the right. This will gradually fade the reflection where it meets the pupil's edge, creating a more natural integration.
Once the process is complete for one eye, the same steps need to be applied to the other. Duplicate the layer (Ctrl/Cmd + J), use the Transform tool (Ctrl/Cmd + T) to adjust its size, and apply a layer mask if the pupil extends beyond the eyelid. Use the eraser tool (or a brush on the layer mask) with appropriate settings to refine the edges.
Restoring noise and reflections on the second eye follows the same principles. Apply the "Add Noise" filter and then use the "Blend If" settings to reintegrate the catchlights. Alternatively, you can copy and paste the layer style from the first eye to the second, saving time and ensuring consistency.
The beauty of these techniques, especially when applied to Smart Objects, is that they are entirely non-destructive and fully editable. This allows for easy adjustments and experimentation, ensuring the final result perfectly complements the original image. Comparing the "before" and "after" images often reveals a significant enhancement in perceived appeal and expressiveness, demonstrating the power of subtle yet precise digital retouching.