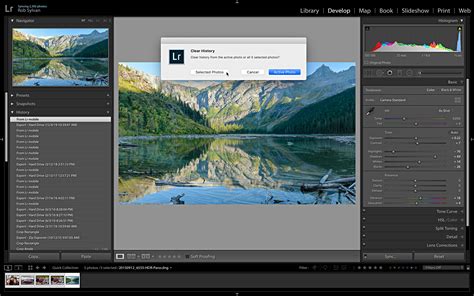
Editing photos in Lightroom Classic CC using presets and brushes is a powerful way to save time and achieve a consistent, polished look for your images. For photographers, especially those balancing creative pursuits with busy lives, these tools transform the editing workflow from a laborious task into an efficient process. This tutorial delves into the effective utilization of presets, brushes, and other Lightroom features to elevate your photography, drawing insights from experienced users and highlighting the advantages of a structured editing approach.
The Foundation of Efficient Editing: Understanding Presets
At its core, a Lightroom preset is a collection of saved development settings. This means that a single click can apply a specific look, including adjustments to exposure, contrast, color balance, tone curves, and more, across multiple images. This capability is a significant time-saver, particularly when working with a large batch of photos from a single shoot. The concept is simple: you develop a desired aesthetic, save those settings as a preset, and then apply it to other images that require similar treatment. This ensures a cohesive visual style throughout your portfolio or a specific project.
The value of presets extends beyond mere time-saving. They act as a starting point, a foundation upon which further refinements can be made. For new Lightroom users, understanding this fundamental concept is crucial. Before diving into complex adjustments or attempting to modify existing presets, it’s beneficial to spend time experimenting within Lightroom. Getting a feel for the software’s functionalities will prevent a sense of being lost when it comes time to fine-tune a preset's effects. This foundational knowledge empowers users to confidently adjust settings and understand the impact of each slider and tool.
How Presets Work: A Deeper Dive
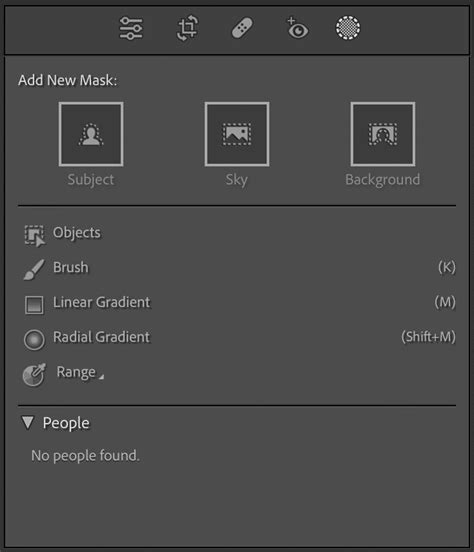
Many Lightroom presets employ sophisticated techniques to achieve their effects. Some utilize filters to introduce changes in contrast, color, exposure, and even simulated elements like sunrays or snow. Identifying how a preset achieves its look can be as simple as examining its underlying structure. By clicking on the masking icon, which often appears as a circle with a dotted outline, you can often discern if a radial gradient mask or a linear gradient mask is being employed. These masks allow for localized adjustments, meaning certain effects can be applied to specific areas of the image without impacting the entire frame. This is a common method for adding atmospheric effects or subtly enhancing particular features.
Furthermore, some advanced presets leverage the power of AI (Artificial Intelligence). This is a key feature of collections like the "Evolution Collections" from Pretty Presets. AI-powered presets can analyze an image and apply adjustments that are intelligently tailored to its content, further reducing the manual effort required and often yielding more accurate and pleasing results.
Workflow Strategies with Presets and Brushes
The workflow for editing with presets differs from purely manual editing, but it offers distinct advantages. The process often begins with an initial evaluation of the photograph. What does the image need? Is the white balance accurate? Is the exposure correct? These are the questions that guide the application of presets and subsequent adjustments.
Utilizing Toolkit Presets for Quick Adjustments
Some preset collections, particularly those in the "Evolution series," come with additional "toolkit presets." These are designed for rapid adjustments to fundamental aspects of an image, such as white balance and exposure. Instead of manually tweaking sliders, you can apply a toolkit preset to quickly correct common issues. This allows you to establish a solid base for your edit before applying more stylistic presets.
The Power of Brushes and Profiles
Beyond global adjustments, Lightroom offers powerful tools for localized corrections and enhancements. Brushes and profiles are invaluable for addressing specific issues and adding creative flair.
- Correcting Imperfections: Brushes can be used to rectify problems like underexposure, overexposure, and unwanted color casts in specific areas. They can also be used for targeted enhancements, such as sharpening eyes or softening skin, to refine portraiture.
- Lightroom Profiles: Profiles are a game-changer for editing. They go beyond simple color and tone adjustments, fundamentally altering how Lightroom interprets the color and tone of your image. They can provide a distinct starting point for your edits, offering a wide range of creative looks that can be applied before or in conjunction with presets. Many photographers find that starting with a carefully chosen profile can significantly influence the final outcome and reduce the need for extensive manual adjustments.
Presets, Profiles and Brushes Import Tutorial
The "Finish or Adjust" Stage
Once a base preset is applied and any necessary brushwork or profile adjustments are made, the "finish or adjust" stage comes into play. This is where you fine-tune the image to perfection. For presets like those in the "Evolution Collections," their popularity stems from their ability to integrate AI-powered adjustments that significantly reduce editing time. Even after applying a preset, there's often room for subtle tweaks. This might involve fine-tuning the exposure, adjusting highlights and shadows, or making minor color corrections. The goal is to ensure the preset enhances the image without overpowering its natural qualities.
Working Through a Preset Collection Systematically
A recommended approach is to "work down the preset collection." This implies a methodical application of presets, perhaps starting with a general aesthetic preset and then moving to more specific ones, or utilizing toolkit presets followed by creative presets. This structured approach helps in understanding how different presets interact and how they contribute to the overall vision for the image.
Consider the "Pretty FILM: Pastels Collection." This collection offers a range of film-inspired looks, often characterized by soft colors and a nostalgic feel.
- Bubble Tea Preset: This preset is frequently used for its clean and simple edit, delivering a subtle film aesthetic. When applied without any tweaks, it provides a good baseline. For further refinement, adjustments to exposure (e.g., -0.53) and highlights (e.g., -67) can be made. A significant change in feel can be achieved by switching the white balance from "as shot" to "auto."
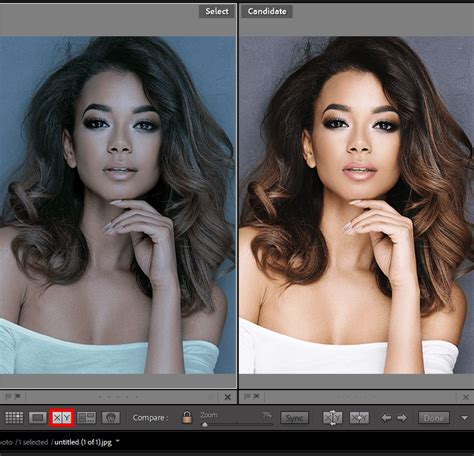
Rose Lace Preset: Another option from the "Pretty FILM: Pastels Collection," this preset offers a simple, nostalgic film look. Its application can be demonstrated through direct comparison with the original image, showcasing its transformative effect.
Nightingale B&W Preset: This black and white preset from the same collection is a popular choice. Its effectiveness can be seen in its ability to create dramatic and compelling monochrome images. Subtle adjustments like changing the white balance to the "Shade" preset, increasing exposure, and modifying clarity and texture can further enhance its impact.
Advanced Adjustments and Variations
For more complex edits, or when a preset doesn't perfectly match the desired outcome, more in-depth adjustments are necessary. Take the "Reverie" preset as an example. While it can be used with minimal tweaks, achieving a specific look might involve:
- Increasing exposure (e.g., to 0.56).
- Adjusting luminance for specific colors (e.g., green luminance +27).
- Setting the white balance to "Shade."
- For a more significant transformation:
- Increasing exposure (+0.43).
- Pulling down highlights (-79) and lifting shadows (+65).
- Setting a custom white balance (e.g., 7,450 temperature, +37 tint).
- Reducing clarity (-34) and increasing texture (+16).
- Adding dehaze (+4).
- Adjusting orange saturation (-39) and luminance (+24).
- Applying luminance smoothing (+12).
These detailed adjustments demonstrate that presets are not rigid templates but flexible starting points that can be molded to individual creative visions.
Exploring Beyond Basic Presets: Tone Curves and Balance Sliders
Understanding the underlying tools within Lightroom is crucial for effectively customizing presets.
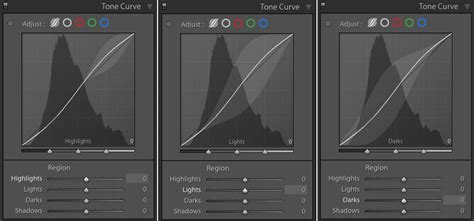
The Tone Curve: This is a fundamental tool for adding contrast to an image. Presets often manipulate the tone curve to achieve their characteristic look. The easiest way to make adjustments to a curve created by a preset is to directly click on the Point Curve. By manipulating the points on the curve, you can selectively brighten or darken specific tonal ranges, thereby controlling the overall contrast and mood of the image.
The Balance Slider: This slider, often found within color grading or split toning tools, determines which color will be more dominant in the image's highlights or shadows. If the slider is moved to the right, the color in the highlights will become more pronounced. This is a powerful tool for subtly influencing the color palette of an image and can be used to complement or contrast with the effects of a preset.
The Significance of Lightroom Profiles
Lightroom Profiles are often overlooked but are incredibly powerful. They function differently from presets. While presets adjust various sliders within Lightroom's Develop module, profiles fundamentally change how Lightroom interprets the raw data of your image. They can emulate the look of different camera sensors, film stocks, or apply unique color science. Using a profile as a starting point before applying a preset can lead to significantly different and often more desirable results. They offer a foundational shift in the image's color and tone, providing a unique canvas upon which presets can build.
When to Seek More Knowledge
As highlighted, it is challenging to effectively adjust a preset if you have minimal knowledge of how Lightroom operates. While this tutorial offers tips, beginners are strongly encouraged to dedicate time to exploring Lightroom's interface and functionalities. This hands-on experience will build familiarity, making it easier to navigate and modify presets when needed. Understanding the basic sliders, panels, and tools will demystify the adjustment process and empower users to take full control of their edits.
Broadening Your Photographic Horizons with Presets
The application of presets is not limited to standard portraiture or landscape photography. Creative techniques can be applied to a wide range of photographic genres.
Silhouette Photography: Presets can enhance the dramatic mood and mystery of silhouette shots. By carefully adjusting contrast and color, the stark outline of a subject against a lighter background can be made even more impactful.
Thematic Editing: Whether it's capturing the crispness of a snowy landscape or the warm glow of a sunset, presets can be tailored to enhance these specific environmental conditions. For instance, presets designed for "blue hour" images can be adapted for various creative uses beyond their intended purpose.
Consistency in Business: For photographers building a business, maintaining a consistent visual brand is paramount. Presets are instrumental in achieving this, ensuring that all client images possess a unified aesthetic, from wedding galleries to commercial portfolios. This consistency builds brand recognition and professionalism.
Pretty Presets & Actions: A Comprehensive Solution
Pretty Presets & Actions has developed a vast library of high-quality presets, brushes, and overlays for both Lightroom and Photoshop. Their collections, such as the "Evolution Collections," the "Pretty FILM: Pastels Collection," the "Dark & Moody Millennium Preset Collection," and "The Luminous Collection: Bokeh, Sun Flare and Haze," offer a diverse range of styles to suit any photographer's needs. These resources are designed to streamline the editing process, enabling photographers to achieve professional-looking results efficiently.

The "Evolution Collections," in particular, are noteworthy for their integration of AI-powered presets, which significantly reduce the time spent on photo editing. The ability to "work down the preset collection" systematically, combined with the flexibility to "finish or adjust" as needed, makes these tools highly adaptable.
For those new to installing these tools, "Pretty Presets" offers easy-to-follow installation instructions, including PDF guides for both Lightroom Classic (desktop) and the Lightroom mobile app. This ensures a smooth transition into utilizing their comprehensive editing solutions.
The journey of mastering Lightroom presets is one of continuous learning and exploration. By understanding the fundamental principles, utilizing the available tools effectively, and experimenting with different collections, photographers can unlock new levels of creativity and efficiency in their editing workflow. The goal is not just to apply a preset, but to use it as a springboard for creating images that truly resonate with your artistic vision.