Creating a professional and impactful business card design is a crucial step in establishing a strong brand identity. While the design itself is paramount, presenting it effectively through a realistic mockup can significantly enhance its perceived value and professionalism. This tutorial will guide you through the process of creating compelling business card mockups using Adobe Photoshop, from initial setup to advanced customization, ensuring your designs are showcased in the best possible light. We will explore various techniques, from using pre-made templates to building your own perspective-based mockups from scratch.
Preparing Your Workspace for Business Card Design
Before diving into the mockup process, it's essential to set up your Photoshop document correctly, especially if you're designing the card from scratch for print. For professional printing services like Vistaprint or Moo, adhering to their recommended Photoshop settings is vital.
First, create a new Photoshop document. The standard business card size in inches is typically 3.5 x 2 inches. However, to accommodate the bleed area necessary for printing, it's recommended to create a slightly larger canvas. A common and effective size for a print-ready business card file is 3.75 x 2.25 inches. This includes a 0.125-inch bleed on all sides.
In the "New Document" dialog box, ensure the unit of measurement is set to "Inches." For print, the resolution should be 300 pixels per inch (PPI), which guarantees a sharp and detailed output. Under "Color Mode," select "CMYK" as this is the standard color model for professional printing.
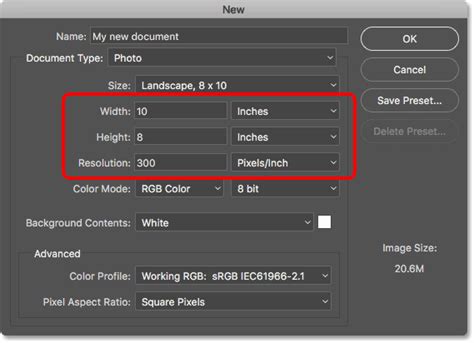
To visualize the bleed and safe areas, it's beneficial to set up guides. Enable rulers by going to "View" > "Rulers" (or press Ctrl+R/Cmd+R). Click on the top ruler and drag downwards to create a horizontal guideline. Place this guideline at 0.125 inches. Repeat this process for the bottom ruler, placing another guideline at 2.125 inches (2.25 total height - 0.125 bleed). Similarly, drag vertical guidelines from the left and right rulers to 0.125 inches and 3.625 inches respectively (3.75 total width - 0.125 bleed). These guides will mark the trim line and the safe zone where essential text and logos should be placed, ensuring they are not cut off during the printing process.
Designing Your Business Card Elements
A high-quality design is crucial for an effective business card mockup. It’s essential to ensure that the design is visually appealing, easy to read, and accurately represents the brand or company. Keep it simple and clean, prioritizing clarity and brand consistency.
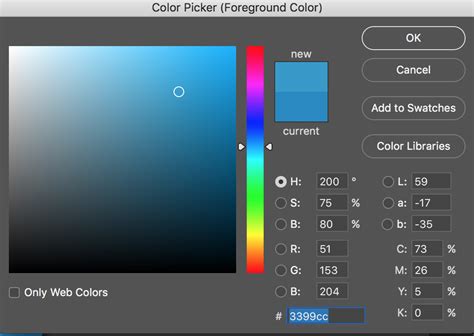
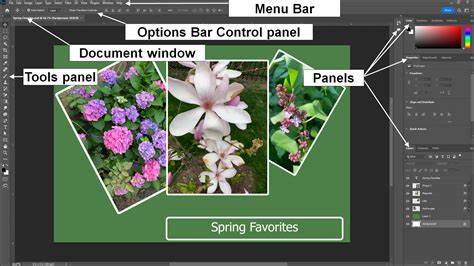
To begin designing, select a color for your background using the color picker, located at the bottom of the toolbar on the left. The top square represents the foreground color, and the bottom square represents the background color. You can use the color picker tool to select any color from the spectrum. Once a color is chosen, you can apply it to your background using the Color Bucket tool or create a gradient fade using the Gradient tool. To use the Gradient tool, select your desired start and end colors using the foreground and background color squares, then click and drag across your canvas to create the transition.
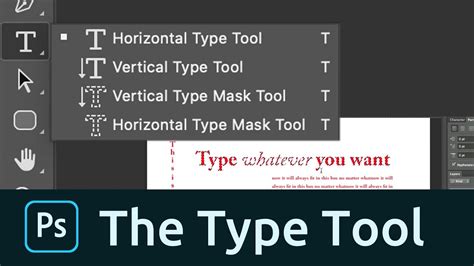
Adding text is a fundamental part of business card design. Select the Type tool (icon resembles a 'T') from the toolbar. Click on your canvas to create the first text item. Use the drop-down menu in the upper-right corner of the options bar to select your desired font. The "Sample" text next to each font shows its appearance. You can also choose the font style (e.g., bold, italic) from an adjacent dropdown. Consistency in font choice throughout your business card is recommended. To select a color for your font, click the colored square at the top of the options bar. Choose a color that offers good contrast with your background for readability. For instance, if your background is dark, opt for a light-colored font.
To adjust the size and position of your text, select the Move tool (the black arrow at the top of the toolbar). Click on a text item to select it. Small boxes (handles) will appear around the text. Click and drag these handles to resize. Hold down the Shift key while dragging to maintain the text's proportions. To align multiple text items, hold down Shift and click on all the text elements you wish to align. Then, click one of the alignment icons in the options bar (e.g., align left, center, right, distribute evenly). A common layout places your name at the top in large letters, your position below it in smaller text, and contact information on separate lines using medium-small text, ensuring all elements are properly aligned.
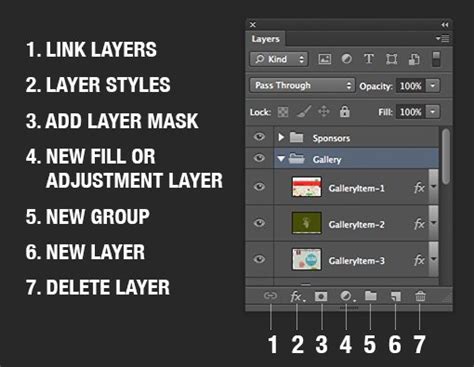
Consider creating a new layer for each new object you add, including different sections of text. This is managed in the Layers panel, typically located in the lower-right corner of the Photoshop interface. To create a new layer, click the "Create a new layer" icon (a square with a plus sign) at the bottom of the Layers panel. You can then double-click on the layer name to rename it (e.g., "Graphics," "Name," "Contact Info"). Dragging layers up or down in the panel changes their stacking order, determining which elements appear in front of others.
Beyond text, you can enhance your business card with graphics and images. The Brush tool can be used to draw simple shapes, lines, or apply textures. The Brush tool's options, including brush type and size, are displayed in the options bar. Solid circle brushes create solid lines, while faded circle brushes create softer edges. The "Size" slider adjusts the brush diameter. For applying patterns or textures, you can use specialized brushes or import images.
To add an image, go to "File" > "Place Embedded…" or "File" > "Place Linked…". Navigate your computer using the file browser to find your image. Once placed, you can resize it by dragging its corner handles (hold Shift for proportional scaling) and reposition it using the Move tool. If the image overlaps text, adjust its layer order in the Layers panel.
It's crucial to save your work frequently. Go to "File" > "Save" or "File" > "Save As." The native Photoshop file format, .PSD, is recommended as it preserves layers, text editability, and color detail. For final output, you may need to export your design in formats like JPEG or PNG via "File" > "Export".
Creating Perspective Business Card Mockups Using Smart Objects
A powerful technique for creating realistic business card mockups involves using Photoshop's Smart Objects and the Free Transform tool. This method allows you to apply your design to a pre-existing 3D-like representation of a business card, giving it a natural perspective.
Start by opening a business card mockup template file in Photoshop. These templates often consist of layers, with one or more dedicated to "Smart Objects." If you don't have a template, you can create your own perspective by taking a photograph. Using a tripod, capture an image of an existing business card or even a plain piece of paper from your desired angle. Then, without moving the camera, remove the card and take another photograph of the surface. This second image can serve as your background.
In your mockup template, locate the layer designated for your business card design, which will likely be a Smart Object. Double-click on the Smart Object thumbnail in the Layers panel. This will open the Smart Object in a new, separate Photoshop window.
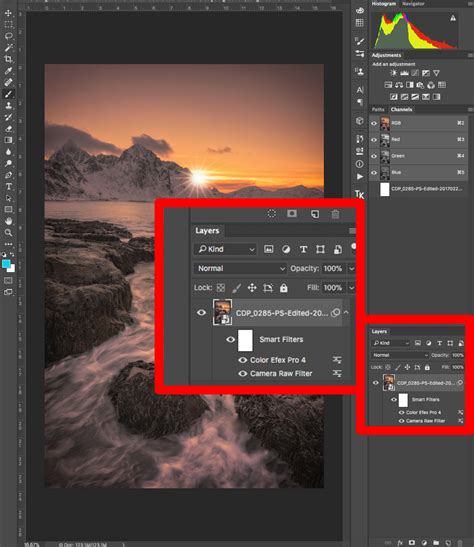
Inside this Smart Object window, you will prepare your business card design. You can either create a new design from scratch or paste your pre-designed business card artwork. Ensure your design fills the canvas of this Smart Object document. Once your design is ready, save the Smart Object document by going to "File" > "Save." Close this Smart Object window.
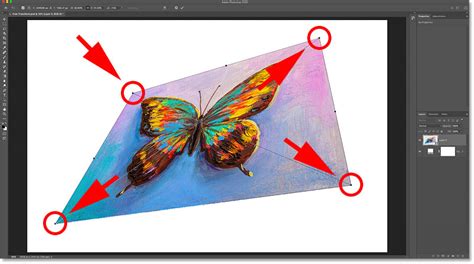
Returning to your main mockup file, you should now see your design applied to the business card shape. If the perspective isn't quite right, you can refine it. Select the layer containing your design (which is now the Smart Object). Press Ctrl+T (or Cmd+T on Mac) to activate the Free Transform tool. Right-click on the object on your canvas. You'll see several transformation options. Choose "Distort." Now, you can click and drag the corner and edge points of your design to precisely match the perspective of the underlying business card shape in the mockup. Adjust these points until the perspective looks natural and convincing.
Once the perspective is perfected, you might want to add realistic shadows to enhance the depth and realism of your mockup. Many mockup templates come with pre-set shadow layers that you can adjust. If you're creating your own, you can add a new layer below your business card design, fill it with a dark color, and then apply a Gaussian Blur filter ("Filter" > "Blur" > "Gaussian Blur") to soften it into a shadow. Adjust the layer's opacity and blending mode (often set to "Multiply") to control the shadow's intensity and appearance. You can also use the Blur tool at a strength of about 50% with a soft brush to selectively blur parts of the background to simulate depth of field.
To create multiple business cards in your mockup, select your business card layer, hold down the Alt (or Option on Mac) key, and drag to duplicate the layer. You can then use the Free Transform tool again on these duplicates to adjust their angles, positions, and even distort them slightly to create a more dynamic arrangement.
Utilizing Online Mockup Generators
For those seeking a quicker and often simpler approach, online mockup generators offer an efficient alternative to manual Photoshop manipulation. Platforms like Mockey.ai provide a vast library of business card templates that can be customized with your designs.
To use such a service:
- Navigate to the chosen online mockup generator website (e.g., Mockey.ai).
- Sign up for an account if required.
- Browse through their extensive collection of business card templates. Choose one that best suits the style and context you want to present.
- Upload your prepared business card design file.
- The platform will automatically apply your design to the selected template, generating a realistic mockup.
- Many generators offer customization options. You can often change the background, adjust colors, resize your design within the card, and sometimes even modify lighting or shadows.
- Once satisfied with the result, export the mockup in your desired format (e.g., JPG, PNG).
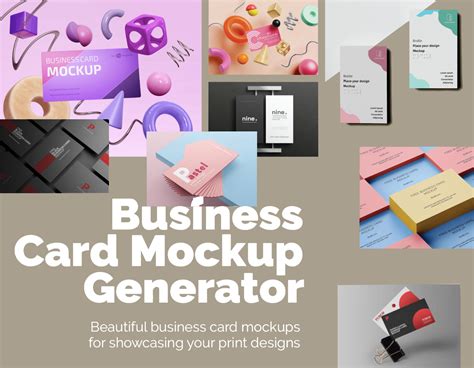
These online tools are particularly user-friendly and can be a great starting point for beginners or for projects with tight deadlines. They eliminate the need for in-depth Photoshop knowledge for basic mockup creation.
Advanced Techniques and Considerations
Beyond the fundamental steps, several advanced techniques can elevate your business card mockups.
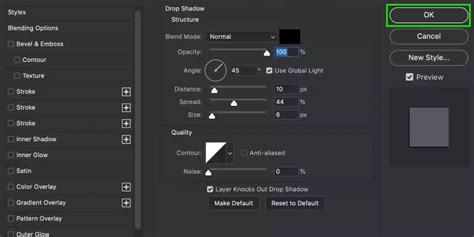
Layer Styles and Effects: Photoshop's layer styles (accessed by double-clicking a layer or going to "Layer" > "Layer Style") offer a wide range of effects like drop shadows, inner shadows, bevels, and strokes. Applying these judiciously can add subtle but effective realism. For instance, a very subtle inner shadow can give a slight embossed effect to text, while a soft drop shadow can lift the card slightly off the background.
Creating Your Own Mockup Backgrounds: Instead of relying solely on pre-made templates or simple background colors, consider creating custom backgrounds. You can photograph realistic textures like wood, marble, or a desk surface, or use high-resolution stock photos. Ensure the background complements your business card design without overpowering it. You can then use the blur tool or adjustment layers to subtly integrate the card with the background.
Adding Depth with Multiple Cards: Presenting a stack of business cards often looks more dynamic than a single card. Duplicate your smart object layer multiple times, then use the Free Transform tool (Ctrl+T/Cmd+T) on each duplicate. Slightly rotate, reposition, and even apply a subtle "Distort" transformation to each card to create a natural-looking stack. Varying the opacity of the lower cards can also enhance the effect.
Refining Lighting and Shadows: Pay close attention to the direction and softness of shadows. If your mockup has a strong light source from one direction, shadows should fall consistently on the opposite side. Soft, diffused shadows generally appear more natural than harsh, sharp ones. Experiment with the "Multiply" blending mode for shadows and adjust their opacity.
REVOLUTIONARY Photoshop Trick Changes Business Cards Forever
Exporting for Different Uses: Be sure to save your file in a format that preserves the layers and resolution of the mockup, especially if you plan to make further edits. When preparing for web use, export in formats like JPG or PNG at a lower resolution and optimized file size. For print, ensure you are exporting in CMYK color mode at 300 PPI. To use your business card mockup in different contexts, you may need to export the file in various formats.
Conclusion: Showcasing Your Design Excellence
Business card mockups are designed to be user-friendly and easy to customize, even for beginners. By mastering these Photoshop techniques, you can create visually appealing mockups that accurately represent your brand or company. The ability to transform a flat design into a realistic, three-dimensional presentation is a valuable skill for any graphic designer. With the various tools and techniques available in Photoshop, you can create unique and customized mockups that stand out from the rest, effectively communicating your design's potential and professionalism to clients or for personal branding. Whether you choose to leverage the power of Smart Objects for custom perspective or opt for the convenience of online generators, the goal remains the same: to present your business card designs in the most compelling and professional manner possible.