When embarking on any project destined for professional printing, a thorough understanding of "bleed" is not merely beneficial, but essential for achieving a polished, professional outcome. Full bleed printing is a technique employed when a project requires printed images or documents to have no discernible margins, meaning that the printed color and images extend all the way to the very edge of the paper. This ensures a seamless, edge-to-edge visual impact, creating the effect that the artwork is extending or "bleeding" off the page indefinitely. While home printers often leave a white border due to their mechanical limitations, professional printing equipment can achieve edge-to-edge coverage through a process of printing slightly beyond the intended trim size and then precisely trimming the excess.
The Purpose and Mechanics of Bleed
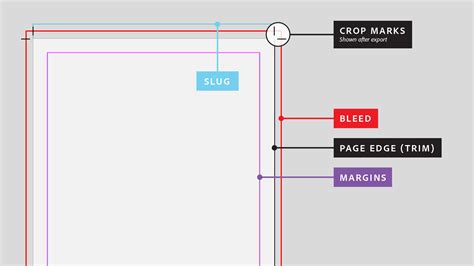
At its core, bleed is an intentional extension of your design beyond the final trim line. This extra area, typically 3mm (or 1/8 inch) on all sides, serves as a critical buffer against minor inaccuracies inherent in the printing and trimming process. Printers, despite their advanced technology, are not infallible. Imperfect paper feeding or slight shifts during the cutting phase can result in unintended white edges appearing on the finished product if the design does not extend into the bleed area. By extending your background colors, images, or any element intended to reach the edge of the page into this bleed zone, you guarantee that even if the trim is not perfectly exact, the visual integrity of your design remains intact, with no unsightly white borders.
The concept of bleed is so fundamental to professional printing that virtually all desktop publishing software, including Adobe InDesign, offers native support for its creation and management. In InDesign, bleed is visually represented by red lines that appear outside the black trim lines, indicating the area where your design elements should extend. It's crucial to distinguish bleed from margins. While margins (often referred to as "safety" areas) are designated spaces within the trim line where critical design elements like text and logos should be placed to avoid being accidentally trimmed, bleed is the area that is intended to be trimmed away.
Navigating Bleed in InDesign: A Step-by-Step Approach
Setting up bleed in InDesign can be done either when initially creating a new document or by adding it to an existing one.
Setting Bleed During Document Creation
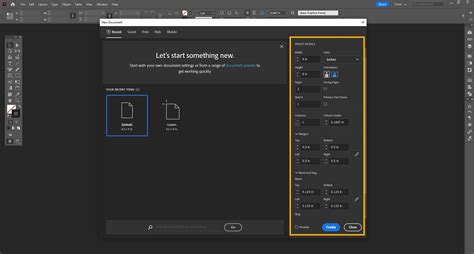
When you first create a new document in InDesign, navigate to the Print option. Within the "Preset Details" section, you will find the "Bleed and Slug" options. Here, you can input the desired bleed value for the top, bottom, left, and right sides. For most professional printing jobs, a 3mm (or 1/8 inch) bleed is standard.
Adding Bleed to an Existing Document
If you have an existing document that requires bleed, you can easily add it by going to File > Document Setup. In the "Bleed and Slug" section, input your desired bleed values for each side. After setting the bleed, it's imperative to ensure that all artwork, background colors, and images intended to extend to the edge of the page are indeed extended to meet these newly established red bleed guides. InDesign's snapping feature can assist in aligning your content precisely to these guides.
The Peculiar Case of Facing Pages and Inner Bleed
A common point of confusion arises when working with documents that feature facing pages, such as books or magazines, and how bleed is handled on the inner edge, adjacent to the spine. In a standard spread layout, InDesign is programmed to place a small strip of the opposite page's bleed area onto the spine-side of its neighboring page. This behavior, while seemingly counterintuitive, is a deliberate design choice within the software.
The purpose of this "orphan" bleed strip is rooted in the mechanics of PDF export for spreads and the subsequent printing process. When a spread is exported as a single PDF page, the trim marks and bleed areas are interpreted by the printing software. If a full bleed is applied to all four sides of every page within a facing-pages document, the inner edge bleed of one page would, without this duplication, be the only content extending towards the spine. However, during the PDF export of a spread, InDesign effectively "mirrors" or duplicates the inner bleed of one page onto the bleed area of the facing page. This ensures that when the printer trims the spread, there is always sufficient bleed present on both sides of the intended final page cut. Without this duplication, the inner edge might be susceptible to the same trimming errors as the outer edges, potentially resulting in white gaps next to the spine.
The strips are indeed intended to be trimmed off. They reside within the 3mm bleed area of the neighbor page, and as such, they fall outside the final trim line. The printing process involves cutting along the trim lines, effectively removing these duplicated bleed portions. Therefore, these strips are not intended to be visible in the final printed document. They serve a functional purpose in ensuring that the bleed is consistently present across the entire edge, even at the binding.
Practical Implications for Book and Magazine Layouts
For documents with facing pages that are intended for binding, it is best practice to set the bleed on the top, bottom, and outside edges only. The inside edge bleed, while handled by InDesign's mirroring, can sometimes lead to unexpected visual artifacts if not managed carefully. Many designers opt to set the inside bleed to 0mm when creating documents destined for binding, relying on the top, bottom, and outside bleeds to cover all trimming requirements. This approach simplifies the layout and avoids any potential confusion or unintended content spillover at the spine.
To achieve this, when setting up your document in InDesign, after inputting the standard bleed for the top, bottom, and outside, you would break the uniform link between the bleed fields and set the inside bleed to 0mm. This ensures that the software does not attempt to create or duplicate bleed on the inner edge.
How to Make an InDesign Book Layout Template
Exporting PDFs with Bleed for Professional Printing
The final step in preparing your InDesign document for professional printing is exporting it as a PDF. This process requires careful attention to the export settings to ensure that the printer receives all the necessary information.
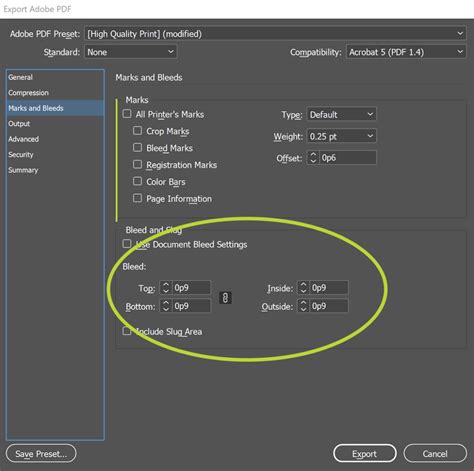
When exporting your InDesign document (File > Export), choose the "Adobe PDF (Print)" format. In the export dialog box, navigate to the "Marks and Bleeds" section. Crucially, you must check the box for "Use Document Bleed Settings." This ensures that the bleed you have defined in your document setup is carried over into the exported PDF.
In addition to bleed settings, it is often necessary to include "Printer's Marks." The specific marks required can vary depending on the printing company, but commonly include:
- Crop Marks: These indicate where the paper should be trimmed to achieve the final page size.
- Registration Marks: These are used by the printer to align the different color separations (Cyan, Magenta, Yellow, and Black) accurately, preventing color misregistration.
- Color Bars: These are used for color calibration, helping the printer ensure consistent color output.
- Page Information: This can include page numbers, document titles, and other job-specific details.
Always confirm with your printing provider which specific marks they require. Including these marks, along with the correctly set bleed, provides the printer with all the necessary guides to produce a high-quality, accurately trimmed final product.
Avoiding Common Bleed Misconceptions and Errors
One of the most frequent errors encountered in files submitted for print is incorrectly set bleed. Designers may set up the bleed in their document but then fail to extend their actual artwork to reach the bleed guides. This results in the very white edges that bleed is intended to prevent. Remember, the bleed area is not a design element in itself; it's an extension of your design elements.
Another misconception is the belief that bleed is only necessary for images that cross the entire page. Any color, graphic, or image that is intended to reach the edge of the final trimmed page requires bleed. If you have a white background, you may not need full bleed printing, as the natural edge of the paper would suffice. However, for any design element that extends to the edge, bleed is essential.
Furthermore, it's important to understand that bleed is a print-specific requirement. If your project is intended for digital distribution only and will not be printed, you can typically exclude bleed and printer marks from your export settings.
In essence, bleed is a technical necessity for professional printing that ensures the visual continuity of your design to the very edge of the printed page. By understanding its purpose and implementing it correctly within your InDesign workflow, you can avoid common pitfalls and guarantee a professional, polished final product. Always communicate with your print provider to ensure you are meeting their specific requirements for bleed and printer's marks.