In a world that's constantly changing and growing, there is one thing you can have total control over: organizing your work. A well-organized document is a sign of a winning product. For this reason, after our tutorial post on bulleted lists, let's find out how to create an InDesign numbered list. After all, what's better than a list to organize your document? How do you go about creating an InDesign numbered list? The process is not much different from what we saw in the previous post on bullet points. Again, our list can be created in two ways: using local formatting or using InDesign paragraph styles. While local formatting offers immediate results, the use of paragraph styles is preferred for consistency within your document. Styles also save a lot of time if you need to go back to your document and edit your work at a later time. In this article, however, we will show you both ways of creating the InDesign numbered list, as well as how to leverage this feature for more complex hierarchical structures.
Overview of Numbered List Creation in InDesign
This guide will provide a practical overview of everything we'll cover, from the fundamental steps of creating a numbered list using local formatting to the more advanced application of paragraph styles for automated, multi-level numbering. We will explore why choosing a numbered list over a bulleted list can be advantageous in specific scenarios, particularly when dealing with hierarchical content such as chapters and sub-chapters.
Why Choose a Numbered List Instead of a Bulleted List?
Numbered lists can be used in the same way as bulleted lists are used to organize information and improve readability. However, the InDesign numbered list has one special feature that makes it stand out: its ability to create chapters and sub-chapters in your document that rely on automated numbering. This hierarchical numbering is crucial for documents with a structured hierarchy, such as books, technical manuals, or academic papers, where the order and relationship between different sections are paramount. Unlike bulleted lists, which primarily serve to group related items without implying sequence, numbered lists inherently convey order and progression. This makes them indispensable for outlining steps in a process, enumerating points in a logical sequence, or defining a clear structure for complex information.
Creating an InDesign Numbered List with Local Formatting
This section will show you how to create an InDesign numbered list without using styles. We will see, in order, how to: transform text into a numbered list, change the indentation value for the numbers, and change the numbering style.
Transforming Text into a Numbered List
To begin, select the text you want to transform into a list. Now, turn your attention to the control bar at the top of the InDesign window. Make sure that the icon on the left with the paragraph symbol is active; if it isn't, click on it to ensure you are in paragraph mode. Then, click on the numbered list symbol to turn the selected text into a list. You will notice that InDesign automatically applies sequential numbering to each paragraph.

Changing the Indentation Value of the Numbers
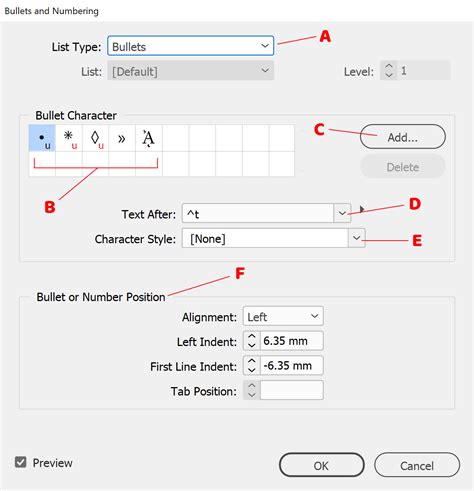
Once you've transformed your text into a list, you'll likely need to adjust the spacing between the numbers and the text to ensure a visually appealing and readable layout. Keep your selection on the numbered text. You can then modify the values in the control bar. The first value at the top (often labeled 'A' in visual guides) indicates how far the text should fall within the margins of the text box that contains it; this is typically measured in millimeters or points. The second value below (often labeled 'B') indicates how far the number is from where the text begins; this value is often negative to pull the number closer to the left margin, creating a consistent indent. These values are crucial for controlling the overall appearance and flow of your list items.
Changing the Numbering Style
To further customize your numbered list, you can change the numbering style itself. Keep your selection on the numbered list. At the far left of the control bar at the top, inside the tools dedicated to the paragraph, click on the icon that typically displays three vertical lines or a similar paragraph formatting indicator. From the dropdown menu that appears, select "Bullets and Numbering…". In the panel that opens, you will find the "Numbering style" section. Here, you can change the format of your list items by clicking on the "Format" option and selecting your preferred style from the dropdown menu, which includes various numerical, alphabetical, and Roman numeral options.
Creating an InDesign Numbered List with Styles
Using paragraph styles is a more robust and efficient method for managing lists, especially in larger documents. The instructions we've just seen for local formatting will come in handy here, as styles essentially capture and automate these settings. There are two primary ways to create numbered lists using styles: using the "Redefine style" option after setting the list locally, or by directly configuring the "Bullets and Numbering" tab within the Paragraph Style Options.
Using the Redefine Style Option
This option is particularly useful for saving any style settings you have given to the text locally. In your document, before changing the style of the numbered list, you would have already assigned a paragraph style to the numbered list (e.g., p-numbered-list). At this point, with p-numbered-list assigned to your list, place your cursor inside the list (it's safer to avoid the paragraph with the number '1' to ensure all list items are affected). Then, open the Paragraph Styles panel. Right-click on p-numbered-list and select "Redefine style." From this moment on, every time you associate p-numbered-list with a paragraph, it will automatically create a list formatted according to the settings you established when using local formatting. This method ensures consistency and allows for quick application of pre-defined list styles.
Using the Bullets and Numbering Tab within Paragraph Styles
This method is for more experienced InDesign users who prefer to set up their numbered lists directly within the paragraph style definition. You can go to the "Bullets and Numbering" tab within the Paragraph Style Options to find all the necessary settings to create your list with a paragraph style. This approach offers greater control and allows for the creation of complex, multi-level lists from the outset.
To create a new paragraph style for a numbered list:
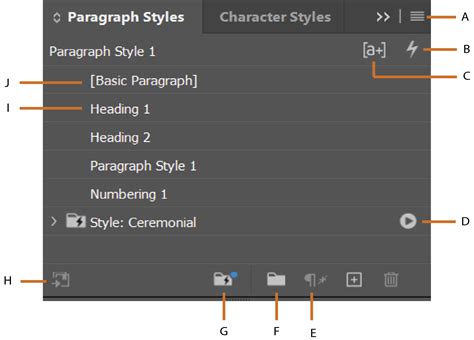
- Open the Paragraph Styles panel (Window > Styles > Paragraph Styles).
- Click the "Create New Style" button at the bottom of the panel.
- In the "New Paragraph Style" dialog box, give your style a descriptive name (e.g.,
My Numbered List Style). - On the left-hand side of the dialog box, navigate to the "Bullets and Numbering" section.
- In the "List Type" dropdown, select "Numbers."
- From the "Format" dropdown, choose your desired numbering style (e.g., 1, 2, 3…).
- Adjust the indentation and spacing settings as needed in the "Bullet or Number Position" area.
- Click "OK" to save the new paragraph style.
You can then apply this style to any text that you want to format as a numbered list. This ensures that all your numbered lists throughout the document adhere to the same formatting rules, maintaining a professional and cohesive look.
Chapters and Sub-Chapters with Automated Numbering
This is where the power of InDesign's numbered lists truly shines. We will explore how to use numbered lists to create chapters and sub-chapters with automated numbering, a feature that can save immense amounts of time and prevent errors in complex documents.
Understanding Chapters in InDesign Context
It's important to clarify what "Chapters" might refer to in InDesign. While some settings might refer to "Chapters," they are often talking about "Books." The use of InDesign's Book feature is a more advanced topic, designed for managing collections of separate InDesign documents that form a larger work, like a multi-volume series or a book with many chapters in individual files. The Book feature allows for synchronized styles, cross-references, and a unified table of contents across multiple documents. However, for structuring a single, long document with a hierarchical outline, the numbered list feature within paragraph styles is often more direct and manageable than the full Book feature.
Creating Chapters and Sub-Chapters with Numbered Lists
The secret to creating automated chapter and sub-chapter numbering lies in using InDesign's tiered list functionality within paragraph styles. Let's start by assuming you have already created paragraph styles for your different heading levels (e.g., p-chapter, p-sub-chapter, p-title-third-level). It's common for sub-styles to be based on a primary style, inheriting some of its properties.
Setting Up the Chapter Style (Level 1)
We will begin by transforming our main chapter style (p-chapter) to incorporate numbered list functionality.
- Enter the "Paragraph Style Options" for your
p-chapterstyle. - Navigate to the "Bullets and Numbering" section.
- Choose "Numbers" as the "List type."
- Ensure the "Level" is set to "1."
- In the "Number" box, you will typically see something like
^#.^t. The^#is a placeholder for the current number, and^trepresents a tab. This sets up your chapters as a continuous numbered list (e.g., 1, 2, 3…). - To ensure that the numbering is correctly formatted and positioned, you may need to adjust the "Left Indent" and "First Line Indent" in the "Bullet or Number Position" area. For example, a common setting for a chapter heading might involve a left indent for the number and a tab position to align the text following the number.
- Click "OK." Now, when you apply the
p-chapterstyle, your headings will be numbered sequentially.
Distinguishing Sub-Chapters (Level 2)
To create sub-chapters, we'll use the same list but at a different level.
- Enter the "Paragraph Style Options" for your
p-sub-chapterstyle. - Go to the "Bullets and Numbering" section.
- Ensure the "List type" is "Numbers."
- Change the "Level" to "2."
- The "Number" box will now likely read
^1.^2.^t. The^1represents the numbering from the previous level (your chapter number), and^2represents the numbering for the current level (your sub-chapter number). This will create numbering like 1.1, 1.2, 2.1, 2.2, and so on. - Adjust the indentation settings for this level. Typically, sub-chapter numbers will be indented further than chapter numbers to visually represent their subordinate status.
- Click "OK." Applying this style will now create nested numbered lists.
Distinguishing Titles on the Third Level (Level 3)
The procedure for setting up the p-title-third-level style is the same.
- Enter the "Paragraph Style Options" for
p-title-third-level. - Go to "Bullets and Numbering."
- Set the "Level" to "3."
- The "Number" box should be configured to read
^1.^2.^3.^t. This will generate numbering like 1.1.1, 1.1.2, 1.2.1, etc. - Adjust indentation as necessary for this deepest level.
- Click "OK."

With these styles applied, you will have a layered list with automated numbering. If you now add or remove items from your list, or reorder them, the numbering will update itself automatically. This simple trick, leveraging InDesign's paragraph styles and multi-level lists, will save you a tremendous amount of time and ensure accuracy in your document's structure.
How to set up Multi level numbering and numbered lists in Adobe InDesign
Advanced Numbering Scenarios
InDesign offers further flexibility for numbering schemes, allowing for more complex organizational needs.
Restarting Numbering
At times, you may need to restart the numbering for a particular section or level. For instance, within a chapter, you might have a series of steps that should be numbered 1, 2, 3, rather than continuing the overall document's numbering sequence. To achieve this, within the "Bullets and Numbering" tab of a paragraph style, you can utilize the "Restart Numbers At This Level After" option. By specifying a level, you can instruct InDesign to reset the numbering for that level whenever a paragraph at a higher level appears. For example, setting "Restart Numbers At This Level After" to 1 in a Level 2 style will restart the Level 2 numbering every time a new Level 1 item begins.
Running Lists and Captions
InDesign also supports "running lists," where numbering continues across different stories or documents, or is interwoven with other content. This is particularly useful for automatically numbering figures, tables, or equations throughout a document or even a book. To create running captions for items like figures or tables:
- Define a list in the "Bullets and Numbering" dialog box.
- Create a paragraph style for your figure captions (e.g.,
Figure Caption Style). - Within the "Bullets and Numbering" tab of this style, select "Numbers" as the List Type and choose your defined list.
- In the "Number" box, you might set it to
Figure ^#(orFigure ^1if it's a top-level item). The^#or^1will automatically insert the sequential number. - Ensure "Restart Numbers At This Level After" is not checked if you want the numbering to be continuous throughout the document or book.When you apply this style to your figure captions, InDesign will automatically number them sequentially (Figure 1, Figure 2, etc.). This applies similarly to tables, equations, or any other element you wish to enumerate consistently.
Converting Lists to Text
While InDesign's automated numbering is powerful, there might be instances where you need to convert the numbered list to static text. This is useful if you need to finalize a list and prevent any further automatic updates, or if you need to manually edit the numbers. To do this, select the text frame containing your list, then go to Type > Convert Bullets and Numbering to Text. Be aware that this action is irreversible, and the numbers will become regular text characters, losing their dynamic linking.
By mastering these techniques, you can effectively organize your content in Adobe InDesign, ensuring clarity, consistency, and a professional presentation for any document, from simple lists to complex hierarchical structures.