Understanding how to control page numbering in Adobe InDesign is a fundamental skill for creating professional documents, whether it's a book, a report, or a brochure. Often, the first page of a document serves a specific purpose, like a title page or a cover, and doesn't require a visible page number, or it needs to be the start of a new numbering sequence. This guide will walk you through the process of initiating page numbering from the second page, or any subsequent page, and explore various related functionalities within InDesign.
The Logic of InDesign Page Numbering
At its core, InDesign's page numbering system relies on a special text placeholder known as the "Current Page Number." This placeholder can be placed directly onto a document page or, more commonly and efficiently, onto a master page. When placed on a master page, the "Current Page Number" placeholder automatically displays the correct page number for every document page that has that master page applied. This means a single change on the master page can update all associated page numbers simultaneously, ensuring consistency throughout your document.
The placement of these page numbers is also crucial for proper document management. As advised by InDesign experts, page numbers, along with headers and footers, should reside in a top layer. This ensures that no other content-such as background images or text frames-obscures the page numbering, maintaining readability and a polished appearance. Layers in InDesign act like stacked containers; elements in higher layers are displayed above those in lower layers.
Implementing Page Numbers: A Step-by-Step Approach
To begin adding page numbers, you'll typically work with master pages.
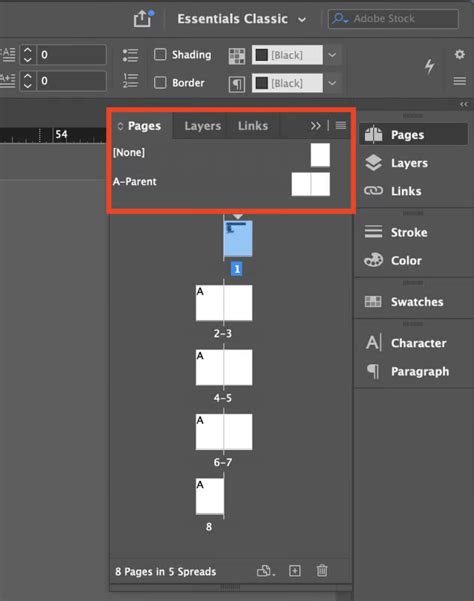
- Access the Pages Panel: If it's not already visible, open the Pages panel by navigating to
Window > Pages. - Select a Master Page: Within the Pages panel, double-click on the master page you wish to edit. This is usually the master page applied to the pages where you want numbering to appear. If you're starting a new document or haven't defined specific masters, you might work with the default
A-Master. - Ensure Correct Layer: If you are using a layered approach for your document, make sure you are working on the designated layer for page numbers (typically a top layer).
- Create a Text Frame: On the master page, draw a text frame where you want the page number to appear. This could be in the footer, header, or any other consistent location.
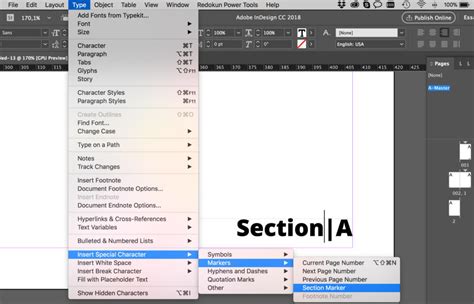
- Insert the Placeholder: With the text frame selected, go to
Type > Insert Special Character > Markers > Current Page Number. You will see a placeholder appear in the text frame, which will display the master page prefix if one is set. - Handle Facing Pages: If your document uses facing pages (e.g., a book layout), you'll need to repeat this process on the other page of the master spread to ensure page numbers appear on both left and right-hand pages.
- Apply Master Page: Once you've set up your master page with the page number placeholder, apply this master page to the document pages where you want the numbers to be displayed.
Changing Page Number Styles
InDesign offers flexibility in how your page numbers are displayed. You can switch between Arabic numerals (1, 2, 3), Roman numerals (i, ii, iii), or letters (a, b, c).
To change the page numbering style:
- Select the First Page of the Section: In the Pages panel, select the first page of the section for which you want to change the numbering style. If you want to change the style for the entire document, select the very first page.
- Open Numbering and Section Options: Right-click on the selected page icon and choose
Numbering & Section Options...from the context menu. - Choose the Style: In the dialog box that appears, locate the
Page Numberingsection. Use the dropdown menu next toStyleto select your desired format (e.g., Arabic, Roman numerals, Letters). - Confirm: Click
OKto apply the new style. All pages within that section will now display numbers in the chosen format.
It's important to note that when changing styles, you should always select the first page of the relevant section. This ensures that the style change is applied correctly to all subsequent pages in that section.
Skipping the First Page or Multiple Pages
A common requirement is to omit page numbers from the initial pages of a document, such as a cover page, title page, or table of contents. InDesign handles this through the concept of "sections." By default, a document starts with a single section beginning on page 1. To skip numbering on the first page, you need to create a new section and then instruct InDesign to start the numbering from a different value on that new section.
Here's how to start numbering from page 2 with the number "1" appearing on that page:
- Identify the Target Page: In your Pages panel, locate the page where you want the numbering to begin. In this scenario, it's page 2, and you want it to display as "1".
- Create a New Section: Double-click on the icon for page 2 in the Pages panel. Then, right-click on this page icon and select
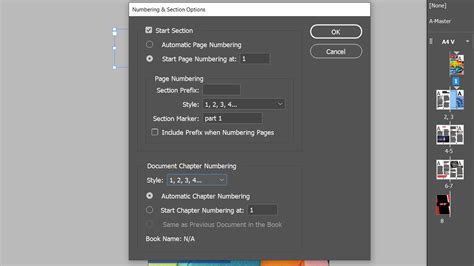
Numbering & Section Options.... - Enable "Start Section": In the
Numbering and Section Optionsdialog box, check the box labeledStart Section. - Set Automatic Page Numbering: Ensure that the radio button for
Automatic page numberingis selected. - Define the Starting Number: Change the value in the
Start page numbering at:field from its default (which might be the page number itself) to1. - Address Potential Warnings: You might encounter a warning screen informing you that some pages could have identical page numbers. This is expected when you're starting a new sequence. Click through any warnings.
- Apply a Different Master (Optional but Recommended): If your first page (page 1) has a master page applied that includes a page number placeholder, you may want to apply a different master page-such as the
Nonemaster-to page 1. This prevents a page number from appearing on page 1. Alternatively, you can override all master page items on page 1 and delete the page number. - The "Identical Page Numbers" Issue: You might run into issues if InDesign becomes confused by duplicate page numbers, especially when applying master pages. For example, if you have two pages designated as "page 1," InDesign might flag this. To resolve this, you can use the
Section Prefixfeature (explained later) or manually adjust the master page application.
A More Detailed Method for Skipping Pages:
For more complex documents with multiple sections or specific requirements, a refined approach can prevent confusion:
- Create the New Section: Select the page from which you want the new numbering to begin (e.g., page 2). Right-click and choose
Numbering & Section Options.... CheckStart Sectionand clickOK. Don't change the starting number yet. This action essentially tells InDesign, "This is the start of a new logical division of the document." - Adjust the First Section's Style (If Necessary): If your first section (page 1) has a numbering style you don't want to carry over, select page 1, right-click, choose
Numbering & Section Options..., and change theStyleto your preference (or toNoneif you don't want any numbers). - Set the New Section's Starting Number: Now, select the same page you chose in step 1 (the start of your new section, e.g., page 2). Right-click, select
Numbering & Section Options..., checkStart Section(it should already be checked), and importantly, flagStart page numbering at:and set the value to1. ClickOK.
This sequence ensures that InDesign correctly recognizes the boundaries between sections and applies numbering as intended.
Advanced Controls: Section Markers and Prefixes
Beyond basic numbering, InDesign provides tools for adding context and unique identifiers to your page numbering.
Adding Section Markers
Section Markers are useful for indicating to readers which part of a document they are viewing, such as a specific chapter in a book or a section in a catalog.
- Edit Section Marker Value: Go back to the
Numbering & Section Options...dialog box for a specific section. You'll find a field toEdit Section Marker. Enter a descriptive name here (e.g., "Chapter 1," "Introduction"). You'll need to do this for each section you've defined. - Add the Section Marker Placeholder: On your master page, within the text frame containing the "Current Page Number" placeholder, go to
Type > Insert Special Character > Markers > Section Marker. This will insert a placeholder that displays the Section Marker text you defined for that section. This placeholder should typically be placed before the "Current Page Number" placeholder.
Adding a Section Prefix
A Section Prefix allows you to add a character or short string before each page number within a section. This is handy for differentiating parts of a document, especially if they are in different languages or have distinct purposes.
- Edit Section Prefix: In the
Numbering & Section Options...dialog box for a section, find theSection Prefixfield. Enter your desired prefix (e.g., "A," "EN," "APP"). - Include Prefix: Make sure to check the box labeled
Include Prefix when Numbering Pages. - Confirm: Click
OK. The specified prefix will now appear before every page number in that section. For instance, if you set the prefix to "A" and the page number is 5, the displayed number will be "A5". This can also help InDesign distinguish between pages that might otherwise have duplicate numbers, resolving potential conflicts.
How To - Parent Pages Tutorial in Adobe InDesign
By mastering these techniques-understanding master pages, utilizing sections, and leveraging special markers and prefixes-you gain complete control over page numbering in your InDesign documents, ensuring clarity, professionalism, and efficient workflow.