Changing hair color in photographs using Adobe Photoshop is a skill that can elevate your portrait retouching, fashion photography, and creative editing. Whether you aim to add a splash of vibrant color for a fashion shot, subtly alter a subject's hair to match a new style, or simply explore different aesthetics without the commitment of a salon visit, Photoshop offers powerful tools to achieve realistic and impressive results. This guide will walk you through the essential techniques, from initial selection to nuanced refinements, enabling you to transform hair color with precision and confidence.
The Foundation: Non-Destructive Editing and Smart Objects
At the core of effective Photoshop editing lies the principle of non-destructive workflows. This means making changes that can be easily reverted, adjusted, or refined at any point without permanently altering the original image data. A crucial first step in this process is converting your image layer into a Smart Object.
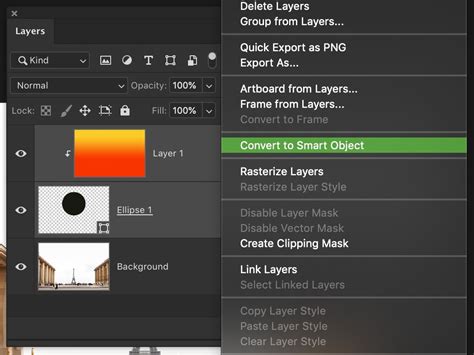
To do this, open your image in Photoshop. Locate the Layers panel, right-click on your image layer, and select "Convert to Smart Object." This action encapsulates your layer within a smart object container, allowing you to apply filters and adjustments as "Smart Filters," which are editable after application. This ensures that all subsequent adjustments remain flexible, giving you the freedom to revisit and tweak your edits without starting from scratch.
Precision Selections: The Key to Realistic Results
The success of any hair color change hinges on the accuracy of your selection. Photoshop's tools have evolved to make this once-challenging task remarkably accessible.
Utilizing the Quick Selection Tool and Refine Edge
The Quick Selection tool is an excellent starting point for isolating hair. Simply brush over the hair area, and Photoshop's intelligent algorithms will attempt to identify and select the contiguous pixels of similar color and texture. As you make your selection, you'll see the familiar "marching ants" outline.
Once you have a preliminary selection, the "Select and Mask" workspace (formerly known as Refine Edge) is your best friend for achieving pixel-perfect edges. With the hair selected, click the "Select and Mask" button in the Options bar. Within this workspace, you can refine the selection further.
- View Modes: Experiment with different view modes, such as "On White" or "Overlay," to clearly see the boundaries of your selection against the background. This helps in identifying areas that need adjustment.
- Radius and Edge Detection: The Radius slider can help Photoshop detect finer details like individual hair strands. Adjusting this value will allow Photoshop to analyze a larger or smaller area around the edges of your selection for finer detail.
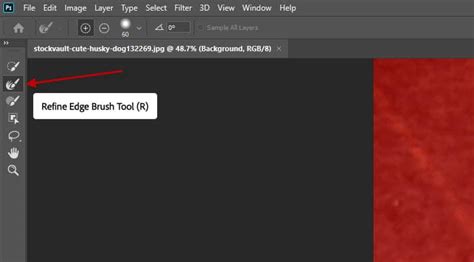
- Refine Edge Brush Tool: This specialized brush is invaluable for areas with complex edges, such as flyaway hairs or wisps. Paint along these edges with the Refine Edge Brush Tool, and Photoshop will intelligently differentiate between hair and background.
- Global Refinements: Within Select and Mask, you'll find sliders for Smooth, Feather, Contrast, and Shift Edge. These global adjustments can help to soften harsh edges, introduce a subtle blur, or expand/contract the selection boundary.
After refining your selection to your satisfaction, set the Output To option to "New Layer with Layer Mask." This creates a new layer containing only the selected hair, with a layer mask that precisely defines its boundaries. This layer mask is crucial for controlling where your color adjustments will be applied.
Applying New Color: Adjustment Layers and Color Balance
With a clean selection and layer mask in place, you can now introduce new color to the hair. Adjustment layers are the preferred method for this, as they are non-destructive and easily editable.
The Power of Color Balance
The Color Balance adjustment layer is a versatile tool for subtly or dramatically altering the color of your subject's hair.
- Create the Adjustment Layer: With your hair layer mask active (ensure the layer mask thumbnail is selected in the Layers panel, not the image thumbnail), click the "Create new fill or adjustment layer" icon at the bottom of the Layers panel and choose "Color Balance."
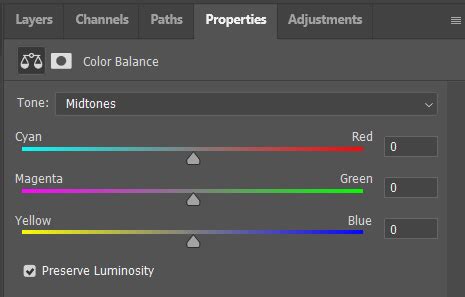
- Targeted Adjustments: The Color Balance dialog box allows you to adjust the Cyan/Red, Magenta/Green, and Yellow/Blue sliders. You can apply these adjustments globally or, by using the Tone dropdown, target specific tonal ranges like Shadows, Midtones, or Highlights.
- Experimentation: Play with these sliders to achieve your desired hue. For instance, moving the Cyan/Red slider towards Red will introduce red tones. Remember that the numerical values used in a tutorial might not be perfect for your specific image; use them as a starting point and adjust accordingly.
- Colorizing Option: For a more direct color application, you can also utilize the "Hue/Saturation" adjustment layer with the "Colorize" option checked. This allows you to select a specific hue and then adjust its saturation and lightness. However, be mindful that "Colorize" can sometimes be overly aggressive and affect the tonal range of the hair, requiring further refinement.
Refinements for Realism: Blend Modes and Opacity
Once a new color has been applied, the result might appear somewhat artificial or disconnected from the rest of the image. This is where blend modes and opacity adjustments come into play to achieve a natural integration.
Blending Modes for Seamless Integration
Blend modes dictate how a layer's pixels interact with the pixels of the layers beneath it. Experimenting with different blend modes can significantly enhance the realism of your hair color change.
- Color: This blend mode applies the hue and saturation of the adjustment layer while preserving the luminosity of the original hair. It's excellent for achieving a natural color shift without altering the highlights and shadows.
- Soft Light: Soft Light is a popular choice for hair color changes. It gently increases contrast and saturation, often resulting in a more vibrant and blended look that feels integrated with the image's lighting.
- Overlay: Similar to Soft Light but more intense, Overlay can produce a dramatic color effect.
- Screen: While often used for lightening, the Screen blend mode can sometimes be useful for applying lighter, more vibrant tones to hair, especially when working with highlights.
Adjusting Opacity
The Opacity slider in the Layers panel controls the overall transparency of the adjustment layer. If the new hair color appears too intense or saturated, simply lowering the opacity will reduce its strength, allowing more of the original hair detail to show through and creating a more subtle effect.
Advanced Techniques and Considerations
While the core process involves selection and adjustment layers, several advanced considerations can elevate your results.
Dealing with Lighter and Darker Hair
The ease of changing hair color often depends on the starting point.
- Dark to Light: Transforming dark hair to a significantly lighter shade, such as blonde, is considerably more challenging than the reverse. Darker hair inherently contains less detail in its lighter areas, making it difficult to introduce bright, luminous tones without losing texture. This often requires extensive work with curves and selective color adjustments to build up luminosity and detail.
- Light to Dark: Conversely, making lighter hair darker is generally more straightforward. You have more existing detail to work with, allowing for smoother transitions and richer tones.
Specific Adjustment Layers for Nuance
- Selective Color: This adjustment layer is powerful for fine-tuning specific color ranges within the hair. You can target the "Reds," "Yellows," or "Cyans" within the hair and subtly adjust them to refine the overall hue.
- Curves: For precise control over lightness and contrast, the Curves adjustment layer is indispensable. You can manipulate the tonal range of the hair to match the lighting of the scene or to enhance details.
Addressing Imperfections and Highlights
Even with meticulous masking, you might encounter issues:
- Losing Detail: Intense color adjustments can sometimes lead to a loss of fine hair highlights. Changing the blend mode of your color adjustment layer (e.g., to Screen) or using a separate Curves layer to selectively brighten highlights can help restore this detail.
- Color Bleed: If the new color appears to be affecting the background or the subject's skin, it indicates an issue with the layer mask. Double-click the layer mask thumbnail to access its properties and refine its smoothness, feathering, or edge shifts. You can also directly paint on the mask with black to hide the effect or white to reveal it.
How to Change Hair Color in Photoshop | Easy & Realistic Hair Coloring Tutorial
A Note on Realism and Practice
It's important to acknowledge that achieving perfectly photorealistic hair color changes can be complex, especially with intricate hairstyles or challenging lighting conditions. The goal is often to create a believable and aesthetically pleasing result rather than an indistinguishable photographic replica.
The provided information highlights that "the results will not be perfect, but you always have the opportunity to refine them." This is a crucial mindset. Embrace the iterative nature of Photoshop editing. Don't be discouraged if your first attempt isn't flawless. The ability to revisit and refine adjustments is the hallmark of professional editing.
Jesus Ramirez, a digital graphics expert and founder of the Photoshop Training Channel, emphasizes the power of Photoshop's tools for realistic hair color manipulation. His expertise underscores that with the right techniques, even challenging edits can yield impressive outcomes.
Ultimately, mastering hair color changes in Photoshop is a skill honed through practice. Experiment with different images, explore various adjustment layers and blend modes, and pay close attention to the interplay of color, light, and texture. The more you practice, the more intuitive these techniques will become, allowing you to confidently achieve a wide range of creative hair color transformations. Remember, the goal is to empower your creativity, allowing you to explore endless possibilities for hair color in your images with ease and precision.