Adobe InDesign is a powerful tool for graphic design and desktop publishing, offering extensive control over page layout and document structure. Understanding InDesign's page setup features is crucial for creating professional-quality documents, from simple flyers to complex books. This tutorial delves into the intricacies of managing pages, spreads, and master pages within InDesign, providing a detailed guide for users of all levels.
The Foundation: Understanding Pages and Spreads in InDesign
At the core of any InDesign document are its pages and spreads. A page is a single canvas for your content, while a spread is a collection of one or more pages that are displayed together, typically side-by-side. Most documents, such as magazines and books, commonly utilize two-page spreads to mimic the experience of reading a physical publication.
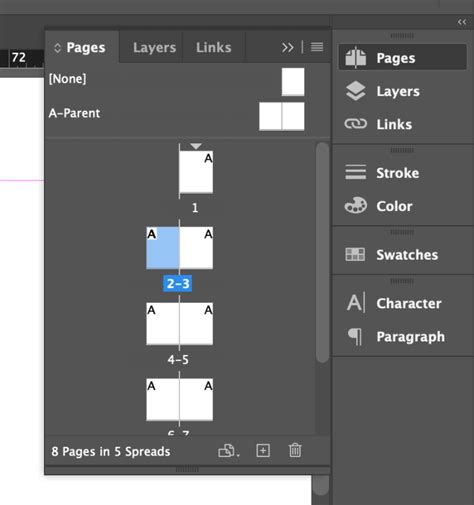
The Pages panel is your central hub for managing these elements. It offers a visual representation of your document's structure through page thumbnails. Within this panel, you have the freedom to freely arrange, duplicate, and recombine pages and spreads. You can even drag an existing page to a spread, integrating it seamlessly into your layout.
Navigating and Manipulating Pages
The Pages panel provides comprehensive information and control over your document's pages, spreads, and parent pages. You can select a page by clicking its icon or target a page or spread by double-clicking its icon or the page numbers beneath it. To add a new page after the currently active page or spread, you can click the New Page button in the Pages panel or navigate to Layout > Pages > Add Page. For adding multiple pages at the end of the document, the process is initiated through File > Document Setup, where you specify the total number of pages. To insert pages at a specific location and assign a document parent, the Insert Pages option from the Pages panel menu or Layout > Pages > Insert Pages is used.
You can also move pages within a document or even transfer them between two different InDesign documents. When copying a page from a document with a different page size to the destination document, it's important to note that page and page item positions might not align perfectly. To prevent unintended shuffling of pages in the destination document, select the Pages panel menu and deselect "Allow Document Pages To Shuffle."
Duplicating and Hiding Pages
Duplicating a page is a straightforward process, allowing you to place the copy either immediately after the selected page or at the very end of the document. Hidden spreads, which can be useful for organizing content or managing different versions of a layout, remain invisible by default. You can toggle their visibility by selecting "Show Hidden Spreads" from the Pages panel menu. However, if a document contains only one visible spread, the "Hide Spread" option will remain disabled. If you attempt to navigate to an object located on a hidden spread, an alert message will be displayed to inform you.
Advanced Page Management Features
InDesign also offers features for more specialized page manipulation. You can rotate the spread view, which is particularly useful when working on documents with rotated elements like calendars or tables. When you select a page using the Page tool and enable the "Show Parent Page Overlay" option, a shaded box appears over the selected page, indicating the presence of parent page items. This overlay helps in visualizing how master page elements are applied to document pages.
The Pages panel can be customized to better suit your workflow. Selecting "Show Vertically" displays spreads in a single vertical column, while "Show Thumbnails" provides thumbnail representations of the content on each page or parent page, offering a quick visual overview of your document.
The Power of Parent Pages: Automating Layouts
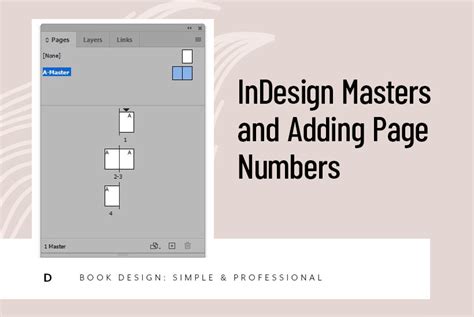
Parent pages, often referred to as master pages, are a cornerstone of efficient InDesign workflow. They act as templates that can be applied to multiple document pages, ensuring consistency in elements like headers, footers, page numbers, and background graphics.
Creating and Applying Master Pages
Within the Pages panel, you'll find a designated section for master pages, typically starting with an "A-Master." To modify a master page, click on its thumbnail or access its options through the Pages panel menu. Here, you can rename, duplicate, or adjust master page settings.
For creating recurring elements like page numbers and running headers, it's essential to set up distinct master pages. For instance, you might create a "Start of Chapter - Master" for pages that begin a new chapter, and a "Body - Master" for the regular text-filled pages within a chapter. To create a new master page, click in the top-right corner of the Pages panel to open the drop-down menu, then select "New Master." You can then define its prefix, name, and the number of pages it will contain.
Implementing Page Numbers and Headers
On a master page, you can insert page number markers that update automatically as you add, remove, or rearrange pages. Create a text frame large enough to accommodate the longest possible page number and any accompanying text. Then, navigate to Type > Insert Special Characters > Markers > Current Page Number. This inserts a flexible page number glyph that will display the correct page number on the applied document pages.
For running headers, you would create text frames at the top of the master page, applying consistent formatting to match your document's style. These headers can include the chapter title or other relevant information. Applying a color label to a parent page will affect all document pages to which that parent is applied. However, if you apply a color label directly to an individual document page, that specific label will take precedence.
Structuring Large Documents: The Book File Feature
For extensive projects like books, InDesign's Book File feature is invaluable. A Book File is not a document itself but rather a collection of separate InDesign documents grouped together to form a complete book. This allows for modular management of content, where each chapter can be a distinct document.
Benefits of Using Book Files
The primary advantage of using Book Files is the ability to share Styles, including Paragraph and Character Styles, across all documents within the book. This ensures a consistent typographic hierarchy throughout the entire publication. Furthermore, the numbering sequence can seamlessly continue from one document to the next, eliminating manual adjustments for page numbering across chapters. Edits to the book become more efficient as you can quickly navigate and modify individual chapter documents.
Creating a Book File
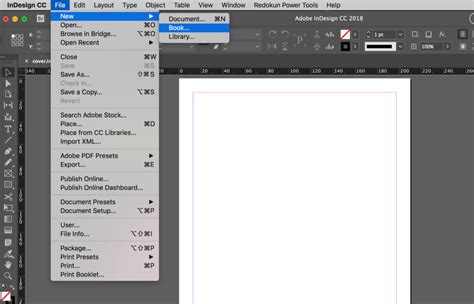
To start, create a new Book File by selecting "Book" from the "Create New" list in the InDesign Welcome Window, or by going to File > New > Book. You will be prompted to name and save your Book File. A new, empty Book panel window will appear.
Adding Documents to a Book File
Once your Book File is created, you can add individual InDesign documents to it. Click the "+" icon in the Book panel window and navigate to the InDesign document you wish to add. It's crucial to ensure that each document within the book is saved with a descriptive name, such as "Chapter One."
Customizing Page Sizes and Margins for Print
When preparing documents for print, precise control over page size and margins is essential. InDesign allows for custom page sizes and detailed margin settings to accommodate various print requirements.
Setting Up Custom Page Sizes
For specific print needs, such as creating paperback or hardback novels, you can define custom page sizes. Go to File > New Document and select "Custom…" from the Print Size drop-down menu. In the Custom Page Size window, provide a name for your custom size (e.g., "B - Paperback").
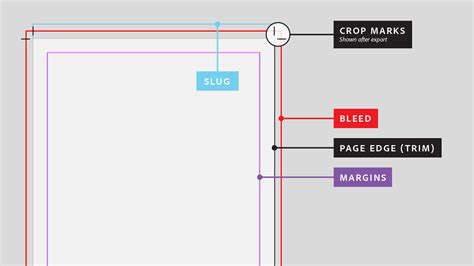
Understanding and Setting Margins
Margins define the printable area of a page. For books, the Inside Margin (the margin closest to the book's binding) is often more generous than the Outside Margin. This accounts for the space that will be lost to the binding and the natural fold of the pages.
- Paperback: A paperback book's inside margin is typically set a few millimeters larger than the outside margin.
- Hardback: Hardback books, especially those with stitch binding, may require an even more generous inside margin. For glue-bound (perfect bound) hardbacks, an additional 5 mm on the inside margin is recommended, regardless of the overall page size.
Incorporating Bleed
A bleed is an area of the document that extends beyond the trim edge of the page. It's crucial for any content, such as images or colored backgrounds, that extends to the very edge of the page. This ensures that when the printed page is trimmed to its final size, there are no unprinted white edges. For print documents, a bleed of 5 mm on the Top, Bottom, and Outside edges is common. The Inside edge typically does not require a bleed as it is not trimmed.
Advanced Page Numbering and Section Management
Effective page numbering and section management are vital for navigating and organizing large documents. InDesign provides robust tools to handle these requirements.
Automatic Page Numbering
Page number markers are a fundamental feature for keeping track of pages in lengthy documents. These markers update automatically as pages are added, removed, or rearranged. They are most commonly placed on master pages. When an automatic page number marker is on a master page, it will display the master page prefix. On a document page, it will display the actual page number.
Creating Numbering and Section Options
InDesign allows for flexible numbering schemes, including the use of different numbering styles and the creation of distinct sections within a document. To access these options, select a page in the Pages panel and then choose "Numbering & Section Options…" from the panel's menu.
Within this dialog box, you can:
- Start Page Numbering at: Specify the starting number for a particular page or section.
- Style: Choose from various numbering formats, such as Arabic numerals (1, 2, 3…), Roman numerals (i, ii, iii… or I, II, III…), or letters (a, b, c…).
For example, you might want your book to start with Roman numerals for introductory sections and then switch to Arabic numerals for the main body of the text. You can achieve this by setting the numbering and section options for the initial pages and then reconfiguring them for subsequent pages.
By mastering these page setup and management features in InDesign, you can create professional, well-organized, and visually appealing documents with greater efficiency and control.