Pull quotes, also known as callouts, are a powerful design element that can significantly enhance reader engagement and visual appeal in any layout. They serve to highlight key phrases or important quotations from the main body of text, drawing the reader's eye and providing a quick summary or impactful statement. While the concept is simple - to pull a key phrase or quotation from your page - executing them effectively in Adobe InDesign involves understanding specific tools and techniques. This tutorial will guide you through several methods for creating compelling pull quotes, from basic formatting to more advanced layering and styling, ensuring your designs are both attractive and functional.
The Fundamentals of Formatting Pull Quotes
Once you have identified the key phrase or quotation you wish to extract, the first step is to format it appropriately within InDesign. This process is straightforward and can be accomplished using readily available tools.
You will need to type in the quote. For formatting, you can utilize either the top Controls panel or the Character panel, accessible via Window > Type & Tables > Character. These panels offer a wide array of options to adjust font, size, leading, tracking, and other typographic attributes. The goal is to make the pull quote stand out from the surrounding body text, conveying its importance visually. This might involve using a larger font size, a different typeface, or a contrasting color.
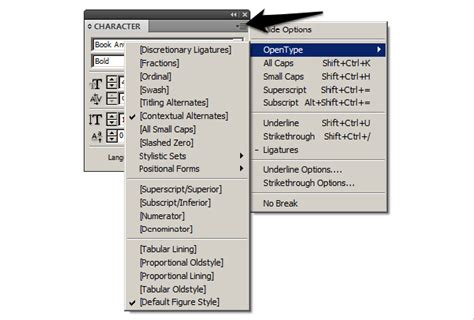
A crucial step in refining the appearance of your pull quote, especially when it's placed near other text, is to enable Optical Margin Alignment. With the text frame containing your pull quote selected, navigate to the Optical Margin Alignment checkbox. Checking this box allows InDesign to adjust the edges of your text so they align more aesthetically with the surrounding text, creating a smoother visual flow. This is particularly useful for ensuring that the pull quote doesn't appear to be awkwardly positioned or misaligned with the main text block.
Enhancing Pull Quotes with Text Frame Options
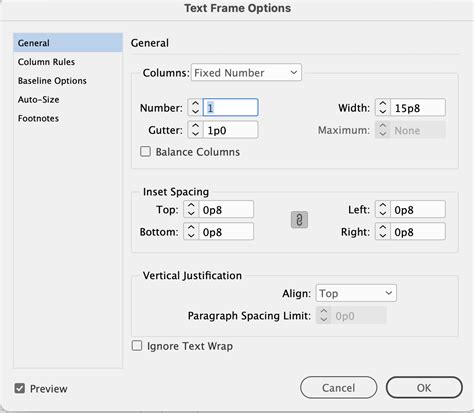
Beyond basic character formatting, the text frame itself offers several options to enhance the presentation of your pull quotes. Adjusting the Inset Spacing values is a key technique here. With the text frame selected, you can modify these values to create a generous margin around the outside of the text within the frame. Ensure that the Preview box is checked in the relevant dialog box. This allows you to see in real-time how much spacing you are adding, ensuring a well-framed and attractive final result. This internal padding prevents the text from feeling cramped and provides a clean, defined space for your pull quote.
Layering Pull Quotes Over Images
A common and effective design strategy is to layer pull quotes directly over images. This technique requires careful attention to ensure readability and a seamless aesthetic. To achieve this, you can give your text frame a color fill. This fill acts as a background, providing contrast between the pull quote text and the image beneath it. Experiment with different colors that complement the image and the overall design palette.
Once the color fill is applied, you can further refine the look by adjusting the inset spacing, as mentioned earlier. This creates a buffer between the text and the edge of the colored frame, preventing the text from appearing too close to the border. If the image is particularly busy, you might consider using a semi-transparent fill for the text frame, allowing some of the image to show through while still maintaining sufficient contrast for the text.
Utilizing Text Wrap for Integrated Designs
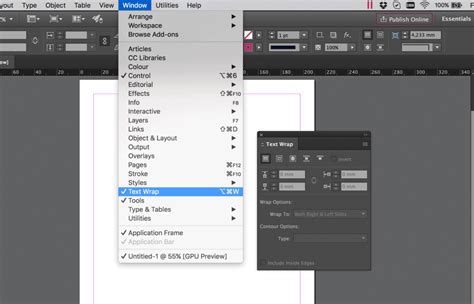
When a pull quote needs to interact with surrounding content, such as images or other text blocks, the Text Wrap panel becomes an indispensable tool. Switch to the Selection tool and click on the callout text frame to select it. Then, choose Window > Text Wrap to open the panel.
Here, you can select a Text Wrap option that best suits your design needs. Options range from wrapping text around a bounding box to wrapping around an object's shape. We tried out filling the callout frame with a color and gradation and experimented with stroke (border) styles. Depending on the text wrap option you selected, you may need to increase the space around the callout text frame. Use the Offset options in the Text Wrap panel to add a bit of padding along one or more sides of the callout. This padding, often referred to as "gutter," ensures that the pull quote doesn't crowd the elements it's interacting with, maintaining visual breathing room and clarity.
Efficiently Creating and Styling Pull Quotes
A common workflow for creating pull quotes involves creating a new text frame, copying and pasting body text, and then styling it. However, InDesign offers more efficient methods.
One advanced technique involves enabling Drag and Drop Text Editing. To do this, go to Edit > Preferences > Type and enable Drag and Drop Text Editing in Layout View. Next, use the Text tool to select the text for your pull quote directly in the layout. Once the selected text is highlighted, the text cursor will transform into an arrow with a small 'T' next to it. You can then drag this highlighted text to a new location. Crucially, while dragging, press and hold Ctrl + Alt (on Windows) or Cmd + Option (on macOS). This action will copy the selected text into a new frame at your desired drop location, preserving its original formatting. You can also use this highlight and drag technique without modifier keys to move text around within the same text frame, which is very useful for repositioning a word or sentence.
Learn InDesign Pull Quotes: Design Tips & Text Wrap Secrets
Once you have your pull quote in a new text box, the most efficient way to manage its styling, especially if you have many to create, is by using Object Styles. Create an object style that applies not only your desired paragraph style for the pull quote but also specific text frame options, text wrap settings, and any other formatting attributes. This ensures consistency across all your pull quotes and saves significant time.
Advanced Styling Considerations
When dealing with multiple pull quotes, particularly those that include the name of the person being quoted, you might want that name to have a distinct appearance from the main quote. For instance, if you have a quote from "John Smith," you might want "John Smith" to be styled differently, perhaps in italics or a lighter weight, to set it apart. This can be achieved by creating a specific paragraph style for the quoted name or by using character styles within the main pull quote paragraph style.
Consider the example of a quote from a student about Rue Art Academy. If you have ten or twenty such quotes to place, each ending with the student's name, applying a consistent and visually appealing style to both the quote and the attribution is key. You might cut and paste the first quote into a text frame and end it with an em dash followed by the name. If you've already created a paragraph style called "pull quote," you can then apply it. To differentiate the name, you'd create a separate paragraph style or character style for it.
Working with Sample Files and Libraries
To practice these techniques, you can use sample files provided by resources like Adobe Stock. These files often come with pre-designed layouts and placeholder text, allowing you to experiment without starting from scratch. If you're using a sample file, remember to activate any necessary Adobe Fonts.
For those looking to share and reuse design elements, InDesign's CC Libraries offer a powerful solution. You can save your expertly styled pull quote text frames, including their formatting and text wrap settings, into a CC Library. This allows you to easily access and apply them across different InDesign documents, ensuring brand consistency and speeding up your workflow. Understanding the differences between sharing snippets versus full library items can also be beneficial for collaborative projects.
The Importance of Grids and Layout
No matter the design project, a grid can be a useful tool. Grids provide a foundational structure that helps align elements, maintain consistency, and create a sense of order. When placing pull quotes, aligning them with your established grid ensures they integrate harmoniously with the rest of your layout, rather than appearing as isolated elements. This systematic approach contributes to a more professional and polished final product.
Final Thoughts on Pull Quote Design
Creating effective pull quotes in InDesign is a blend of technical proficiency and aesthetic judgment. By mastering the tools within the Character panel, Text Frame Options, and Text Wrap panel, and by leveraging efficient workflows like drag-and-drop text editing and object styles, you can elevate your designs. Remember that the ultimate goal is to enhance readability and visual interest, making your content more accessible and engaging for your audience. Whether you're a seasoned graphic designer or just developing an eye for design, these techniques will undoubtedly help you make your pull quotes look great and speed up your production process.