Lightroom brush presets are powerful tools that can significantly enhance your photo editing workflow, allowing for targeted adjustments and the development of a consistent, recognizable style. Whether you're a seasoned professional or an aspiring photographer, understanding how to add and effectively use these presets can elevate your image manipulation skills. This guide will walk you through the process, from understanding the core benefits to the practical steps of installation and application.
The Indispensable Role of Brush Presets in Your Workflow
The primary advantage of employing Lightroom brush presets lies in their ability to dramatically accelerate your editing process. By saving frequently used brush settings, you eliminate the need to manually adjust sliders for every local edit. This not only saves precious time but also ensures consistency across your images. Using the same brush settings repeatedly helps in cultivating a distinct and recognizable editing style, a crucial aspect of developing a personal photographic identity. As the saying goes, "How you edit photos is part of developing an easily recognizable photography style."

It's important to recognize that not every photograph demands the same level of intervention. For instance, "Not every photo needs the exact same amount of, for example, skin softening." This is where the targeted nature of brush presets truly shines. Brushes are specifically designed for making very local adjustments to particular areas of an image, offering a fine-tuning capability that differs from global presets. Previously, similar settings could be applied to the local adjustment brush, graduated filter tool, and radial filter tool. Now, these functionalities have been seamlessly integrated into Lightroom's masking tools, with brush presets being a key component within this system.
The creative mind thrives on innovation, not repetition. "Besides, photographers are creatives and there’s nothing more mind numbing for a creative than repetitive tasks." Brush presets offer a solution to this, freeing up mental energy for more artistic endeavors. While Lightroom offers a default pack of brush presets, these can serve as an excellent starting point for creating your own custom sets tailored to your specific needs and aesthetic.
Understanding the Power of Local Adjustments
The fundamental difference between brushes and presets lies in their scope of application. "When we talk about photo editing, I often spend a lot of time on presets, because they really are the cornerstone of any professional editing process. However, being a truly well-rounded editor and a Lightroom expert requires at least some knowledge of all the tools you might need to use, not just presets." While presets can be applied to an entire image to establish an overarching mood or style, "the biggest difference between brushes and presets is that brushes edit small areas of an image, while presets edit the entire thing."
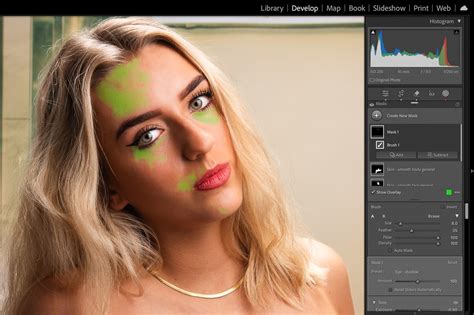
The process with a brush is straightforward: you select the desired adjustment, and then use the brush tool to "paint" that adjustment onto the specific areas of your photo that require it. This makes it a more nuanced "fine-tune" editing tool. For example, if you want to lighten shadow areas on faces, you would select a brush preset designed for that purpose and carefully paint over the shadowed regions. The green areas in an example image might visually represent where such a custom preset for lightening shadow areas on faces was effectively applied.
Similarly, if a particular backdrop color doesn't complement the subject's attire, a custom brush preset can be created to alter it precisely. Imagine a scenario where "the purple backdrop didn’t suit her outfit colors." In such a case, a preset could be developed to effectively change the color of the backdrop to something more harmonious.
Another common application is in portrait retouching. The default Lightroom portrait brush preset for skin smoothing, often named "Soften Skin (Lite)," might not always yield the desired results. This preset is typically intended for "lightening under eye shadows, removing signs of puffiness under the eye and dodging shadows on foreheads for a smoother look." However, photographers often find themselves needing more specific adjustments, leading to the creation of custom presets.
Consider the challenge of dealing with undesirable studio elements. "I hire different studios for photoshoots and one of them has an ugly pink carpet, so I used to avoid full length photos or photos that included the floor." To overcome this limitation, a photographer might create a custom brush preset to effectively neutralize or replace the offending carpet color, allowing for more creative freedom in framing shots. Likewise, if a photographer "often use[s] my fake wooden floor backdrop for portraits with dramatic lighting," a custom vignette brush preset, perhaps named "Floor Vignette," could be created to quickly add to the drama in post-production, enhancing the overall mood of the image.
Creating Your Own Lightroom Brush Presets: A Creative Endeavor
A common question arises: "Why buy brush presets when you can make your own Lightroom brush presets free?" The ability to create your own presets empowers you to tailor your editing tools precisely to your needs and artistic vision, and it costs nothing beyond your time and creativity. The process is intuitive: "Any existing brush preset can be used to create a new one." This means you can start with a default preset and modify its settings.
Just as when using the brush tool without a preset, you have the freedom to "adjust the sliders of Lightroom brushes to suit your needs." This iterative process of adjustment and refinement allows you to build presets that perfectly match your desired outcome. For example, if the default "Soften Skin (Lite)" preset isn't quite right, you can start with it and tweak the exposure, clarity, and other sliders until you achieve the precise skin smoothing effect you're looking for.
Over time, as you develop a unique editing style, you'll likely find yourself creating numerous custom presets. To maintain efficiency and avoid clutter, it's beneficial to keep them organized. "Given that we use brush presets to save time, it make sense to also keep them organized so that you can easily find them." A good practice is to create different versions of a brush preset that you use regularly by making separate brushes for each specific use. For instance, instead of a single "Soften Skin" preset, you might create "Soften Skin Face" and "Soften Skin Body" presets, each with slightly different parameters optimized for those areas. This meticulous organization ensures that when you need a specific adjustment, you can locate the appropriate preset quickly.
Lightroom Coffee Break: Create Your Own Adjustment Brush Presets in Lightroom | Adobe Lightroom
Installing Lightroom Brush Presets: A Step-by-Step Process
There are several methods to import and install Lightroom brush presets, depending on your version of Lightroom. For Lightroom Classic and Adobe Camera Raw, the process is generally as follows:
Download Your Presets: Begin by downloading the brush presets you wish to use. These are often provided as .lrtemplate files. If they are in a zip file, ensure you extract the individual .lrtemplate files before proceeding. It's crucial to "make sure what you copied into the 'Local Adjustments' folder actually holds the brush presets and not another folder that contains those brush presets."
Access Lightroom Preferences: Navigate to Lightroom's Preferences. This is typically found under the "Edit" menu on Windows or the "Lightroom Classic" menu on macOS.
Locate the Presets Tab: Within the Preferences dialog box, select the "Presets" tab.
Reveal Lightroom Presets Folder: Click on the button that says "Show All Other Lightroom Presets." This action will open a new window displaying the Lightroom presets folder structure on your computer.
Navigate to Local Adjustment Presets: Within this newly opened folder, locate and select the "Lightroom" folder. Inside the "Lightroom" folder, you will find a folder named "Local Adjustment Presets." This is where your brush presets need to be placed.
Copy and Paste Brush Files: Go back to the location where you saved your downloaded brush preset files (.lrtemplate). Copy all of these files (using Command + C on a Mac or CTRL + C on a PC).
Paste into Local Adjustment Presets Folder: Paste the copied .lrtemplate files into the "Local Adjustment Presets" folder that you opened in step 5.
Restart Lightroom: After placing the files, you must restart Lightroom for the new presets to be recognized and loaded into the application.
Once Lightroom has relaunched, your newly installed brush presets will be available. "You can find them on the far right of the Develop module, below the histogram but above the Basic panel." Under the Masking panel, which is now accessible from the tool strip of the Develop module, you will see a section for brush presets. "A list of all the adjustment brushes you have downloaded will pop up, and all you have to do is select the one you want to use."
For users who have purchased presets from reputable sellers, such as "Pretty Presets for Lightroom" or "Greater Than Gatsby," the installation process is very similar. These companies often provide detailed instructions and even video tutorials. "Pretty Presets has been in business for over 9 years, and we look forward to serving you. We love our community and are a trusted resource to over 250,000 photographers from over 100+ countries." They emphasize having "the best Lightroom brush install video and written tutorial below." The core principle remains the same: locate the "Local Adjustment Presets" folder and copy the .lrtemplate files into it, followed by a Lightroom restart.
It's essential to "Double-check the Local Adjustment Presets folder and make sure that the brush files are there." If you encounter issues, ensure that you are using the extracted .lrtemplate files and not the original zip folder. This straightforward installation process should only take a few minutes, allowing you to immediately start benefiting from your new brush presets.
Integrating Brush Presets into Your Editing Workflow
The true power of brush presets is unleashed when they are used in conjunction with other Lightroom editing tools. "Use brush presets with other Lightroom editing tools." This integrated approach allows for a comprehensive and sophisticated editing process. Photographers often "use shortcuts to speed up workflow and highly recommend them." Combining keyboard shortcuts with the efficiency of brush presets can lead to a remarkably streamlined workflow.
When considering the broader landscape of photo editing, presets are foundational. However, becoming a proficient editor requires more than just preset mastery. "Being a truly well-rounded editor and a Lightroom expert requires at least some knowledge of all the tools you might need to use, not just presets." Brushes, as a form of local adjustment, offer a level of control that complements the global impact of presets.
To find and select a brush preset after installation, navigate to the "Masking" tool within the Develop module. From the options presented, choose "Brush." Next to the "Effect" label, you will find a dropdown menu where you can select your desired brush preset. This makes accessing your custom or downloaded brushes a quick and intuitive process.
The ability to add and utilize brush presets in Lightroom Classic is a testament to the software's commitment to providing powerful and flexible editing tools. By understanding their benefits, mastering their installation, and thoughtfully integrating them into your workflow, you can significantly enhance your efficiency, consistency, and creative output as a photographer.