Photoshop, a cornerstone of digital artistry and photo manipulation, offers a vast array of tools for creative professionals and hobbyists alike. While many of its color-adjusting features operate by subtly tweaking existing tones, there are instances where a more direct approach is needed. This is where the "Fill" command, specifically the "Fill Color" option, proves invaluable. This tutorial delves into the power of this tool, demonstrating how to directly inject color into specific areas of an image, and then expands to cover the sophisticated technique of filling shapes with images, offering a comprehensive guide for enhancing your Photoshop workflow.
Direct Color Application with Fill Color
Most color manipulation tools in Photoshop work by modifying an image's existing colors, which can inherently limit the extent of the transformation. The "Fill" command, however, operates differently by directly adding a chosen color. This capability allows you to transform any existing color into a desired hue, offering a straightforward yet powerful method for color replacement.
Example 1: Transforming Dress Color
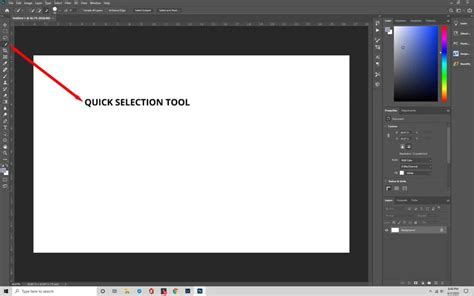
Consider a photograph featuring a subject wearing a blue dress. The goal is to change this dress to a vibrant red. The first step involves isolating the dress using the Quick Selection tool. This tool is adept at quickly identifying and selecting areas of an image based on color and texture. Once the dress is selected, access the Fill command. Within the Fill dialog box, set Contents to Color. This ensures that Photoshop will apply a solid color fill rather than attempting to sample or blend existing pixel data. The Mode should also be set to Color to preserve the underlying texture and luminosity of the original dress while applying the new hue.
Following the fill operation, the dress will appear red. To further refine the result and ensure a natural look, adjustment layers can be applied. These layers offer non-destructive editing, meaning they affect only the selected area without permanently altering the original pixels. For instance, a Curves adjustment layer can be used to fine-tune the lightness of the newly colored dress, ensuring it integrates seamlessly with the rest of the image. Similarly, a Hue/Saturation adjustment layer can be employed to reduce the saturation of any lingering blue tones, further solidifying the color replacement. The comparison between the original and the modified image will vividly illustrate the effectiveness of this hue replacement technique, a feat that proves challenging for many other color adjustment tools.
Example 2: Stylized Mountain Rock Color Change
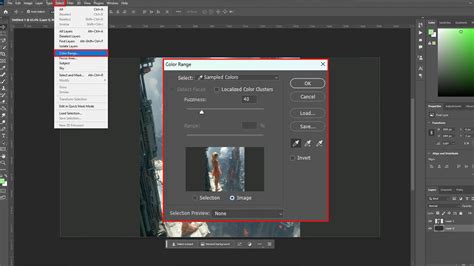
In a second scenario, imagine a stylized photograph of a mountain range where the objective is to alter the color of the rocks. This example highlights the importance of choosing the right selection tool. Due to the presence of shadow areas on the rocks, which would look unnatural if filled directly with a new color, the Quick Selection tool might not be the optimal choice. Instead, the Color Range tool is a more suitable option. This tool allows for precise selection based on specific color values, enabling you to target the gray of the rocks while excluding the darker shadow regions.
Once the desired rock areas are selected using Color Range, the Fill command is applied again. As in the previous example, set Contents to Color and Mode to Color. After the fill, the mountain rocks will have a new hue. The advantage of this targeted fill is that any subsequent fine-tuning will only affect the selected mountain area. This means you don't need to create a duplicate selection to isolate the changes, streamlining the editing process.
These two examples, the dress color transformation and the mountain rock hue change, demonstrate the versatility of the Fill Color command in Photoshop. The same principles can be applied to a multitude of tasks, such as altering hair color or changing the shade of lips in portraits.
Enhancing Workflow with TourBox
For individuals who frequently engage in photo editing and color work within Photoshop, specialized hardware can significantly enhance efficiency and creativity. The TourBox is a prime example of such a tool. This controller allows users to map common Photoshop shortcuts and commands to its physical knobs and buttons. However, TourBox is more than just a shortcut mapper; it boasts built-in features that expand its functionality. For instance, it enables the creation of macros, which can automate sequences of repeated actions, thereby saving considerable time. Its high degree of customization ensures that TourBox can adapt to the user's specific needs across various software applications, making it a valuable asset for any digital artist.
The Tourbox Controller for Photoshop & Lightroom: Is it Actually Useful?
Filling Shapes with Images in Photoshop
Beyond direct color application, Photoshop offers a powerful technique for integrating images within defined shapes, transforming ordinary graphics into compelling visual elements. This method allows you to place a photograph inside any geometric or custom shape, adding depth and artistic flair to your designs.
Creating a New Document and Drawing Shapes
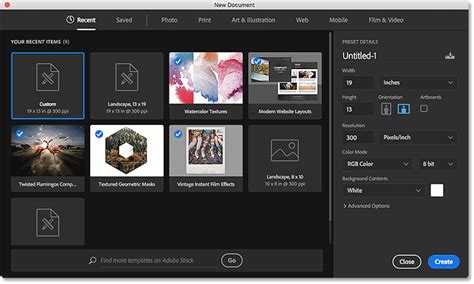
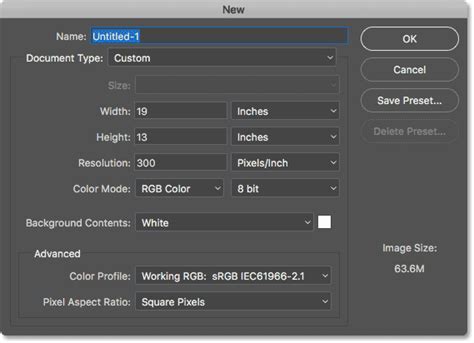
The process begins with creating a new Photoshop document. Accessing the New Document dialog box allows you to define the document's specifications. For this tutorial, a square-shaped document with dimensions of 2000x2000 pixels is created. Given that images intended for placement are often high-resolution, setting the document's Resolution to 300 pixels per inch is recommended to maintain image quality.
Photoshop's Shapes panel provides the fastest way to draw custom shapes. This panel, often located in a secondary column, contains various shape categories. Within these categories, you can find hundreds of pre-designed shapes, including classic sets and newer additions. For this tutorial, a shape from the "Nature" set, specifically the Butterfly shape, is selected.
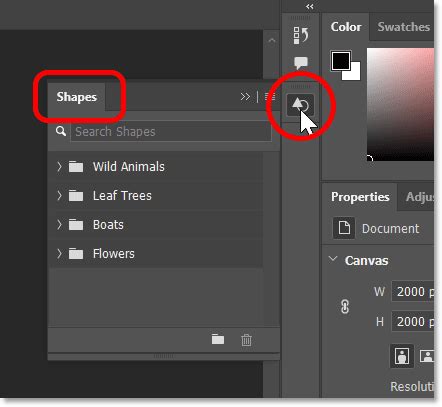
Once selected, the shape can be resized by dragging its transform handles. It's then positioned at the center of the canvas. In the Layers panel, the shape automatically appears on its own dedicated shape layer. At this stage, a stroke can be added later if desired. The default fill color for the shape can be set to "No Color" by clicking the corresponding icon in the upper left of the panel.
Placing and Clipping an Image into the Shape
The next crucial step is to place the desired image into the document. Navigate to the image file's location on your computer and open it within Photoshop. The image will be added on a new layer, typically positioned above the shape layer. Photoshop intelligently converts the placed image into a smart object, indicated by a small icon in the lower right of its layer thumbnail. This conversion allows for non-destructive scaling and transformations.
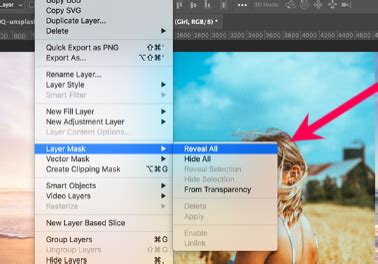
Initially, the image will likely cover the entire document, or at least extend beyond the boundaries of the shape. To confine the image within the shape, a clipping mask is employed. This technique "clips" the image layer to the shape layer directly below it. Consequently, only the portion of the image that lies directly above and within the confines of the shape becomes visible.
To achieve this, ensure the image layer is selected in the Layers panel. Then, right-click on the image layer and choose Create Clipping Mask. Alternatively, you can hold down the Alt (Windows) or Option (Mac) key and click on the dividing line between the image layer and the shape layer in the Layers panel. The image layer will then become indented, displaying a small downward-pointing arrow, signifying it's clipped to the layer below.
With the image clipped, you can now resize it by dragging the transform handles and reposition it to perfectly frame your subject within the shape. This process effectively places the photo inside the shape, completing the core effect.
Refining the Composition: Background Color and Strokes
Several options exist for further enhancing the composition. One common enhancement is changing the background color. To do this, create a Solid Color fill layer and position it directly above the original Background layer in the Layers panel.
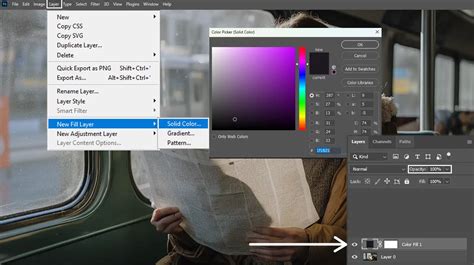
Photoshop will prompt you to select a color using the Color Picker. While black is the default and can effectively highlight the shape's details, you can choose any color. You can also sample colors directly from the image within the shape using the eyedropper cursor, ensuring a harmonious palette.
Adding a stroke to the shape can further define its edges. While strokes can be applied via the Properties panel, using Layer Styles is a preferred method for many. Accessing Layer Styles opens a dialog box where you can select Stroke options. Here, you can choose a new color for the stroke, for instance, white by setting RGB values to 255. Within the Layer Style dialog box, setting the Position to Outside ensures the stroke appears around the exterior of the shape. Adjusting the Size value controls the stroke's thickness.
Exporting with Transparency
A crucial final step is preparing the image for use on different backgrounds. If you intend to place the shape and its contained image onto another background, you'll need to remove the existing background behind the shape. If a Solid Color fill layer was added for the background, disable its visibility by clicking its icon in the Layers panel. This will reveal the transparency behind the shape, represented by a checkerboard pattern in Photoshop.
To ensure the shape is isolated with no excess surrounding space, the Trim command is used. In the Trim dialog box, select Transparent Pixels at the top and ensure Top, Bottom, Left, and Right are all checked at the bottom. Clicking OK will trim away any unnecessary transparent areas.
When saving the file, it's imperative to choose a format that supports transparency. JPEG files do not support transparency, so they are unsuitable. Instead, save the image as a PNG file. This format preserves the transparent background, allowing for seamless integration into other designs. When prompted, provide a file name and navigate to your desired save location.
Advanced Techniques for Image-in-Shape Integration
While the clipping mask method is widely used, Photoshop offers alternative techniques for achieving similar results, each with its own advantages:
Method 1: Advanced Blending (Blend If)
For images placed over clean, solid-colored shapes, the Blend If feature within Layer Styles can be a remarkably fast method. After placing the photo on a layer above the shape, the edges might appear jagged. By accessing the Layer Style dialog for the image layer and utilizing the "Blend If" sliders (specifically by holding Alt/Option and dragging the right-hand triangle of the "This Layer" slider), you can selectively blend the image's pixels with the underlying shape, effectively creating a clean edge.
Method 2: Paste Into
The Paste Into command offers another direct approach. After copying the image you wish to use, select the shape layer. Then, go to Edit > Paste Special > Paste Into. This action pastes the copied image directly into the selection defined by the shape layer, essentially acting as a built-in clipping mask.
Method 3: Using Layer Masks with Cut-Out Shapes
This method, often favored for its flexibility, requires the shape to be initially cut out with transparent areas around it. This is particularly effective when working with custom shapes. Place the desired photo on a layer above the cut-out shape. Then, create a layer mask for the photo layer. Using a brush with black paint, carefully paint over the areas of the photo that should be hidden, effectively revealing the shape beneath. This allows for more nuanced control over the image's appearance within the shape.
Further Enhancements and Related Techniques
Once the image is successfully placed within the shape, further refinements can elevate the final composition. Adding a subtle inner shadow to the shape layer can introduce a sense of depth and dimension, making the contained image appear more integrated. Combining this with a textured background can further enhance the visual richness of the artwork.
Simulating In-Camera Effects
Photoshop also allows for the simulation of in-camera photographic effects. For instance, a zoom blur effect can be achieved to draw the viewer's eye towards a specific portion of a photograph, mimicking the intentional camera movement used by photographers.
Combining and Blending Photos
The ability to combine photos in Photoshop and blend them seamlessly is a fundamental skill for digital compositing. Techniques involving layer masks, blending modes, and adjustment layers are essential for creating cohesive and believable composite images.
Understanding Selection Tools
Mastery of Photoshop's selection tools is paramount for precise editing. The Quick Selection tool, often found grouped with the Magic Wand tool, excels at rapidly selecting areas based on color and texture. Alternatively, the Marquee Tool provides geometric selection options. Understanding when to use each tool, and how to refine selections using options like adding or subtracting from existing selections (indicated by dashed lines around the edges), is crucial for professional results.
Content-Aware Fill
Beyond direct color fills, Photoshop's Content-Aware Fill offers a sophisticated method for filling selected areas. This feature analyzes the surrounding pixels and intelligently generates content to fill the selected region, effectively removing unwanted objects or extending backgrounds in a natural-looking manner. You can access this by going to Edit > Fill, and then selecting Content-Aware under the Contents dropdown.
Gradients for Color Transitions
For more complex color applications, gradients can be used. By clicking on the gradient bar in the relevant dialog box, you can choose from a variety of pre-set gradients or create your own custom transitions. This allows for smooth color blends rather than solid fills.
Quick Summary of Color Filling
For a straightforward color fill operation in Photoshop:
- Open your desired image in Photoshop.
- Use a selection tool, such as the Quick Selection or Marquee tool, to isolate the area you wish to fill.
- Navigate to the Edit menu and select Fill.
- In the Fill dialog box, choose Color next to Contents and then select your desired color.
- Click OK to apply the color fill to the selected area.