In the realm of digital design, the distinction between raster and vector graphics is fundamental. While raster images, like JPEGs and PNGs, are composed of a fixed number of pixels and can lose quality when scaled, vector graphics are defined by mathematical equations, allowing them to be scaled infinitely without any degradation. There are numerous occasions when a vector design is a necessity for projects, such as when preparing files for laser cutting, embroidery, or large-format printing. Inkscape, a powerful and free open-source vector graphics editor, offers a robust solution for converting raster images into editable vector formats. This guide will walk you through the process of transforming your JPEG or PNG files into scalable vector designs using Inkscape's "Trace Bitmap" function.
Preparing Your Image for Conversion
Before diving into Inkscape, ensure that your image file has been downloaded and, if necessary, unzipped. For those unfamiliar with this process, resources on how to unzip a zip file on your PC can provide the necessary guidance. The quality of the final vector output is often directly related to the quality of the original raster image. Higher resolution images with clear lines and good contrast will generally yield better results when converted. Conversely, very low-resolution or heavily compressed images may present challenges, potentially leading to a less-than-perfect vector trace.
This tutorial will utilize a mother's day SVG and a bee sticker PNG as illustrative examples, demonstrating the conversion process for both single-color and multi-color raster images.
Step 1: Importing Your Raster Image into Inkscape
The initial step involves opening your JPEG or PNG image within Inkscape. Navigate to the "File" menu located at the top of the Inkscape window and select "Open." Browse to the location of your image file, select the desired image, and click "Open."
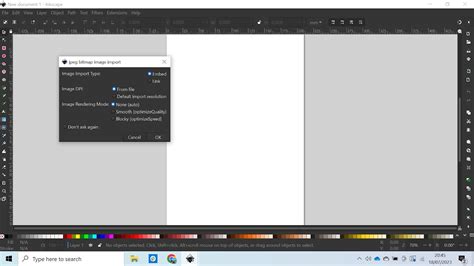
Upon opening either a JPEG or PNG file, a new dialog window will appear. If you are importing a JPEG, this window will be titled "JPEG Bitmap Image Import." For PNG files, it will be labeled "PNG Bitmap Image Import." For the purpose of this guide, we will proceed with a PNG file. It is generally recommended to leave all the import settings at their default values and click "OK." This action will place the raster image onto your Inkscape canvas.
Step 2: Tracing a Single-Color Image with "Trace Bitmap"
To transform a raster image into a vector, the core process involves tracing its outlines. Once your image is open in Inkscape, click on it to select it. You can initiate the tracing process through two methods: by navigating to "Path > Trace Bitmap" in the menu bar, or by right-clicking on the selected image and choosing "Trace Bitmap" from the context menu.
This action will open the "Trace Bitmap" dialog window, presenting a range of settings for controlling the conversion. The optimal settings will vary depending on the complexity and color profile of the image you are tracing. If the "Preview" window within the dialog box appears blank, click the "Update" button to refresh the preview.
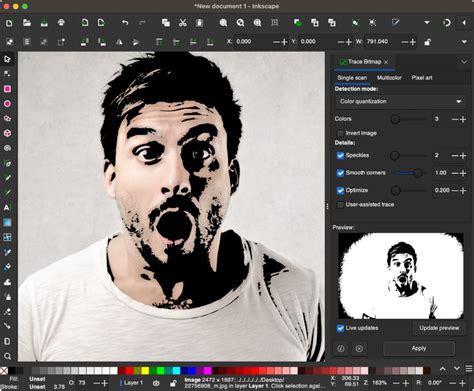
For our initial example, we are working with a black and white image. In such cases, the "Single Scan" option under the "Trace Bitmap" settings is highly effective. While it is designed for images with a single color, it can also be used with color images, though the result will be a monochrome vector. The "Brightness Cutoff" method, which is usually selected by default, is an excellent starting point for single-color tracing. You are encouraged to experiment with other options available in the dropdown menu, remembering to click "Update" after each adjustment to observe the changes in the preview.
For a straightforward black and white image, leaving the other settings as they are and clicking "OK" is often sufficient. It's important to note that you might not observe an immediate visual change on your original image. This is because the newly created vector trace is placed directly on top of the original raster image. To see the traced vector, click and drag the traced object to the side, revealing the underlying raster image.
Once you have successfully separated the traced vector from the original raster, you can close the "Trace Bitmap" window by clicking the "X" button. The original PNG or JPEG image is no longer needed and can be safely deleted from your canvas. You can then reposition and resize the newly created vector design as required for your project.
A key characteristic of vector images is their editability through nodes. With your vector design still selected, choose the "Edit paths by nodes" tool from the left-hand toolbar. This will reveal a network of nodes that define the vector paths. Each of these nodes can be manipulated individually to refine the shape, adjust curves, and fine-tune the overall design. This level of control is impossible with raster images.
Step 3: Tracing a Color Image
The process for converting a color raster image to a vector differs slightly from that of a single-color image. If you were to apply the same "Single Scan" settings to a color image, the result would be a black and white vector representation, losing the original color information.
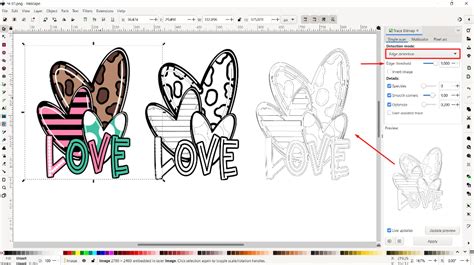
To preserve and trace the colors within your image, you need to utilize the "Multiple Scans" option. Within the "Trace Bitmap" dialog, select "Multiple Scans" from the dropdown menu. Then, choose "Colors" as the tracing method. It is crucial to ensure that the checkboxes for "Smooth," "Stack," and "Remove Background" are ticked. These options help to create a cleaner and more refined vector output. Leave the remaining settings at their default values unless you have a specific reason to adjust them.
After configuring these settings, click "OK." As with the single-color trace, the new vector trace will appear on top of your original image. Drag the traced object aside to view the result. You will notice that the color image has now been converted into a multi-layered vector object, with each layer corresponding to a distinct color or shade identified during the tracing process.
Step 4: Ungrouping and Refining the Vector Trace
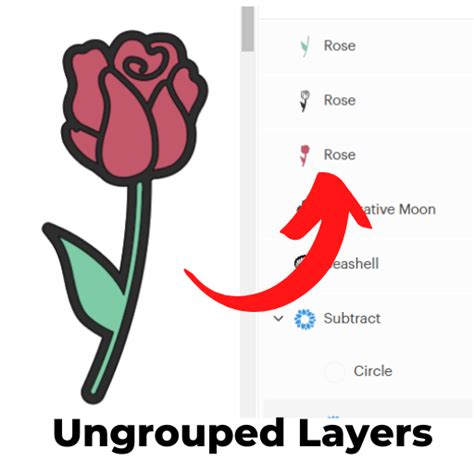
Once you have successfully converted a color PNG image to a vector using the "Multiple Scans" method, the next logical step is to "Ungroup" the resulting vector object. This action breaks down the composite vector into its individual components, allowing you to work with distinct elements of the design. You can achieve this by going to "Object > Ungroup" in the menu bar or by right-clicking on the selected object and choosing "Ungroup."
When you ungroup a vector trace created with "Multiple Scans," you will typically find that it is composed of numerous individual layers or objects. As illustrated in the accompanying image, separating these layers reveals that what was once a single color image is now a collection of seven distinctly traced layers. This granular breakdown enables you to select, modify, or even delete specific parts of the design.
It is important to understand that a single-color design, traced using the "Single Scan" method, cannot be ungrouped in the same way as a multi-color trace. This is because it results in a single, unified vector path rather than multiple distinct layers. However, even in this format, once saved as an SVG, the trace can be effectively utilized as a cut file. For instance, when imported into software like Silhouette Studio, the image will display clear cut lines, ready for precise cutting operations.
How to Use Inkscape for Vinyl Cutting
After you have meticulously reviewed and are satisfied with the entirety of your vector design, the final step is to save it in your desired format. Go to "File > Save as" and select the appropriate file type. Inkscape supports a wide array of vector formats, with SVG (Scalable Vector Graphics) being the most common and versatile for general use. You have now successfully converted your JPEG or PNG image into an editable and scalable vector format in Inkscape, ready to be used in a multitude of creative projects.
Troubleshooting Common Issues: Fuzzy Outlines and Artifacts
A common concern, particularly for beginners, is the appearance of "fuzzy outlines" or unwanted artifacts in the resulting SVG. This can stem from several factors, including the quality of the original raster image and the chosen tracing settings.
Addressing Fuzzy Outlines
If you are encountering fuzzy outlines, especially when tracing text or logos, the most effective method is to obtain the original vector source if possible. For fonts, this means downloading or purchasing the font file itself. For example, a font that appears to have a modified 'A' might be "Future Tense Regular by Borges." Using the actual font ensures that the text remains sharp and editable at any size, and the resulting SVG file will be significantly smaller and cleaner.
If acquiring the original font or logo is not feasible, consider the source of your raster image. If it's a logo you intend to use for a business or product, reaching out to the company for their official vector logo is the ideal solution. They are usually willing to provide it, especially if you are working with their brand or products.
Dealing with Low-Resolution Traces and Artifacts
When dealing with low-resolution raster images, autotracing can indeed produce unsatisfactory results with visible artifacts. The "Trace Bitmap" function in Inkscape, while powerful, is not infallible, especially with low-quality input. For instance, when attempting to convert a low-resolution image, you might need to increase the "Threshold" value in the "Trace Bitmap" settings. Experimenting with values, such as increasing it to 520 as an example, might yield a better result.
It's important to remember that tracing is rarely a perfect process. A higher resolution source image, meaning one with more pixels, will always provide a better foundation for a clean vector conversion. After completing the trace, always remember to select and delete the original raster image to avoid confusion and ensure you are working with the cleaner vector version.
For those experienced with vector editing, hand-tracing a design from scratch can sometimes be more efficient than trying to fix a flawed autotrace, especially when dealing with numerous repeated elements or straight lines. However, for beginners, hand-tracing can be a more challenging endeavor. The key takeaway is that the quality of the output is heavily dependent on the quality of the input. If the original raster is poor, the resulting vector will likely require significant manual cleanup.