Creating custom brushes in Ibispaint can significantly enhance your digital art workflow, allowing for unique textures, effects, and drawing styles. This tutorial delves into the intricacies of brush customization, from understanding fundamental brush settings to crafting sophisticated color patterns. Whether you're a beginner looking to personalize your tools or an experienced artist seeking to expand your creative possibilities, this guide will equip you with the knowledge to design brushes that perfectly match your artistic vision.
Understanding Core Brush Components
Before diving into the creation process, it's essential to grasp the primary elements that define a brush's behavior and appearance in Ibispaint. These components are accessible through various tabs within the brush settings menu.
Brush Pattern: The Foundation of Your Brush Tip
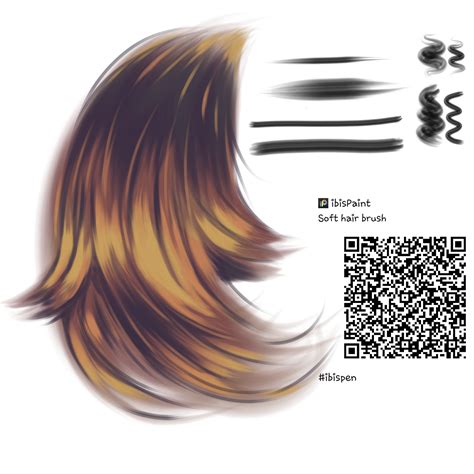
The Brush Pattern is the fundamental shape that defines the tip of your brush. In the [Shape] tab's [Brush Pattern] setting, you select or create an image that will be repeated along the stroke as you draw. This pattern dictates the basic form of your brush mark. For instance, a simple circle will create a round brush, while a more complex shape can yield a textured or irregular line.
Texture: Adding Surface Detail
The Texture setting, found under the [Type] tab's [Texture Pattern] option, allows you to apply a paper-like or other surface texture to your brush strokes. This adds a layer of realism or stylistic depth, mimicking the feel of drawing on different materials. A fine-grained paper texture can give a sketch-like feel, while a rougher texture might simulate canvas.
Blurring Shape: Controlling Brush Fade and Opacity
The Blurring Shape, located in the [Fade] tab's [Blurring Shape] setting, governs how the brush fades out along its stroke. This controls the opacity and softness of the brush tip as it's applied, influencing how the edges of your strokes appear. A gradual fade can create soft, blended effects, while a sharp fade results in more defined lines.
Selecting and Editing Brush Patterns
The [Type] tab offers crucial options for how your brush pattern is interpreted and applied.
Types of Brush Patterns
- Brush Pattern (Mono): This option creates an image that can be used as a [Brush Pattern]. Brushes created with this setting are typically monochrome, meaning they primarily use shades of gray or a single color.
- Brush Pattern (Color): This option also creates an image for use as a [Brush Pattern], but it supports multiple colors. This is essential for creating brushes with inherent color variations or patterns.
The initial settings of a brush will differ based on the template you choose. It's recommended to select a template that most closely resembles the brush you intend to create. For instance, if you aim to create a brush that functions like a stamp, setting the type to [Brush Pattern (Color)] and the template to [Star] is a good starting point.
Editing Your Brush Pattern
When you select ⑥[Edit Pattern], the content you draw on the canvas becomes your new brush pattern. This is where you define the unique shape or image that your brush will use.
If you find that your custom brush pattern isn't appearing correctly in the test drawing, showing only a simple line instead of the intended shape, it's likely due to two common issues: the brush Thickness is too thin, or the Spacing is too small.
- Increasing Thickness: Try increasing the brush's thickness. The maximum brush thickness can be adjusted in the Max Thickness setting within the [Settings] tab.
- Adjusting Spacing: The spacing between repeated pattern elements also affects how the brush appears. Too little spacing can cause the pattern to blend into a continuous line.

Once you are satisfied with your custom brush pattern, you can save it. The brush pattern image will be automatically uploaded to your gallery when you navigate to ⑭[Back to My Gallery]. Your new brush pattern will then be available for use. Selecting "OK" will add the brush you used for test drawing to the ⑯[Custom] tab in the Brush Window.
It's important to note that there's a limit to the number of original brush patterns you can import from other users.
Advanced Customization: Color Brush Patterns
Creating a brush pattern from scratch can be a rewarding process, but it can also be challenging. A more accessible approach for beginners is to start by customizing an existing favorite brush and then registering it as a custom brush.
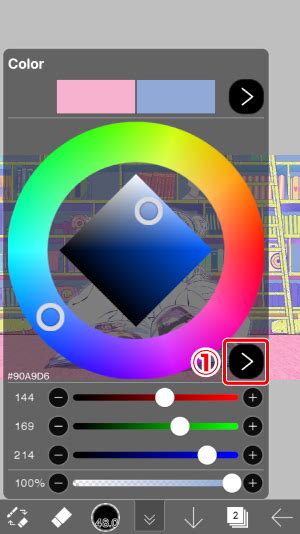
When creating brush patterns, the Brush Pattern (Color) option allows you to design patterns with multiple colors. The key principle here is how the ①[Color of Brush Pattern Image] is transformed based on the ②[Color Currently Selected] when you use the brush.
The Role of Base Color in Color Brushes
You can also set a ③[Base Color] for your color brush pattern. In Pattern Editing Mode, you'll find a ⑤[Base Color Button]. This base color is crucial because it influences how the colors within your brush pattern will appear when you actually use the brush.
For instance, if your brush pattern primarily consists of red elements, setting the base color to red is recommended. Similarly, if the pattern is predominantly blue, set the base color to blue.
To create a custom color brush, start by creating a canvas with the type set to ⑥[Brush Pattern (Color)]. The ⑧ [Base Color] button allows you to set the hue. To determine the correct hue for your base color, use the eyedropper tool to select a representative color directly from your brush pattern image.
Let's illustrate with an example: imagine you've designed a sunflower brush pattern. If you set the base color to yellow (perhaps by using the eyedropper on the yellow petals of your sunflower), then when you test the brush with yellow as the selected color, you will indeed get a yellow sunflower.
Understanding Color Transformation in Custom Brushes
Now, consider what happens when you change the brush color. If your base color was red and you change the selected brush color to green, the hue will shift. The difference in hue between red and green is approximately 120 degrees on the color wheel. If you then change the brush color from red to blue, the hue difference is around 240 degrees.
It's important to remember that the examples of red, green, and blue mentioned above typically have 100% brightness and saturation. When using a color brush pattern, the final image drawn on the canvas will never appear more vivid or saturated than the original brush pattern image itself. The custom brush color modifies the hue of the pattern, but it doesn't enhance its intensity beyond what was originally created.
Practical Steps for Creating a Custom Brush
Let's walk through a practical example of creating a custom brush, focusing on customization rather than starting entirely from scratch. This approach often yields more immediate and satisfying results.
Choosing a Base Brush and Canvas Size
For this tutorial, we will use a small canvas size, for example, a 3 x 4 unit canvas, to work on the brush pattern itself. The initial step involves selecting a brush to customize. Click the arrow on the right side of the brush selection interface to reveal various settings tabs.
The first tab, Basic, primarily controls the pattern opacity and the thickness of the brush. You can modify these settings later.
The Fade tab, as mentioned earlier, influences how the brush fades. For now, if you haven't made any changes to the original brush, you can leave these settings as they are.
The Crucial Shape Tab
The Shape tab is arguably the most significant area for brush customization, as it's where the most substantial changes to the brush's behavior will occur. The brush pattern used in a popular example from 12 days prior was the Round Brush. However, for this tutorial, let's experiment with Watercolor (Bleed).
Dynamic Settings and Brush Rotation
Under the Dynamic tab, setting all parameters to 100% is a common practice to ensure the full effect of other settings.
It's essential to rename your brush and export it to prevent losing your custom creation.
Brush Customization Series | Episode 4: Type, Dynamic, Settings | Beginner's Course for IbisPaint X
Advanced Brush Settings: Following Rotation and Force Fade
Consider the following tips for further refinement:
- Following Rotation: This setting is very important. It determines whether the brush pattern rotates with your stroke. Turning Following Rotation ON can create more natural-looking strokes, especially for brushes designed to mimic organic textures like watercolor or foliage. If the first iteration of a brush doesn't behave as expected, re-examining this setting is often the key.
- Force Fade: Activating Force Fade can further control the brush's tapering effect, ensuring a consistent fade regardless of pressure or stroke speed.
Experimenting with different combinations of these settings can lead to unique results. For instance, one user might prefer a combination of two brushes: one for the primary stroke and another used as a highlight, imported and compared to achieve a layered effect.
Finalizing and Saving Your Brush
To finalize your custom brush:
- Change the Brush Pattern: Select one of the four available types for your brush pattern.
- Adjust Spacing: Set the Spacing to around 55%. This value can be adjusted based on the desired density of the pattern.
- Enable Following Rotation: Ensure Following Rotation is turned ON.
- Rename the Brush: Go to the Settings Tab and give your brush a descriptive name.
- Save: Once you've made all your desired adjustments, save the brush. It will then be available in your custom brush library for immediate use.
By understanding and manipulating these various settings, you can move beyond the default brush options and craft tools that are perfectly tailored to your unique artistic style and project needs within Ibispaint.