Procreate has rapidly become a beloved tool for digital artists, praised for its intuitive interface and powerful brush engine. Many users, particularly those transitioning from traditional art or exploring new digital mediums, often find themselves asking a crucial question: "Is Procreate vector-based?" This question is not merely academic; it has significant implications for how artwork can be scaled, edited, and integrated into different design workflows, especially when interacting with industry-standard software like Adobe Illustrator. Understanding Procreate's underlying technology is key to unlocking its full potential and ensuring seamless integration with other design tools.
Understanding Raster vs. Vector Graphics
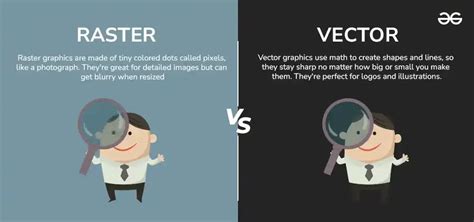
Before delving into Procreate's capabilities, it's essential to grasp the fundamental difference between raster and vector graphics.
Raster graphics, also known as bitmap graphics, are composed of a fixed number of tiny squares called pixels. Each pixel has a specific color and position. When you zoom into a raster image, you will eventually see these individual pixels, leading to a loss of quality and a jagged appearance. Photographs and detailed digital paintings are typically raster images. The resolution of a raster image is fixed; it's defined by the number of pixels it contains (e.g., 1920x1080 pixels). Enlarging a raster image beyond its original resolution requires the software to guess at the missing pixel information, which often results in blurriness or pixelation.
Vector graphics, on the other hand, are defined by mathematical equations that describe points, lines, curves, and shapes. These graphics are not pixel-based. Instead, they are made up of paths and nodes. Because they are based on mathematical formulas, vector graphics can be scaled to any size - from a tiny icon to a massive billboard - without any loss of quality or clarity. The lines and curves remain perfectly sharp and crisp at any resolution. Logos, typography, and illustrations designed for scalability are typically created as vector graphics. Software like Adobe Illustrator and Affinity Designer are primarily vector-based programs.
Procreate's Foundation: A Raster-Based Powerhouse
Procreate, at its core, is a raster-based application. This means that when you create artwork in Procreate, you are working with pixels. Every brushstroke, every color fill, and every element you add is composed of pixels arranged on a digital canvas. This is why Procreate excels at creating rich, textured, and painterly artwork that mimics traditional media. The ability to use a vast array of custom brushes, blend colors naturally, and achieve subtle gradients is a hallmark of its raster foundation.
The iPad’s touch interface and Apple Pencil integration make Procreate incredibly responsive and tactile, allowing artists to achieve a level of expressiveness that is often associated with traditional painting and drawing. The pressure and tilt sensitivity of the Apple Pencil translate directly into variations in brush stroke thickness and opacity, further enhancing the organic feel of Procreate artwork. When you save a Procreate file, you are essentially saving a collection of pixels arranged in a specific way. Common file formats for raster graphics, such as .JPG, .PNG, and .TIFF, are what Procreate typically exports to.
Bridging the Gap: Procreate to Vector Workflows
While Procreate itself is raster-based, its strength lies in its ability to serve as a powerful starting point for projects that will ultimately be realized or utilized in vector formats. This is a common workflow for many designers and illustrators who love the artistic freedom and expressive capabilities of Procreate but need the scalability and editability of vector graphics for their final output.
A popular scenario involves creating illustrations in Procreate and then importing them into Adobe Illustrator to be vectorized. This process allows artists to leverage Procreate's intuitive drawing tools for the initial creative phase, capturing unique textures and painterly qualities, and then use Illustrator's powerful vectorization tools to create clean, scalable versions of their artwork.
One of the key techniques for this workflow involves using Procreate's export options to save files in a format that is easily importable into Adobe Illustrator. Saving as a high-resolution PNG or PSD (Photoshop Document) is often recommended. The PSD format is particularly useful as it can preserve layers, which can then be managed and utilized within Illustrator.
When importing a Procreate file into Adobe Illustrator, the primary method for converting the raster image into vector paths is often through Illustrator's Image Trace function. This feature analyzes the pixel data of a raster image and attempts to convert it into editable vector paths. The effectiveness of Image Trace can vary depending on the complexity and style of the Procreate artwork. Simple, clean illustrations with distinct lines and solid colors tend to vectorize more cleanly than highly textured or painterly pieces.
For those struggling with texture issues when moving from Procreate to Illustrator, specific techniques are employed. This might involve carefully adjusting Image Trace settings to capture finer details or, in some cases, manually redrawing key elements in Illustrator over the imported Procreate image as a guide. The goal is to create a "sensible and repeatable workflow" that allows for the smooth transition of illustrations, especially those with texture, into a vectorized format suitable for pattern making or other design applications.
Essential Tools and Techniques for Transitioning
To effectively transition artwork from Procreate to Adobe Illustrator, several tools and knowledge points are crucial:
- iPad with Procreate installed: This is the foundational requirement for creating the artwork.
- Adobe Illustrator: This is the destination software for vectorization.
- Reliable File Transfer: A method to get your Procreate file from your iPad to your desktop computer is essential. This could involve using cloud storage services (like Dropbox, Google Drive, or iCloud Drive), AirDrop (for Apple devices), or connecting your iPad to your computer.
- Understanding Export Settings: Knowing which file format and resolution to export from Procreate is critical. Higher resolutions (e.g., 300 DPI) and formats that preserve detail and layers (like PSD) are generally preferred for subsequent vectorization.
- Mastering Adobe Illustrator's Image Trace: This tool is central to the vectorization process. Users need to understand its various presets and custom settings (like paths, corners, noise, and method) to achieve the best results for different types of artwork. Experimentation is key, as the optimal settings will depend heavily on the source Procreate image.
- Layer Management: Preserving and utilizing layers from Procreate in Illustrator can significantly streamline the editing process. When a Procreate file is saved as a PSD, layers can often be imported directly into Illustrator, allowing for easier manipulation of different elements.
- Manual Redrawing and Refinement: For complex or highly textured artwork, Image Trace might not be sufficient on its own. Artists may need to use Illustrator's pen tool and other vector editing tools to manually redraw or refine paths, ensuring clean lines and precise shapes. This approach offers the highest level of control and can result in superior quality vector graphics.
How I Vectorise My Procreate Art in Adobe Illustrator | Step-by-Step Tutorial for Beginners
It's worth noting that while Procreate doesn't natively support vector output, its raster capabilities are so robust that it can produce artwork that, when skillfully vectorized, retains much of its original charm and detail. The process is not always a simple one-click solution, but with the right knowledge and tools, it's a highly achievable and rewarding workflow.
Affinity Designer vs. Procreate in the Vector Context
The user mentions Affinity Designer in the context of vector capabilities. It is important to clarify that while Affinity Designer is a powerful design application, its primary strength is in its hybrid approach, offering both raster and vector capabilities within a single app. However, for the specific workflow of importing raster artwork and automatically converting it to vector paths using a function akin to Adobe Illustrator's Image Trace, Affinity Designer, as of current knowledge, does not possess a direct equivalent that is as widely used or integrated for this specific purpose.
This distinction is important for users aiming to replicate the Procreate-to-Illustrator vectorization workflow. While Affinity Designer can create vector graphics from scratch and has tools for manipulating paths, the automatic tracing of a raster image into editable vector paths is a specialized function that is a core feature of Adobe Illustrator. Therefore, if the goal is to leverage Procreate’s raster output and then convert it into vector using an automated tracing tool, Adobe Illustrator remains the go-to software for this particular task.
Time-Saving Tools and Tricks
Beyond the core functionality, several "time-saving tools most people don’t know about" can enhance the Procreate-to-Illustrator workflow:
- "Open With" Functionality: A simple yet often overlooked step is knowing how to correctly open a file on your desktop. Right-clicking a file and selecting "Open With" followed by choosing Adobe Illustrator can be a direct pathway to importing your artwork, rather than navigating through Illustrator's "File > Open" menu. This level of detail in instruction can be a game-changer for those who have been searching for answers.
- Layer Naming Conventions: Before exporting from Procreate, naming your layers descriptively (e.g., "Character Body," "Eyes," "Background Elements") can make organizing and editing the imported file in Illustrator much faster.
- Vector Brushes in Procreate (Simulated): While Procreate brushes are raster, some brush creators design their brushes to mimic vector-like qualities. Using these, combined with precise line work, can make the subsequent vectorization process smoother.
- Utilizing Illustrator's Vector Editing Tools: Once vectorized, understanding tools like the Direct Selection Tool (for manipulating individual anchor points and segments) and the Pen Tool (for creating new paths) is crucial for refining the artwork and making it truly "vector."
- Pattern Making Workflows: For pattern making specifically, ensuring that the vectorized elements are perfectly aligned, scaled, and repeatable is key. Techniques like creating pattern tiles in Illustrator and using its pattern preview mode are essential.
The journey from Procreate's expressive raster canvas to the scalable precision of vector graphics is a testament to the adaptability of modern digital art tools. While Procreate itself operates on a pixel-based system, its role as a powerful creation tool that can feed into a vector workflow is undeniable. By understanding the fundamental differences between raster and vector, and by mastering the techniques for transitioning between these formats, artists can unlock a broader range of creative possibilities and professional applications for their digital artwork. The ability to get your Procreate illustrations into Adobe Illustrator to get vectorized motifs for pattern making, especially those with texture, can truly change the game and make complex design tasks more accessible and manageable.