In the realm of digital content creation, the quality of both visual and auditory elements is paramount. While modern cameras have advanced significantly, the audio capture capabilities, particularly on smartphones, often fall short of professional standards. This disparity underscores the importance of recording audio separately. However, this practice introduces a new hurdle: the intricate process of syncing external audio with video footage. Traditionally, this task has been a time-consuming and often frustrating endeavor, frequently necessitating the use of resource-intensive desktop software or rudimentary built-in tools. Fortunately, browser-based solutions like Kapwing offer an intuitive and efficient alternative for achieving perfectly synchronized audio and video.
This tutorial will guide you through the essential steps of syncing your audio and video using Kapwing, a powerful online video editor. We will delve into the process of uploading your media, aligning audio and video timelines, combining them for seamless editing, and finally exporting your polished final product.
The Imperative of Separate Audio Recording and Synchronization
The decision to record audio separately from video is driven by a fundamental pursuit of superior sound quality. External microphones, whether dedicated audio recorders or high-quality lavalier microphones, are designed to capture richer, clearer sound with less ambient noise compared to built-in camera microphones. This is particularly crucial for content intended for platforms like YouTube, where viewer engagement is heavily influenced by audio clarity.
However, the benefit of enhanced audio comes with the responsibility of re-integrating it with the video. The synchronization process ensures that the audio and video remain aligned throughout the playback, creating a cohesive and professional viewing experience. Without proper syncing, even the best-recorded audio will detract from the overall quality, leading to a disconnect between what is seen and what is heard.
The Clap Sync Method: A Visual and Auditory Cue
A common and highly effective technique for achieving precise audio synchronization is the "clap sync" or "visual sync" method. This involves performing a distinct action, such as clapping your hands or using a clapboard, directly in front of the camera at the very beginning of the recording, just before or as the primary audio recording begins.

When you import your video and audio files into Kapwing, you'll be able to visually identify the moment the hands meet in the video. Simultaneously, you'll observe a significant spike in the audio waveform corresponding to the sound of the clap. By aligning these two distinct markers - the visual of the clap and the audio spike - you establish a precise starting point for your audio track that matches the video. This method is invaluable for ensuring that even if there's a slight delay in starting the recording devices, the precise moment of action is captured and can be used as a reference point for perfect synchronization.
Step-by-Step Guide to Syncing Audio and Video with Kapwing
Kapwing's user-friendly interface and robust feature set make the process of syncing audio and video remarkably straightforward. The following steps will walk you through the entire workflow:
1. Upload Your Audio and Video Files
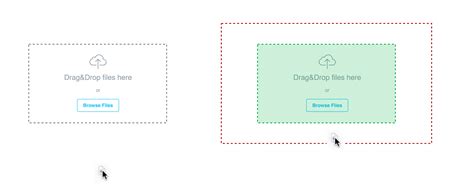
Begin by navigating to Kapwing.com and initiating a new project by clicking "Get started." You have several convenient options for uploading your media files. You can drag and drop your audio and video files directly from your device's file manager into the designated upload box. Alternatively, you can click to upload, paste a URL if your media is hosted online, or leverage the integrated cloud storage options like Google Drive or Google Photos.
Once uploaded, both your audio and video files will appear in the "Media" tab, typically located on the left-hand side of the Kapwing editor. Depending on the size of your files, you may need to wait a few moments for them to fully process before they are ready for editing.
2. Aligning the Start of Your Audio and Video
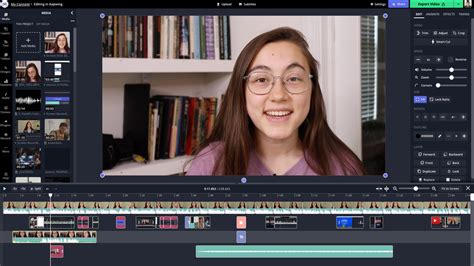
The next critical step involves placing both your video and audio files onto the timeline. Click the blue plus (+) button positioned over the thumbnail of each file in the Media tab to add them to your project's timeline. You will observe each file appearing as a distinct layer on the timeline.
If your video file inherently contains audio, it's essential to detach and remove this original audio. Navigate to the video layer on the timeline, right-click, select "Detach audio," then identify the newly created audio layer and delete it. This ensures that only your separately recorded, higher-quality audio is used in the final project.
Now, meticulously play through your video and audio. Identify the precise moment when the action or speech begins in your video. If you employed the clap sync method, this will be the visual of the hands meeting. For spoken dialogue, pinpoint the exact instant the subject starts speaking. Locate the corresponding moment in your audio layer. For a clap, this will be the prominent spike in the waveform; for dialogue, you may need to play the audio and video back a few times to achieve exact alignment.
Once you've identified the synchronization point, position the player head at that exact frame. With the audio layer selected, click the "Split" button on the timeline or use the keyboard shortcut (S). This action will divide the audio clip at the player head's position. Right-click on the portion of the audio you wish to remove (typically the silence before the clap or speech) and select "Ripple delete." This command not only removes the selected clip but also shifts the remaining audio forward, closing the gap and moving it towards the beginning of the timeline (0.0s mark).
Repeat this splitting and ripple delete process for your video layer, ensuring the visual start aligns perfectly with the audio start. After adjusting both layers, play back the section to verify that the audio and video are perfectly synced. Make any necessary micro-adjustments by nudging the audio or video layers slightly left or right on the timeline until the synchronization is flawless.
3. Combining Audio and Video for Unified Editing
With your audio and video layers precisely synchronized, you can now group them together. This allows you to edit them as a single unit, ensuring that any subsequent trimming or splitting operations apply to both layers simultaneously, maintaining their synchronized state. Select both the audio and video layers on the timeline by clicking and dragging a selection box around them, or by holding down the Shift key and clicking each layer. Then, right-click on the selected layers and choose "Group layers."
This grouping functionality is incredibly beneficial for streamlining your editing workflow. For instance, if you need to trim the beginning or end of your video, or make cuts at specific points, grouping ensures that both the visual and auditory components are adjusted in tandem.
Should you wish to perform more advanced edits, such as automatically removing silences within the video, adding automatic subtitles, or other complex modifications, it is often recommended to export the video at this stage. Then, re-upload the synced video back into Kapwing. This creates a consolidated video file where the audio is permanently embedded, simplifying subsequent editing processes.
4. Exporting and Downloading Your Synced Video
Once you are satisfied with the synchronization and any preliminary edits, it's time to export your project. Click the "Export" button, typically located in the top-right corner of the editor. Here, you can select your desired export format (e.g., MP4) and resolution settings to match your intended platform or use case.
After Kapwing processes your video, a download button will appear. Click this button to save the final, perfectly synced video file to your device. From this point, you have the flexibility to open a new project in Kapwing to perform further edits, or if you are content with the result, you can publish it directly to various web platforms.
Exploring Alternatives: Other Tools for Audio-Video Synchronization
While Kapwing stands out for its ease of use and browser-based accessibility, it's beneficial to be aware of other tools that offer audio and video synchronization capabilities.
1. Kapwing: The All-in-One Online Solution
As detailed in this tutorial, Kapwing excels in providing a seamless online experience for syncing audio and video. Its strengths lie in its intuitive interface, accessible on any device with a web browser, and its comprehensive suite of editing tools. Beyond synchronization, Kapwing offers features like automatic subtitle generation, background noise removal, and a vast library of stock media, making it a robust platform for end-to-end video production.
Key Features:
- Browser-based accessibility on any device.
- Timeline editing for precise audio and video syncing.
- A suite of smart, intuitive tools for audio and video manipulation.
- Automatic subtitle generation.
- Cloud storage for project saving and retrieval.
Pricing:
- Free Plan: Offers access to a broad range of editing tools with a watermark on exports and limited project storage.
- Pro Plan ($16/month): Provides watermark-free exports, access to all smart tools, and expanded cloud storage with HD exports.
2. FlexClip: A User-Friendly Online Editor
FlexClip is another online video editor that facilitates audio and video synchronization. It offers a free tier alongside several paid plans, catering to varying user needs. While FlexClip's audio editing capabilities beyond basic trimming and cutting are more limited compared to Kapwing, it allows users to "link" audio and video layers in the timeline after synchronization, enabling simultaneous editing.
Key Features:
- Browser-based, accessible on any device.
- Ability to link audio and video layers for synchronized editing.
- A variety of basic editing tools, including text overlays and a stock media library.
Pricing:
- Free Plan: Includes a 480p resolution cap, a maximum video length of 10 minutes, and a watermark, with limited project storage.
- Basic Plan ($4.19/month): Offers 720p resolution for videos up to 25 minutes without a watermark.
- Plus Plan ($6.99/month): Provides 1080p resolution, unlimited video length, and 30GB of storage.
- Business Plan ($13.99/month): Features 1080p resolution, unlimited video length, and 100GB of storage.
3. Adobe Premiere Pro: Professional Desktop Software
For users requiring advanced, professional-grade editing capabilities, Adobe Premiere Pro is a powerful desktop solution. It offers sophisticated tools for synchronizing audio and video, including an AI-powered "Synchronize" feature that can automatically align multiple video clips with a single audio track. This is particularly useful for multi-camera shoots. However, Premiere Pro comes with a steeper learning curve and a higher cost.
Key Features:
- Automatic synchronization of multiple audio and video files using AI.
- Extensive professional video and audio editing tools.
- Includes a royalty-free sound library.
Pricing:
- Starts at $20.99/month for individual use and $35.99/month for team licenses.
Beyond Synchronization: Leveraging Kapwing for Comprehensive Audio Editing
Kapwing's utility extends far beyond mere audio synchronization. The platform offers a robust set of tools designed to enhance and manipulate audio, empowering creators to achieve studio-quality sound.
Converting Audio Formats: WAV to MP3 and More
Kapwing's conversion tools are indispensable for managing various audio file formats. WAV files, known for their uncompressed, high-fidelity audio, often come with very large file sizes, making them cumbersome for online sharing or playback on many devices. Kapwing's WAV to MP3 converter allows you to efficiently transform these large WAV files into smaller, more widely compatible MP3 format without significant loss of quality.
The process is as simple as uploading your WAV file, selecting MP3 as the export output, and letting Kapwing handle the conversion. This is particularly useful for optimizing audio for podcasts, music, or any application where file size and compatibility are crucial. The platform also supports converting MP3s to video, a valuable function for platforms that primarily accept video uploads.
Transcribing Audio to Text: Unlocking Content Potential
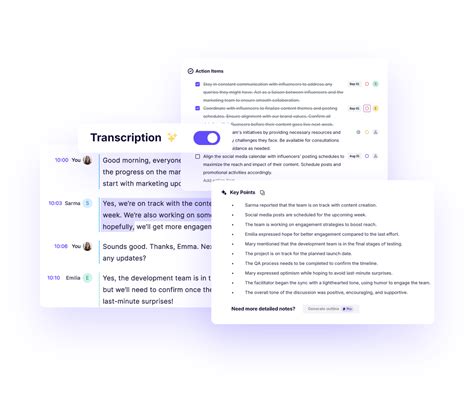
The ability to transcribe audio into text opens up a world of possibilities for content repurposing and accessibility. Kapwing's AI-powered transcription tool offers a fast and accurate method for converting spoken words into written text.
This feature is invaluable for:
- Accessibility: Providing captions and transcripts for deaf or hard-of-hearing audiences, as well as for those who prefer to read along.
- Content Repurposing: Transforming video or audio content into blog posts, social media updates, articles, or detailed meeting minutes.
- Searchability: Making your content discoverable through search engines by creating text-based versions.
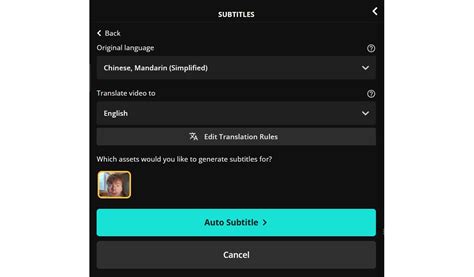
The transcription process in Kapwing is straightforward: upload your audio or video file, select the language, and let the AI generate the transcript. You can then edit the transcript for accuracy, remove filler words like "um" and "uh" using the "Cut Filler Words" tool, and export it as a .txt file. For those needing to correct specific terms, Kapwing's Custom Spelling feature within the Brand Kit can proactively address common misinterpretations of proper nouns or industry-specific jargon.
Enhancing Audio Quality with AI Tools
Beyond basic editing and transcription, Kapwing provides advanced AI-powered tools to elevate the quality of your audio.
- Clean Audio: This tool is a lifesaver for recordings made in less-than-ideal conditions. It effectively removes background noise, static, and other unwanted interference, resulting in crystal-clear audio. Whether you're dealing with wind noise, a noisy cafe, or general ambient sound, Kapwing's AI can significantly improve the clarity of your recordings with a single click.
- Smart Cut: This intelligent feature automatically detects and removes silent sections from your audio or video. This is particularly useful for creating more engaging content by eliminating unnecessary pauses, stutters, or dead air, making your videos and podcasts more dynamic and concise.
- Split Vocals: This innovative tool uses AI to separate vocals from instrumental tracks in audio files. This allows for greater flexibility in audio editing, enabling you to isolate voices for voiceovers or remix music.
Adding Voiceovers and Music
Kapwing simplifies the process of adding voiceovers and background music to your projects. You can record your voice directly within the editor using the "Record" function, which allows you to speak over your video. The platform also offers an extensive audio library filled with royalty-free music and sound effects, which can be easily dragged and dropped into your timeline.
The ability to add multiple audio files to a single project means you can layer background music, sound effects, and voiceovers to create a rich and immersive audio experience. You can then edit each audio layer independently - trimming, adjusting volume, changing speed, or duplicating clips - to achieve the perfect mix.
Conclusion: Kapwing as Your Centralized Creative Hub
Kapwing emerges as a versatile and powerful online platform that addresses numerous challenges faced by content creators, particularly in the realm of audio and video editing. From the fundamental task of syncing external audio with video to advanced features like AI-powered transcription, noise reduction, and format conversion, Kapwing provides an integrated solution. Its browser-based nature ensures accessibility across devices, while its intuitive interface makes professional-level editing achievable for users of all skill levels. By streamlining complex processes and offering a comprehensive suite of tools, Kapwing empowers creators to produce high-quality, engaging content efficiently and effectively.