In the fast-paced world of professional photography, time is a currency as valuable as a perfectly captured image. The hours spent meticulously editing can often feel like an insurmountable hurdle, consuming precious time that could otherwise be dedicated to shooting, client engagement, or even personal pursuits. This is precisely where the transformative power of Lightroom presets comes into play. Far from being a mere shortcut, presets are an indispensable tool for photographers aiming to cultivate a distinct, signature style and significantly accelerate their post-production workflow. View them not as a magical solution, but as a potent launchpad for both creativity and efficiency.
Understanding the Essence of Lightroom Presets
At its core, a Lightroom preset is a saved collection of settings within Adobe Lightroom's Develop module. These settings encompass a wide array of adjustments, including but not limited to exposure, contrast, highlights, shadows, color balance, and tone curves. Imagine you have just perfected a golden hour portrait, achieving precisely the warm tones, soft contrast, and rich colors you envisioned. Instead of trying to recall every single slider adjustment, you can encapsulate that entire combination of settings into a preset. This allows for the instantaneous application of that specific look to any other photograph with a single click.
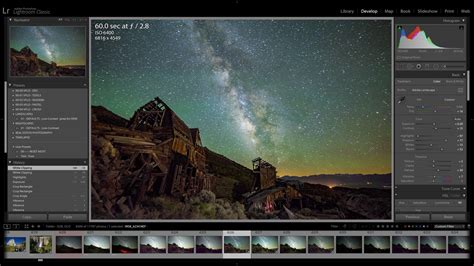
A common misconception is that presets are akin to the simplistic filters found on social media applications. However, a Lightroom preset is a far more sophisticated entity. It represents a detailed configuration of slider positions, offering a granular level of control over the final image. This depth of customization is what elevates presets from mere stylistic overlays to foundational editing tools.
The Compelling Advantages of Utilizing Presets
For any working photographer, the benefits of integrating presets into their workflow are too substantial to overlook.
Accelerating Your Editing Workflow
The most immediate and apparent advantage of using presets is the dramatic reduction in editing time. Consider the daunting task of editing a wedding gallery that might contain upwards of a thousand images. Editing each photograph from scratch is an exceptionally time-consuming endeavor. With presets, you can apply a base edit to hundreds of photos simultaneously, slashing your editing hours significantly. This newfound efficiency allows you to dedicate more time to capturing new images, marketing your services, or simply reclaiming some personal time.
Cultivating a Cohesive and Recognizable Style
Have you ever admired a photographer's portfolio and been struck by its remarkable visual consistency? This is the hallmark of strong brand identity, and presets are a cornerstone in achieving it. By consistently applying a defined set of presets, you ensure that your images possess a similar aesthetic, regardless of when they were captured or under what conditions. This uniformity cultivates a recognizable style that clients will not only notice but actively seek out, leading to more bookings and a stronger professional reputation.
A Springboard for Creative Exploration
A prevalent myth suggests that presets can stifle creativity. The reality is quite the opposite. A well-crafted preset is not intended to be a final, unalterable edit. Every photograph is unique, presenting distinct challenges and opportunities related to lighting, subject matter, and location. A preset should be viewed as a robust foundation, capable of handling the foundational color grading and toning, thereby bringing you approximately 80% of the way to your desired outcome. This foundational work liberates you to concentrate on the nuanced, image-specific refinements that elevate a good photograph to an exceptional one. In essence, presets are an integral component of a professional photographer's essential toolkit.
Navigating the Diverse Landscape of Presets: Free vs. Paid
Once you embark on the journey of integrating presets into your workflow, you will encounter a vast and diverse marketplace offering an endless array of options. A primary decision you will face is whether to opt for free presets or invest in professional, paid collections.
The Allure and Limitations of Free Presets
Who can resist the appeal of "free"? Thousands of free presets are readily available online, often found on photography blogs, shared through YouTube tutorials, or offered as introductory materials. However, it is crucial to approach free presets with a degree of realism. They frequently serve as a marketing tool for larger, paid collections. Consequently, they might be designed as a "one-trick pony," functioning flawlessly on a specific type of photograph but faltering when applied to images with different lighting conditions or subject matter. Despite these limitations, free presets can be invaluable for learning and experimentation, offering a practical way to deconstruct how edits are constructed and to gain hands-on experience with different looks.
The Value Proposition of Paid Preset Collections
This is where most serious photographers eventually land. Paid preset collections are typically developed by established, professional photographers who have dedicated years to refining their unique style. The advantages of investing in paid presets are manifold. They are almost invariably of higher quality and are engineered for greater versatility. Often, these collections are curated with variations designed to address different lighting scenarios, such as "golden hour," "overcast," "indoor reception," and so forth. Furthermore, paid presets usually come accompanied by comprehensive installation guides and dedicated customer support, ensuring that you have assistance readily available should any issues arise.
Integrating Presets into Your Lightroom Workflow
Once you have identified a desirable preset pack, the process of getting them into Lightroom is refreshingly straightforward.
Installing Presets on Lightroom Desktop
This is the most common method employed by professional photographers.
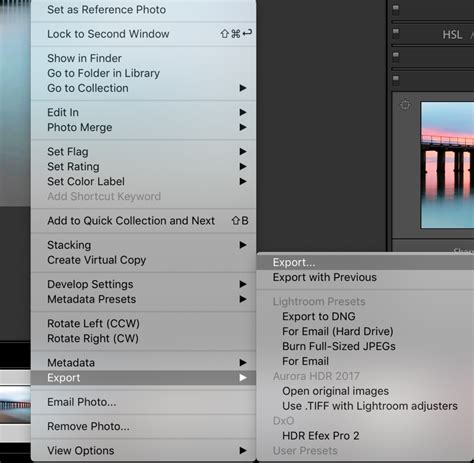
- Download and Unzip: After purchasing or downloading your presets, they will typically be provided in a .zip file. You will need to extract these files to a designated location on your computer.
- Open Lightroom Classic: Launch Adobe Lightroom Classic.
- Locate the Presets Panel: On the left-hand side of the screen, you will find the "Presets" panel. If it is not visible, click on the "+" icon at the top of the panel and select "Import Presets."
- Navigate to Your Files: A file browser window will open. Navigate to the folder where you saved your unzipped .XMP preset files. Select the desired presets and click "Import."
Installing Presets on Lightroom Mobile
If you edit on the go, you can install presets directly into the Lightroom mobile app.
- Open Lightroom Mobile: Launch the Lightroom mobile application on your device.
- Select an Image: Choose any image from your library to edit.
- Access Presets: Tap on the "Edit" icon (usually a slider symbol) and then tap on the "Presets" icon.
- Import Presets: Tap the three dots in the top right corner of the Presets screen and select "Import Presets."
- Locate Preset Files: Navigate to and select the .DNG preset files you have downloaded (note: mobile presets are often distributed as DNG files). The presets will then be added to your library.
Optimizing Preset Usage for Maximum Impact
Remember, a preset is merely a starting point, not a definitive final edit. To achieve the best results, follow these guidelines:
Prioritize Basic Corrections First
Before applying any preset, it is crucial to adjust the white balance and exposure of your image. These two settings are fundamental to a good edit and are inherently unique to every single photograph. Establishing a solid foundation with these basic corrections will significantly enhance the outcome of your preset application.
Apply the Preset and Refine
Once your basic corrections are in place, you can apply the desired preset. Lightroom offers a live preview feature, allowing you to hover over presets to see a real-time preview on your image before committing. After applying a preset, you will almost always need to make minor adjustments. This might involve re-tending the exposure, reducing the contrast slightly, or tweaking the saturation to perfectly match the image's nuances.
The Next Frontier: Creating Your Own Custom Presets
While utilizing presets created by other photographers is an excellent method for learning and accelerating your workflow, the ultimate aspiration for many is to develop a style that is unequivocally their own. The most effective way to achieve this is by creating your own custom presets.
When you craft your own presets, you are distilling your unique creative vision into a reusable, efficient tool. You are no longer adopting someone else's style; you are actively defining and solidifying your own. This is paramount for building a distinctive and recognizable brand. Your custom presets will be meticulously tailored to your specific camera, lenses, and shooting style, ensuring unparalleled relevance and effectiveness.
The Process of Creating Custom Presets
Creating your own presets is a more accessible process than many might imagine.
- Start with a High-Quality Image: Open a well-exposed RAW image in the Develop module of Lightroom Classic.
- Edit the Image to Perfection: This is the creative core of the process. Adjust all the relevant settings until you are completely satisfied with the aesthetic.
- Open the "Create Preset" Dialog: Navigate to the Presets panel on the left-hand side and click the "+" icon, then select "Create Preset."
- Select Settings to Include: This is a critical step. A dialog box will appear, presenting a comprehensive list of checkboxes corresponding to various editing parameters. Carefully select the settings you wish to include in your preset.
- Determine What to Exclude (Crucial): It is almost always advisable to uncheck the boxes for White Balance, Exposure, Transform, and Lens Corrections. These settings are highly specific to individual photos and should be adjusted manually before or after applying your custom preset. Excluding them ensures your preset remains versatile.
- Name and Organize Your Preset: Assign a descriptive name to your preset so you can easily identify its purpose later. Organize it into an appropriate folder for easy retrieval.
- Click "Create": Once you have configured your settings, click "Create."
By building a personal library of custom presets tailored for various scenarios, you gain complete command over your editing workflow, ensuring a style that is authentically yours.
Embracing the Future: AI-Powered Editing with Imagen
For years, presets have been the predominant solution for efficient and consistent photo editing. They have served the industry admirably. However, what if a tool existed that could transcend the limitations of static presets? Imagine a tool that doesn't merely apply the same set of rules to every photograph but instead analyzes each image individually, making intelligent adjustments informed by your unique personal style. This is not about replacing the artist; it is about equipping the artist with a more intelligent and adaptable brush.
The Fundamental Limitation of Traditional Presets
The inherent limitation of a traditional preset lies in its static nature. It applies the exact same settings to a brightly lit, sunny outdoor photograph as it does to a dimly lit, moody indoor shot. This often necessitates significant manual correction, negating some of the time-saving benefits.
Imagen: Intelligent, Personalized Editing
Imagen revolutionizes this paradigm. It employs artificial intelligence to learn your distinctive editing style and then intelligently applies that knowledge to each new photograph. At the heart of this technology is the Personal AI Profile. This feature is what truly sets Imagen apart.
To create your profile, you submit a collection of your previously edited photos from your Lightroom Classic catalogs â a minimum of 3,000 images is recommended for optimal results. Imagen's AI meticulously analyzes these photos, learning everything about your style. It understands how you manage exposure in challenging lighting, how you adjust skin tones, how you grade colors in both shadows and highlights, and even how you approach cropping.
The process is remarkably seamless. Imagen is a desktop application that integrates directly with Lightroom Classic, Lightroom, Photoshop, and Bridge. You simply upload your unedited photos through the Imagen app. The AI then processes these images in the cloud at an astonishing speed â often in less than half a second per photo. Once completed, the edits are downloaded directly back into your Lightroom catalog, with all adjustments applied as if you had manually moved each slider yourself.
How to Make & Edit Images with ChatGPT for Beginners
For the Emerging Photographer: Talent AI Profiles
What if you are a newer photographer without thousands of edited images to train an AI? Or perhaps you deeply admire the style of an industry leader and desire a professional look right out of the box? Imagen addresses this with Talent AI Profiles. These are not merely preset packs; they are AI profiles meticulously built by analyzing the complete editing styles of world-renowned photographers. When you apply a Talent AI Profile, you are not just acquiring a static look; you are harnessing the power of that photographer's AI-enhanced editing expertise for your own images.
Imagen: A Comprehensive Workflow Solution
While the personalized editing capabilities of the Personal AI Profile are a standout feature, Imagen is engineered as a comprehensive post-production platform. Its aim is to streamline your entire workflow, not just a single facet of it. Imagen recognizes that editing is but one component of the broader post-production puzzle.
AI Culling: Streamlining Image Selection
For many photographers, culling â the process of selecting the best images from a shoot â is the most dreaded part of the job. It can involve hours of painstaking work to sift through thousands of photos, identifying blinked eyes, blurry shots, and redundant duplicates. Imagen's AI Culling automates this arduous process. It analyzes your entire shoot, intelligently groups similar photos, and flags images that are blurry or feature closed eyes.
Additional AI-Powered Tools
Beyond culling, Imagen offers a suite of intelligent tools designed to handle other common yet time-consuming adjustments. This integrated approach moves beyond simple editing to encompass a more holistic post-production solution.
Imagen's Flexibility: Standalone Use or Integrated Ecosystem
One of the significant advantages of the Imagen platform is its inherent flexibility. You are not confined to a single, rigid workflow. Perhaps you are content with your current culling method but wish to automate your editing. Imagen allows you to use its AI editing feature independently. Alternatively, you might desire to streamline your entire process from start to finish. By offering this all-in-one ecosystem, Imagen transcends its role as a mere "editing tool" and evolves into a true workflow partner.
Presets vs. Imagen: A Direct Comparison
To clarify the distinction between traditional Lightroom presets and Imagen's AI editing, let's break down their differences in a direct, factual comparison:
| Feature | Lightroom Presets | Imagen Editing |
|---|---|---|
| Application Method | Applies the same saved group of static settings to every photo. | Analyzes each photo individually and applies unique, intelligent adjustments based on the imageâs specific content. |
| Consistency | Provides a good baseline for a consistent look, but requires manual adjustments for true consistency across different lighting conditions. | Delivers excellent consistency in style and results across a wide variety of lighting, scenes, and subjects by adapting the edit to each photo. |
| Personalization | Highly personal if you create your own from scratch. When using presets from others, you are adopting their style. | Creates a Personal AI Profile that learns from your own past edits. The AI evolves with you as you âfine-tuneâ it with new work, making it deeply personalized. |
| Workflow Role | Serves as a single, valuable step in the manual editing process. | Can be a comprehensive workflow solution, with options for AI-powered culling, editing, cloud backup, and delivery all in one platform. |
| Learning Curve | Easy to apply. Creating a truly versatile and professional preset requires significant skill and practice. | Requires an initial setup to train your Personal AI Profile (by providing your edited photos). After that, the editing process is almost fully automated. |
| Adaptability | Not adaptable. A preset for a sunny day will perform poorly on an indoor photo without significant manual correction. | Highly adaptable. The AI intelligently adjusts settings based on the unique characteristics of each image. |
This comparison highlights a pivotal shift in the industry. Presets are a tool you utilize. Imagen is an intelligent assistant that learns and adapts.
The Evolving Landscape of Photography and the Role of AI
The photography industry is in a constant state of evolution. Cameras continuously improve, client expectations rise, and the demand for faster turnaround times intensifies. To thrive in this dynamic environment, professionals must work smarter, not merely harder. This is why AI-powered tools like Imagen are not simply a fleeting trend; they represent the future of professional post-production.
By embracing AI, you are not relinquishing creative control. Instead, you are delegating the tedious, mechanical aspects of the editing process to an intelligent assistant that you have personally trained. This strategic delegation frees up your mental energy to focus on what truly matters: capturing breathtaking images, weaving compelling visual narratives, and nurturing strong, lasting relationships with your clients.
Frequently Asked Questions About Lightroom Presets and AI Editing
1. What is the main difference between a Lightroom preset and an Imagen AI Profile?A Lightroom preset is a static set of saved settings that is applied identically to every photo. An Imagen AI Profile, on the other hand, learns your unique editing style and applies intelligent, context-aware adjustments to each image individually.
2. Can I use Lightroom presets on my phone?Yes, Lightroom presets can be used on mobile devices through the Lightroom mobile app, though the installation process and file formats may differ slightly from desktop.
3. Will buying professional presets automatically make my photos look professional?Not automatically. Professional presets provide a high-quality starting point and can significantly improve your workflow and consistency. However, they are not a one-click solution and often require minor adjustments to suit individual images. True professionalism comes from understanding the editing process and applying presets thoughtfully.
4. How many photos do I need to create an Imagen Personal AI Profile?Imagen recommends a minimum of 3,000 of your previously edited photos from a Lightroom Classic catalog to build a robust and accurate Personal AI Profile. The more high-quality, representative edits you provide, the better the AI will learn your style.
5. Is Imagen a subscription service?Yes, Imagen operates on a subscription model. You typically pay a monthly or annual fee for access to the platform, and then a per-photo rate for editing and culling services.
6. Can Imagen edit in Black & White?Absolutely. You can create a separate Personal AI Profile specifically trained on your black and white editing style to achieve consistent and nuanced monochrome results.
7. What happens if I donât like an edit from Imagen?You are always in complete control. After Imagen delivers the edits back to your Lightroom catalog, you can tweak any slider or setting just as you would with a manual edit. The AI provides a highly intelligent starting point, but final artistic decisions remain yours.
8. What are Imagenâs Talent AI Profiles?Talent AI Profiles are editing profiles created by world-renowned photographers. They allow you to apply the intelligent, AI-powered style of an industry leader to your own photos, offering a shortcut to a professional aesthetic.
9. Does Imagen replace Lightroom?No. Imagen is not a standalone editor itself; it is a powerful workflow accelerator designed to integrate seamlessly with Adobe Lightroom Classic, Lightroom, Photoshop, and Bridge. It enhances, rather than replaces, your existing Adobe ecosystem.
10. How long does it take for Imagen to edit my photos?Imagen is incredibly fast. It typically edits photos in under 0.5 seconds per image, significantly speeding up your post-production time.
11. Can I still be creative if I use Imagen?Yes, more so than ever. By automating 80-90% of the editing process that is repetitive and technical, Imagen frees you up to dedicate your time and creative energy to the final 10-20% of the edit that truly makes a photo special and imbues it with your unique artistic vision.
12. What is AI Culling?AI Culling is an Imagen feature that automatically sorts through your entire photoshoot, identifying the best shots and flagging potential issues like blinks or duplicates, saving you significant time in the selection process.