Photoshop's Filter Gallery stands as a powerful gateway to a vast array of creative possibilities, allowing users to emulate traditional artistic techniques, introduce compelling textures, and conjure unique special effects. This comprehensive guide delves into the intricacies of this feature, exploring its functionalities, categorized filters, and practical applications for both novice and experienced digital artists.
Accessing the Filter Gallery and Initial Considerations
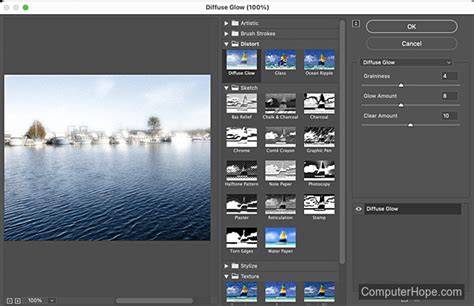
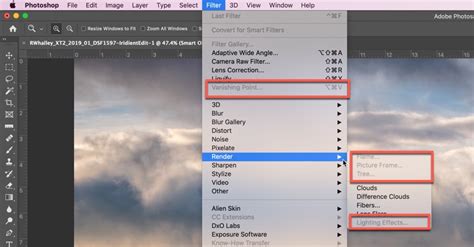
To embark on your creative journey with the Filter Gallery, the process is straightforward. Navigate to the top menu bar and select "Filter," then choose "Filter Gallery." This action will present you with a visually organized interface where you can explore and preview a multitude of filters.
A crucial point to bear in mind is the bit depth of your image. If your image is in 16-bit mode, the "Filter Gallery" option will appear grayed out. This is because the Filter Gallery, and indeed many of Photoshop's filters, are designed to function exclusively in 8-bit color mode. To overcome this limitation, you will need to convert your image. This is achieved by going to "Image," then "Mode," and selecting to convert from 16-bit to 8-bit. This conversion is a necessary step to unlock the full potential of the Filter Gallery.
Furthermore, some filters within the Filter Gallery are sensitive to your current foreground and background colors. Before diving into filter application, it's often beneficial to set these to their default values by tapping the 'D' key. This action resets the foreground color to black and the background color to white, providing a predictable starting point for experimenting with color-dependent filters.
For an optimized viewing experience within the Filter Gallery, you can utilize keyboard shortcuts or the zoom controls located in the lower-left corner of the gallery window. For instance, the shortcut Command + 0 (on Mac) or Control + 0 (on Windows) will fit the image to your screen, allowing for a clear preview of the applied effects.
The Power of Smart Objects and Smart Filters
Before applying filters, especially when exploring the Filter Gallery, it is highly recommended to convert your layer into a Smart Object. This is achieved by right-clicking on the layer in the Layers panel and selecting "Convert to Smart Object." The advantage of working with Smart Objects lies in the ability to apply filters as "Smart Filters."
When a filter is applied to a Smart Object, it becomes a Smart Filter, which is non-destructive. This means you can adjust, rearrange, disable, or even remove the filter at any time without permanently altering the original image data. This flexibility is invaluable for experimentation and refining your creative vision. You can find and manage these Smart Filters within the Layers panel, offering a clear overview of all applied effects.
Navigating the Filter Categories
The Filter Gallery organizes its extensive collection of filters into logical categories, making it easier to locate the specific effect you're seeking. These categories include:
Artistic: Emulates traditional drawing and painting techniques, offering effects like Colored Pencil, Cutout, Dry Brush, Film Grain, Fresco, Neon Glow, Paint Daubs, Palette Knife, Poster Edges, Rough Pastels, Smudge Stick, Sponge, and Watercolor. These filters are excellent for transforming photographs into artistic renderings.
Blur: Softens or blurs specific areas of an image, creating depth, a dreamy effect, or reducing distracting details. Key filters include Gaussian Blur, Motion Blur, Radial Blur, Shape Blur, Smart Blur, and Surface Blur.
Distort: Applies various distortions and transformations to images, bending and warping them in unique ways. Popular choices include Glass, Ocean Ripple, Pinch, Polar Coordinates, Ripple, Shear, Spherize, Twirl, Wave, and ZigZag.
Pixelate: Manipulates individual pixels, often used for creating abstract or retro looks, or for stylized censoring. Filters like Color Halftone, Crystalize, Facet, Fragment, and Pointillize fall into this category.
Render: Generates natural-looking elements and textures, such as clouds, fire, and lens flares, enhancing atmosphere and visual interest. This category includes Clouds, Difference Clouds, and Lens Flare.
Sharpen: Enhances edge detail and clarity, bringing definition back into images. Common filters include Unsharp Mask and Smart Sharpen.
Sketch: Simulates traditional sketching techniques, offering effects like Chrome, Charcoal, Chalk & Charcoal, Conte Crayon, Graphic Pen, Halftone Pattern, Jitter, Note Paper, Photocopy, Plaster, Reticulation, Stamp, Torn Edges, and Water Paper.
Stylize: Applies a wide range of creative effects, often for dramatic or abstract transformations. This category includes Asphalt, Bas Relief, Brush Strokes, Cartoon, Chrome, Clouds, Emboss, Extrude, Find Edges, Glowing Edges, Grain, Halftone Pattern, Jacquard, Lattice, Neon Glow, Oil Paint, Paint Daubs, Palette Knife, Poster Edges, Rough Pastels, Smudge Stick, Solarize, Spray Strokes, Stained Glass, Sumi-e, and Watercolor.
Texture: Adds surface qualities and tactile appearances to images. Filters like Add Texture, Craquelure, Grain, Patchwork, and Stucco are found here.
Understanding Key Filter Mechanics and Their Applications
The Impact of Foreground and Background Colors:
As mentioned earlier, some filters are directly influenced by your chosen foreground and background colors. The "Diffuse Glow" filter, for instance, produces vastly different results depending on whether the foreground is white and the background black, or vice versa. Similarly, the "Halftone Pattern" filter's output is significantly altered by the color configuration. Experimenting with different color combinations is key to unlocking the full potential of these color-sensitive filters.
Blur Filters in Detail:
Blur filters are fundamental tools for image manipulation.
- Gaussian Blur: Applies a weighted average to pixels, creating a smooth, bell-curve-shaped blur. It's essential for softening images, creating depth of field, or reducing noise. However, be mindful of edge artifacts when applying it to selections, as it can "contaminate" the selection edges with data from outside.
- Motion Blur: Simulates the effect of movement by blurring in a specific direction and distance.
- Radial Blur: Creates a blur that radiates outwards from or inwards towards a central point, simulating zooming or spinning effects.
- Smart Blur: A more advanced blur that aims to preserve edges while blurring areas, useful for noise reduction without sacrificing detail.
- Surface Blur: Blurs an image while preserving edges by searching for dissimilar pixels. The "Threshold" setting controls how dissimilar pixels must be before they are affected, and the "Radius" determines the size of the area sampled for the blur.
Distort Filters for Creative Warping:
Distort filters offer a playground for creative manipulation.
- Wave: Applies a wavy distortion to an image. You can control the number of wave generators, their amplitude, and wavelength.
- Ripple: Creates a rippling effect, similar to dropping a stone into water. You can adjust the amount and size of the ripples.
- Spherize: Makes a selection bulge or shrink as if it were on a sphere. This can be used for fisheye lens effects or to create rounded shapes.
- Twirl: Rotates a selection around a central point.
- Glass: Applies a distortion that makes the image look as if viewed through a piece of glass. You can load a texture file to define the distortion pattern.
Artistic and Sketch Filters for Stylization:
These filters are instrumental in transforming photographs into artistic creations.
- Oil Paint: Simulates the look of an oil painting, allowing control over brush strokes, cleanliness, and stylization.
- Dry Brush: Mimics the effect of a dry brush technique, often used in watercolor or oil painting.
- Watercolor: Simplifies details and softens colors to resemble a watercolor painting.
- Colored Pencil: Emulates the look of colored pencil drawings.
- Poster Edges: Simplifies an image by finding the edges and posterizing the result.
- Cutout: Simplifies an image by reducing the number of colors and adding outlines, giving it a cut-paper look.
Texture and Render Filters for Depth and Atmosphere:
- Grain: Adds a film grain texture to an image, useful for adding grit or emulating vintage photography.
- Clouds: Generates a cloud-like pattern using the foreground and background colors. "Difference Clouds" inverts the colors to create a more dramatic effect.
- Lens Flare: Simulates the effect of light reflecting within a camera lens, adding a dramatic or atmospheric touch.
Sharpening Filters for Clarity:
- Unsharp Mask: A classic sharpening filter that enhances edges. You control the Amount, Radius (how wide the edge is that gets sharpened), and Threshold (how much contrast is needed for an edge to be sharpened).
- Smart Sharpen: A more advanced sharpening tool that offers greater control and the ability to minimize noise and halo effects. It supports CMYK and allows for sharpening individual channels. The "Reduce Noise" slider is crucial for balancing sharpening with noise reduction, preventing a "plasticky" look.
Other Notable Filters:
- Halftone Pattern: Simulates the look of a newspaper or comic book print by converting image areas into circles of varying sizes.
- Emboss: Creates a raised, three-dimensional effect by highlighting edges.
- Find Edges: Detects and highlights the edges in an image, often used as a starting point for other effects.
- Stained Glass: Gives an image the appearance of being made of colored glass panes separated by dark lines.
Applying Filters to Selections and Beyond
While the Filter Gallery allows you to apply filters to an entire image, you can also use it on specific selections. This opens up possibilities for selective enhancements and creative manipulations within a particular area of your photograph.
Furthermore, beyond the Filter Gallery, Photoshop offers a vast array of individual filters accessible directly from the "Filter" menu. These are organized into similar categories and can be applied directly to layers or, preferably, as Smart Filters to maintain non-destructive editing.
Advanced Techniques and Best Practices
Layer Masks: When working with filters, especially on Smart Objects, layer masks are essential. They allow you to selectively reveal or hide the effect of a filter on different parts of your image without permanently altering pixels.
Blend Modes: Experimenting with blend modes in the Layers panel can dramatically alter how filters interact with underlying layers, leading to unique and complex visual outcomes.
Opacity Control: Adjusting the opacity of a layer or a Smart Filter allows you to control the intensity of the applied effect, ensuring a subtle and integrated result.
Practice and Experimentation: Mastering Photoshop's filters, particularly within the Filter Gallery, requires consistent practice and a willingness to experiment. Don't be afraid to try different filters, adjust their settings, and combine them to discover new creative avenues.
How to use the Filter Gallery in Adobe Photoshop (Explained Ep. 2)
By understanding the capabilities of the Photoshop Filter Gallery and its diverse range of filters, users can significantly enhance their images, transform photographs into artistic masterpieces, and unlock a world of creative expression. The ability to preview, adjust, and non-destructively apply these effects makes the Filter Gallery an indispensable tool for any digital artist.