In today's digital landscape, video content has become an indispensable tool for communication, marketing, and creative expression. Platforms like Instagram have significantly shifted their focus towards video, making skills in video editing no longer a niche requirement but a crucial asset for a wide range of professionals, from marketers and entrepreneurs to educators and content creators. Fortunately, mastering video editing is now more accessible than ever, thanks to user-friendly online platforms like Kapwing. This guide will delve into the intricacies of using Kapwing's online video editor, providing step-by-step workflows for creating videos from scratch, repurposing existing content, and leveraging AI-powered tools. We will also address a common concern for users of the free plan: how to remove the Kapwing watermark.
Understanding Kapwing's Watermark Policy
Kapwing, like many online creative platforms, has specific policies regarding watermarks, particularly for users on its free plan. When you create and export videos or images using Kapwing's free tier, a small watermark is typically embedded in the output. This watermark serves as a form of attribution to the platform and acts as a subtle promotion for Kapwing's services.
However, Kapwing understands that users may require watermark-free content for professional or personal projects. The ability to export content without the watermark is a feature primarily offered through their paid subscription plans. These plans are tailored to user needs, providing enhanced functionality and a more professional output.
Options for Watermark Removal
There are generally three main approaches to obtaining watermark-free content from Kapwing:
- Upgrading to a Paid Plan: This is Kapwing's intended method for users who need to export content without a watermark. Paid plans, such as the Creator or Pro tiers, unlock this feature along with other advanced editing tools and capabilities. By upgrading, users gain the ability to export unlimited content without any branding or watermarks, ensuring a clean and polished final product.
- Using Third-Party Watermark Removers: For users who prefer not to upgrade, or for those who have already exported a project with a watermark, third-party tools can be employed. These tools range from dedicated watermark remover software to more general video editing applications with watermark removal capabilities.
- Utilizing Kapwing's AI Image Watermark Remover: Kapwing itself offers an AI-powered tool specifically designed for removing watermarks from images. This solution leverages AI Inpainting to intelligently restore areas where watermarks were present, delivering a sharp, high-quality result without branding or visual clutter.
It is important to note that removing watermarks from content you do not own or have authorization to modify could infringe upon copyright and licensing agreements. Wipit, for example, emphasizes that it only removes watermarks and elements from user-owned or authorized content, and users must avoid infringing on others’ intellectual property rights.
Editing a Video from Scratch with Kapwing
For users who want complete creative control over their video projects, editing from scratch provides the ideal workflow. This process begins with recording your content, followed by making a rough cut, adding essential elements like subtitles and voiceovers, incorporating visual enhancements, and finally, reviewing and exporting.
Step 1: Record Your Content
Before diving into editing, having quality raw footage is essential. Recording with the editing process in mind can significantly streamline the workflow.
- Audio Quality: While modern smartphones boast impressive cameras, their built-in microphones may not always produce high-quality audio. Poor sound can detract significantly from even the best visuals. Investing in an external microphone can dramatically improve audio clarity. For optimal results, consider recording audio separately and then synchronizing it with your video.
- Optimize Your Setup: Choose a recording environment that is quiet and well-lit. Natural light is often preferable, but a ring light or softbox can be beneficial for indoor recordings. Aim for a clean and intentional background that doesn't distract from the main subject.
- Plan Your Content: Being on camera can be daunting initially. Planning your content by creating a script or outline before recording can prevent awkward improvisations and ensure a more coherent final product.
Step 2: Make a Rough Cut
A rough cut is the initial full draft of your video, where all clips are arranged in the correct sequence, and any unusable segments, such as long pauses or mistakes, are removed. This foundational step makes the subsequent editing process much smoother. While manual trimming and cutting can be time-consuming, Kapwing's "Auto-Edit" tool automates much of this work by intelligently removing silences, filler words, and redundant takes.
To use Auto-Edit:
- Upload Footage: Begin by uploading your video files directly from your device or by importing them using a link. Click the “Create New” button to start a new project.
- Arrange Clips: Place your video clips in the desired order on the timeline.
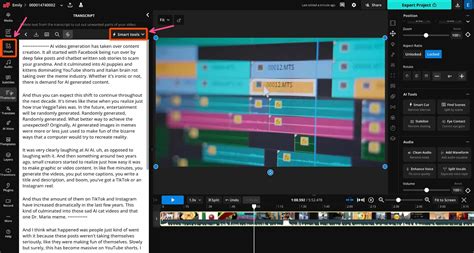
- Generate Transcript: Navigate to the “Transcript” tab in the left-hand toolbar. This will generate a full transcript of your video. You can edit the transcript directly; deleting text will also trim those corresponding sections from the video.
- Apply Auto-Edit: For a faster workflow, open the “Smart Tools” menu in the top-right corner and select “Auto-Edit.” You will be prompted to select the language spoken in your video. Kapwing will then automatically remove silences, filler words, and bad takes. The video in your timeline will be trimmed into smaller, cleaner segments.
Step 3: Add Subtitles or Voiceover
Subtitles and voiceovers enhance a video's engagement, inclusivity, and platform readiness. Subtitles improve accessibility for hard-of-hearing viewers, multilingual audiences, and those watching without sound. Voiceovers provide narration and clarify visual information.
Adding Subtitles:
Kapwing simplifies subtitle creation. You can either upload an existing subtitle file (SRT or VTT) or generate them automatically using Kapwing's AI.
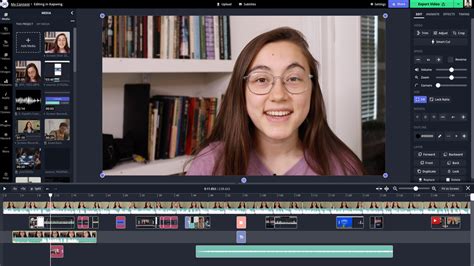
- Access Subtitles: Click on “Subtitles” in the left-hand toolbar.
- Generate or Upload: Choose to upload a subtitle file or select “Auto Subtitles” for AI generation.
- Select Language: If using Auto Subtitles, select the spoken language or choose a language for translation.
- Generate Captions: Click “Auto Subtitle” to generate time-synced captions.
- Edit and Customize: Once generated, you can easily edit any typos or errors. Kapwing also offers extensive customization options for subtitle appearance, including font, color, size, animations, characters per line, and placement.
Adding Voiceovers:
For narration, Kapwing's Text-to-Speech tool allows you to generate voiceovers using AI.
- Access Audio Tools: Click “Audio” in the left toolbar and select “Text-to-Speech.”
- Enter Script: Type your script into the provided field.
- Choose Voice: Select from a range of realistic AI voices, with support for over 20 languages and multiple voice profiles per language. You can even create an AI clone of your own voice.
Step 4: Add Transitions, Overlays, and Audio
Transitions, overlays, and music effects are vital for polishing your video, fixing filming imperfections, and creating a professional look.
- Transitions: These guide viewers smoothly between scenes, enhancing visual flow. Kapwing offers over 70 transition effects, including fades, slides, wipes, and zooms, suitable for various editing needs, from opening and closing sequences to scene changes and emphasizing moments. To add a transition, select a clip in the timeline and click the “Transitions” tab on the right-hand toolbar. You can then choose a style and set its duration.
- Overlays/B-Roll: Overlays are images or text placed on top of your footage to highlight key information. B-roll refers to supplementary footage spliced into the timeline to visually support the narrative. Both help illustrate your points and keep the audience engaged. Access these by clicking the “Visuals” tab in the left-hand toolbar to open the stock media library, or upload your own files via the “Media” tab.
- Adding Audio: Audio plays a crucial role in setting the tone. You can upload your own music (ensuring you have the rights) or browse Kapwing’s stock audio library via the “Audio” tab, searching by keyword or category. Adjust the volume to ensure it complements, rather than overpowers, your main audio. Kapwing also allows you to layer in sound effects, either by searching the stock library or generating custom sounds with AI.
Step 5: Review and Export
Before finalizing your video, conduct a thorough review to ensure it is polished and ready for its intended platform. For short-form vertical videos, utilize the "Safe Zones" feature to prevent essential content from being obscured by in-app UI elements. Select the target platform from the options provided. Finally, click the export button in the top-right corner to download your finished video.
Repurposing Existing Video Content
In today's content-driven environment, repurposing existing videos for different platforms is a highly effective strategy. Kapwing's AI tools can automate this process, allowing you to generate social-ready clips from longer videos based on detected topics and highlights.
To repurpose video using Kapwing AI:
- Start a New Chat: Open Kapwing AI and initiate a new chat.
- Upload Video: Click "Attach Media" in the bottom-left corner to upload your video file.
- Analyze and Generate Clips: Kai, Kapwing's AI, will automatically analyze the video and generate a series of short clips grouped by topic or key moments, ideal for social media.
- Review and Select: You can then review these clips and choose to download them directly or click "Edit in Studio" to make further adjustments like adding subtitles, resizing for vertical formats, or trimming.
Generating Videos with AI
Kapwing's AI capabilities extend to generating entire videos from simple text prompts, eliminating the need for cameras, scripts, or traditional editing software.
Step 1: Open Kapwing AI and Start a New Chat
Navigate to Kapwing AI and click “Attach Media” if you wish to include an image in your prompt, or begin by typing your prompt directly into the chat.
Step 2: Write a Strong Prompt
A well-crafted prompt is key to achieving desired AI-generated video results. Include:
- Topic & Tone: Clearly define the subject and the desired mood (e.g., "Create an upbeat video explaining how to make iced coffee").
- Audience Context: Specify format and length requirements (e.g., "Vertical, 30 seconds long, with captions and background music").
- Expert Tip: Use
[camera break]to structure multi-scene videos, indicating where one scene ends and the next begins. For example: "Scene 1: Show someone typing at a laptop in a coffee shop.[camera break]Scene 2: Close-up of hands pouring iced coffee over ice."
Step 3: Include Media (Optional)
You can upload images or audio files for Kai to incorporate into the generated video, which is useful for brand assets or specific visual references.
- Expert Tip: Upload a high-quality image and prompt Kai to animate it using motion effects, camera pans, or overlays. For instance: "Create a short animated clip using this image, adding slow zoom-in and ambient music."
Step 4: Edit or Refine the Output
Once Kai generates your video, you can:
- Request Refinements: Reply with specific instructions like "Make it shorter," "Add more energy," or "Use brighter visuals."
- Ask for Reformatting: Request changes like "Resize for Instagram Reels," or "Add captions and voiceover."
- Edit in Studio: Click “Edit in Studio” to open the video in Kapwing’s full editor for manual or AI-assisted adjustments to timing, text, music, and transitions.
But how do AI images and videos actually work? | Guest video by Welch Labs
Tips for Better Video Editing as a Beginner
Developing video editing skills is a journey, and adopting best practices from the outset can significantly accelerate your learning curve and improve the quality of your output.
Start with a Plan: Before opening your editor, clearly define your video's purpose, target audience, and intended platform. Create a basic outline or storyboard, including your hook, main content, and call to action (CTA). This pre-edit planning minimizes indecision during the editing process and ensures your video has a logical, goal-driven structure.
- Pro Tip: Label your footage clearly and organize clips into folders (e.g., A-roll, B-roll, cutaways, audio) to quickly locate needed assets.
Utilize Keyboard Shortcuts: Mastering keyboard shortcuts can exponentially speed up your editing process, especially for frequently used actions like clipping and trimming. Common shortcuts include:
- Cut: ⌘ + x (Mac) | ctrl + x (Windows)
- Copy: ⌘ + c (Mac) | ctrl + c (Windows)
- Paste: ⌘ + v (Mac) | ctrl + v (Windows)
- Delete: delete (Mac) | delete (Windows)
- Ripple Delete: ⌘ + delete (Mac) | ctrl + delete (Windows) - deletes selected sections and shifts subsequent content left.
- Split: s (Mac) | s (Windows)
Use Visual Effects Intentionally: Avoid adding transitions, zooms, or effects purely for aesthetic reasons. Instead, employ them strategically to solve editing problems, such as masking a jump cut or emphasizing a key statement.
- Pro Tip: Use subtle effects like motion blur, crossfades, or gentle zooms sparingly to create rhythm and visual interest without overwhelming the viewer. Reserve bolder effects for significant moments or transitions.
Design for Mobile-First: With over 80% of video views occurring on mobile devices, designing with mobile users in mind is paramount. This includes ensuring text is legible on smaller screens and considering vertical video formats.
Maintain Brand Consistency: Consistent branding builds recognition and trust. Use the same fonts, colors, logo placements, and transitions across all your videos to establish a cohesive brand identity.
Kapwing stands out as a highly beginner-friendly online video editor, offering a simple drag-and-drop interface, AI-powered tools, and no requirement for software downloads. This makes it an accessible entry point for anyone looking to create professional-looking videos.
Frequently Asked Questions: Removing Kapwing Watermarks
Does Kapwing have watermarks?Yes, Kapwing places a watermark on videos and images created and exported using its free plan. This is a standard practice for many free creative tools, serving as a form of branding.
How can I remove the Kapwing watermark?There are several ways to achieve a watermark-free export:
- Upgrade to a Paid Plan: This is the most straightforward and officially supported method. Kapwing's paid plans (e.g., Creator, Pro) include watermark-free exports. Once upgraded, simply re-export your project.
- Use Kapwing's AI Image Watermark Remover: For images, Kapwing offers a dedicated AI tool that can intelligently remove watermarks. You upload the image, prompt the AI to remove the watermark, and download the clean version.
- Utilize Third-Party Tools: Various video editing software and online tools can help remove watermarks. Some popular options mentioned include MiniTool MovieMaker, Wipit, HitPaw, AnyMP4 Video Converter Ultimate, and WatermarkRemover.io. These tools often employ techniques like cropping, blurring, or AI-based object removal.
Is the AI Image Watermark Remover free?Kapwing's AI tools operate on a credit system. While you can try them for free, a credit allowance is provided. For extensive use or maximum creativity, upgrading to a Pro account unlocks the full potential of these AI features.
Can I remove watermarks from a batch of images?Yes, Kapwing allows for bulk uploads to your media library. You can then use the AI Assistant to remove watermarks from multiple images. For more complex or consistent editing needs across a batch, building a Custom Kai can automate watermark removal and other edits.
How do I remove watermarks from photos using AI?Open a new chat in Kapwing AI, click "Attach Media" to upload your image, and enter a prompt like "Remove the watermark." Press the generate arrow, and then click "Download" to save your watermark-free image.
Does the AI watermark eraser work on any watermark?The AI watermark eraser is designed to handle various types of watermarks, including repeating logos and intricate patterns. Its effectiveness depends on the complexity of the watermark and the underlying image.
What file formats can I upload and download?Kapwing supports most popular image file types, including JPEG and PNG. Watermark-free images can be downloaded as JPEG, PNG, or WEBP.
How to remove watermarks on mobile?To remove watermarks from an image using a mobile device, use your mobile browser to access Kapwing. Create a new chat, upload your image, enter your prompt, and generate the watermark-free version. You can then download the image directly to your phone.
By understanding Kapwing's features and policies, and by leveraging the various tools available, users can effectively manage watermarks and create polished, professional content. Whether through upgrading to a paid plan for seamless integration or exploring third-party solutions, the goal remains to produce clean, impactful visuals.