Sunlight, with its inherent ability to transform the ordinary into the extraordinary, plays a crucial role in photography. When captured effectively, sun rays can imbue an image with a sense of warmth, drama, and ethereal beauty. For photographers and digital artists seeking to enhance their images with this captivating element, Adobe Photoshop offers a powerful suite of tools. This tutorial delves into a precise and effective method for adding realistic sun rays, ensuring they integrate seamlessly with your existing lighting and subject matter.
The core principle behind creating believable sun rays lies in understanding where light naturally manifests. Sun rays are most prominent in the brightest areas of an image - the highlights. By strategically applying and masking the effect within these luminous zones, we can achieve a result that feels organic and integrated, rather than a superficial addition. This technique is particularly effective for images where the sun is either directly in front of the camera or positioned slightly to the side, as these scenarios naturally lend themselves to visible light rays.
Preparing Your Image for Sun Ray Enhancement
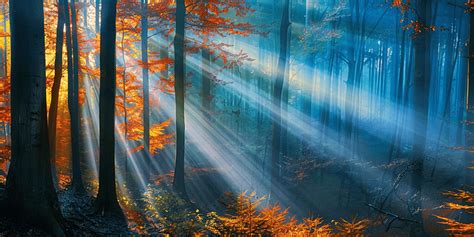
Before diving into the technical aspects of Photoshop, it’s essential to select an image that will best showcase the sun ray effect. The most successful results are typically achieved with photographs that are backlit by the sun or another strong light source. Images featuring a subject against a bright sky, or within a natural environment where light can filter through, are ideal. For instance, a photograph of a subject in a forest, illuminated by a setting sun, provides a perfect canvas for creating dramatic light rays.
Once you have identified a suitable image, take a moment to analyze the existing lighting. Observe the direction and intensity of the light. This analysis will be crucial in determining the path and spread of the sun rays you intend to add. Understanding the natural flow of light within your image is the first step towards creating a believable and impactful effect.
Laying the Foundation: Creating the Initial Light Rays
The process begins with a straightforward approach to establishing the basic structure of your sun rays. You don’t need complex tools for this initial stage.
Create a New Layer: In Photoshop, start by creating a new, empty layer above your background image. This dedicated layer will house the elements of your sun rays, keeping them separate and easily manageable.
Brush Tool for Ray Placement: Select the Brush Tool. Using a relatively soft brush, paint thin, white strokes along the paths where you envision the sun rays originating and traveling. At this stage, precision is not paramount; the goal is to establish the general direction and density of the rays. Think of these strokes as the foundational streaks of light.
Transforming Raw Strokes into Believable Rays
The initial white strokes, while indicative of light, lack the diffusion and natural spread that characterize real sun rays. To achieve this, we’ll employ a powerful blur effect and then refine it.
Convert to Smart Object: Before applying any filters, it’s a good practice to convert your newly created ray layer into a Smart Object. Right-click on the layer containing your painted strokes and select "Convert to Smart Object." This will allow you to non-destructively apply filters, meaning you can go back and make adjustments later without degrading the image quality.
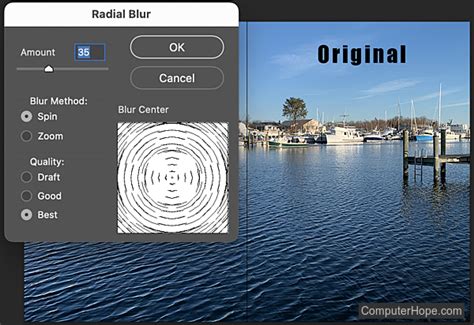
Applying Radial Blur: Navigate to the "Filter" menu, then select "Blur" and choose "Radial Blur." In the Radial Blur dialog box, set the "Blur Method" to "Zoom." This is the key setting for creating a radiating effect.
Setting the Origin Point: The Radial Blur filter allows you to define a single point from which the blur effect will originate. Position this point strategically within your image. Ideally, it should align with the apparent source of the light in your photograph - for instance, behind the subject or a specific point in the sky. Experiment with this placement to find the most natural-looking origin for your rays.
Adjusting the Amount of Blur: Once the origin is set, adjust the "Amount" of the Radial Blur. You’re aiming for a diffusion that starts to mimic the soft, spreading nature of light. It might be beneficial to duplicate the Radial Blur effect multiple times on your Smart Object layer, or simply increase the blur amount, to achieve the desired level of diffusion. The goal is to soften the hard brush strokes into something more ethereal.
Refining Color and Integration: The Role of Adjustment Layers
The blurred white streaks now represent the shape of your light rays, but their color and integration into the scene need further attention. This is where adjustment layers and masking come into play.
Creating a Levels Adjustment Layer: Above your light ray layer, create a new "Levels Adjustment Layer." This layer will be used to control the luminosity and color of the light rays.
Using the Light Ray Layer as a Mask: The magic of integrating the effect lies in using your light ray layer as a mask for the Levels Adjustment Layer. To do this, you’ll first need to select the contents of your light ray layer. Hold down the "Ctrl" (Windows) or "Cmd" (Mac) key and click on the thumbnail of your original light ray layer. This creates a selection around the blurred white streaks. With this selection active, click on the mask thumbnail of your Levels Adjustment Layer. This effectively "loads" the shape of your light rays onto the mask, meaning any adjustments made in this Levels layer will only affect the areas where your light rays are present.
Color Correction with Levels: The Levels Adjustment Layer offers granular control over the tonal range and color of your image. To adjust the color of the light rays, you can target specific color channels.
- Red Channel: Select the Red color channel within the Levels Adjustment Layer. By manipulating the sliders, you can introduce warmth. Often, a slight shift towards yellow and orange is desirable for sun rays. Experiment with moving the white slider to the left and the black slider slightly to the right to brighten and subtly tint the rays.
- Green Channel: Switch to the Green color channel. Again, adjust the sliders to fine-tune the color. The goal here is to complement the Red channel adjustments and achieve a natural-looking warm hue.
- Blue Channel: Finally, adjust the Blue channel. Typically, for warm sun rays, you’ll want to reduce the blue component, so you might move the white slider to the right.
Feel free to switch between these channels as needed, making small adjustments until the color of your light rays feels harmonious with the overall lighting of your photograph. Remember, highlights are often warmer than shadows, so a yellowish-orange tint is a natural starting point.

Enhancing Realism: Adding Noise and Final Touches
Even with careful color correction, digital effects can sometimes appear too smooth and artificial. Adding a touch of noise can significantly enhance the realism.
Adding Noise: Select one of your Levels Adjustment Layers. Go to the "Filter" menu, navigate to "Noise," and select "Add Noise." A dialog box will appear, allowing you to control the amount of noise.
Matching Existing Noise: The key to making this step effective is to match the noise level to the existing noise within your original photograph. Zoom in on your image and observe the grain or digital noise present. Adjust the "Amount" slider in the "Add Noise" dialog box until the added noise blends seamlessly with the natural texture of your photo. You can also choose the "Monochromatic" option to avoid adding color noise, which is usually more natural for this effect.
Add Realistic Sun Rays in Photoshop – Lighting Hack You’ll Love!
By following these steps, you can effectively add sun rays to your photographs in Photoshop, transforming them with a touch of warmth and dramatic flair. The method prioritizes natural integration by leveraging the image's existing highlights and employing precise adjustment techniques. Experiment with different images and settings to master this versatile technique and elevate your photographic creations.