Adobe Photoshop, a titan in the realm of digital imaging and graphic design, offers a vast array of tools and functionalities. While the visual interface is intuitive, true mastery and efficiency often lie in the strategic application of keyboard shortcuts. These keystroke combinations are not merely conveniences; they are fundamental to streamlining workflows, reducing repetitive mouse movements, and ultimately, enabling creators to produce stunning work at an unprecedented pace. As digital graphics expert, speaker, and educator Jesús Ramirez, founder of the renowned Photoshop Training Channel, attests, "Honestly, the actual answer is a lot of practice, but it all revolves around a set of incredibly useful, efficiency producing keyboard shortcuts."
For those who have delved into intermediate or advanced Photoshop techniques, these shortcuts become second nature, transforming the creative process from a series of deliberate clicks into a fluid, almost subconscious dance between keyboard and canvas. This article aims to illuminate these powerful shortcuts, providing a comprehensive guide for users across all skill levels, from beginners seeking to grasp the fundamentals to seasoned professionals looking to refine their speed and precision.
Navigating the Interface with Speed
Efficient navigation within Photoshop is paramount. The ability to quickly switch between tools, zoom in and out, and manage your workspace can significantly impact your productivity.
Tool Selection Shortcuts
Many of Photoshop's core tools have direct keyboard shortcuts, allowing for instant access without the need to locate them in the toolbar.
- Move Tool: Pressing 'V' activates the Move Tool, essential for repositioning selected content or layers.
- Eyedropper Tool: The 'I' key (for "igloo") summons the Eyedropper Tool, invaluable for sampling colors directly from your image.
- Crop Tool: Press 'C' to engage the Crop Tool, enabling you to trim and resize your image. Once the Crop Tool is active, pressing 'X' cycles through its orientation options. Holding down the 'Option' key (on macOS) or 'Alt' key (on Windows) while dragging one side of the crop boundary scales the crop proportionally on all sides. Pressing 'O' cycles through the various crop overlays, offering different guides for composition.
- Brush Tool: 'B' selects the Brush Tool.
- Eraser Tool: 'E' activates the Eraser Tool.
- Type Tool: 'T' brings up the Type Tool for adding text.
- Hand Tool: Holding down the 'Spacebar' temporarily activates the Hand Tool, allowing you to pan around your image without changing your currently selected tool.
Color Management Shortcuts
Quickly resetting or swapping your foreground and background colors can be a frequent necessity.
- Reset Color Palette to Black and White: Pressing 'D' (for "default") instantly resets your foreground and background colors to their default black and white settings.
- Switch Foreground and Background Colors: The 'X' key is a swift way to swap your current foreground and background colors.
Zooming and Viewing Shortcuts
Precise control over your view is crucial for detailed work.
- Fit Image to Screen: On macOS, pressing 'Command+0' fits the entire image within the screen boundaries. On Windows, this shortcut is 'Ctrl+0'.
- Zoom to 100%: For a true pixel-level view, use 'Command+1' on macOS or 'Ctrl+1' on Windows. This displays the image at its actual pixel dimensions.
- Zoom In/Out: 'Command++' (macOS) or 'Ctrl++' (Windows) zooms in, while 'Command+-' (macOS) or 'Ctrl+1' (Windows) zooms out. Holding 'Option' (macOS) or 'Alt' (Windows) while using the zoom shortcuts can reverse the action.
Arrow Key Navigation
The arrow keys offer fine-tuned control for pixel-level adjustments. When the Move Tool is active, pressing any of the arrow keys moves the selected layer or selection by 1 pixel in that direction. Holding down the 'Shift' key while using the arrow keys increases this increment to 10 pixels, providing a faster way to make larger positional adjustments.
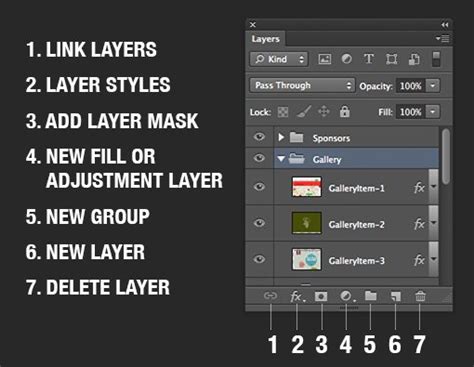
Layer Management: The Backbone of Photoshop Workflows
Layers are the fundamental building blocks of complex Photoshop documents. Mastering layer shortcuts is non-negotiable for efficient image manipulation.
Layer Creation and Duplication
- Create a New Layer: The shortcut 'Command+Shift+N' (macOS) or 'Ctrl+Shift+N' (Windows) instantly generates a new, empty layer above the currently selected one.
- Duplicate Any Layer: Pressing 'Command+J' (macOS) or 'Ctrl+J' (Windows) is the quickest way to duplicate the active layer, creating an exact copy directly above it. This is incredibly useful for non-destructive editing, allowing you to experiment with adjustments on a duplicate without affecting the original.
Layer Grouping and Organization
Keeping your layers organized is vital, especially in complex projects.
- Group Selected Layers: Select multiple layers (by clicking on one, holding 'Shift', and clicking on others at the opposite end of the stack, or by using 'Command+Click'/'Ctrl+Click' for non-contiguous layers), then press 'Command+G' (macOS) or 'Ctrl+G' (Windows) to group them into a folder.
- Ungroup a Group: To disband a layer group, select the group and press 'Command+Shift+G' (macOS) or 'Ctrl+Shift+G' (Windows).
Merging and Combining Layers
While non-destructive editing is often preferred, there are times when merging layers is necessary.
- Merge Selected Layers: With multiple layers selected, 'Command+E' (macOS) or 'Ctrl+E' (Windows) merges them into a single layer.
- Merge All Visible Layers: To combine all layers that are currently visible (indicated by an eye icon), use 'Command+Shift+E' (macOS) or 'Ctrl+Shift+E' (Windows).
- Merge Layers but Retain Them Too: This advanced shortcut, 'Command+Shift+Option+E' (macOS) or 'Ctrl+Shift+Alt+E' (Windows), creates a merged copy of all visible layers at the top of the layer stack, leaving the original layers intact. This is a powerful technique for applying global adjustments or filters without permanently collapsing your individual layers.
Clipping Masks
Clipping masks are a powerful non-destructive way to confine the visibility or effect of a layer to the shape of the layer below it.
- Create a Clipping Mask: Position the layer you want to clip above the layer you want to clip it to. Then, hover your mouse cursor between these two layers in the Layers panel. When the cursor changes to a downward-pointing arrow, hold down the 'Option' key (macOS) or 'Alt' key (Windows) and click once.
- Remove a Clipping Mask: The process to remove a clipping mask is identical to creating one. Hover your mouse cursor between the clipped layer and the base layer in the Layers panel, hold down the 'Option' key (macOS) or 'Alt' key (Windows), and click once.
Enhancing Efficiency with Opacity and Blending Modes
Directly adjusting layer opacity and applying blending modes are fundamental to achieving sophisticated visual effects. Photoshop offers a remarkably efficient way to control these properties using the number keys.
Opacity Control with Number Keys
This is one of the most frequently cited and incredibly useful shortcuts for speeding up workflow. When a layer is selected, pressing a number key (0-9) directly sets the opacity of that layer.
- Single Digit: Pressing a single number key (e.g., '5') sets the opacity to that percentage (e.g., 50%).
- Double Digit Combination: For precise opacity control, press a combination of two number keys. For example, typing '1' and then '2' will set the opacity to 12%. Typing '0' and then '5' will set it to 5%. Typing '0' and then '0' will set it to 0% (making the layer completely transparent).
This method is significantly faster than clicking and dragging the opacity slider in the Layers panel, especially when you need to quickly dial in a specific transparency level for effects like subtle overlays or ghosted images.
Blending Mode Shortcuts
Blending modes dictate how a layer's pixels interact with the pixels of the layers beneath it. While you can select these from a dropdown menu, there are shortcuts to cycle through them.
- Cycle Through Blending Modes: With a layer selected, press 'Shift++' (plus key) to cycle forward through the blending modes, and 'Shift+-' (minus key) to cycle backward. This allows for rapid experimentation with different blending effects without taking your hands off the keyboard.
Photoshop Blend Modes Tips and Tricks
Selections, Masks, and Precise Control
Mastering selections and masks is crucial for isolating and manipulating specific areas of an image. Photoshop provides shortcuts to enhance these processes.
Mask Overlay Visibility
- Show Mask Overlay: Pressing the backslash key '\' toggles the visibility of the mask overlay. This is incredibly useful for quickly visualizing the areas that are masked or unmasked, helping to identify any unintended areas of transparency or coverage.
Creating Straight Lines
Photoshop's drawing tools offer precise control for creating geometric shapes and lines.
- Create a Straight Line: To draw a perfectly straight horizontal or vertical line with the Brush, Pencil, or Line Tool, click once to set the starting point, then hold down the 'Shift' key before and during the stroke to the desired endpoint.
- Create a Straight Line Between Two Points: For precise line placement, click once to establish the starting point. Then, hold down the 'Shift' key, and click at the desired ending point. Photoshop will automatically draw a straight line connecting these two points.
Advanced Workflow Enhancements
Beyond the fundamental tool and layer shortcuts, several advanced commands can significantly boost efficiency.
Layer Comps for Variations
Layer Comps allow you to save different states of your layers, including visibility, position, and appearance, within a single document. This is invaluable for creating design variations, A/B testing, or presenting different options to clients. While there isn't a single shortcut to create a Layer Comp, accessing the panel is key. You can typically find Layer Comps under Window > Layer Comps.
Actions for Batch Processing
Actions are a powerful feature that allows you to record a series of commands and play them back on other files or at a later time. This is essential for automating repetitive tasks like resizing images for web, applying consistent branding elements, or batch converting file formats. You can record actions via the Actions panel (Window > Actions). While there isn't a direct shortcut to start recording an action, once an action is recorded, you can assign a Function key (F-keys) to it for quick execution.
The Practice Principle
As Jesús Ramirez aptly puts it, "Like everything in photography, and in life, practice makes all of the difference." The true power of keyboard shortcuts is unlocked through consistent application. Initially, you might need to refer to a cheat sheet or consciously recall the shortcuts. However, with time and deliberate practice, these keystrokes will become ingrained, allowing you to navigate and manipulate Photoshop with unparalleled speed and fluidity.
Investing a small amount of time to learn and regularly use these shortcuts will yield significant returns in your creative workflow. They transform Photoshop from a tool you operate into an extension of your creative intent, enabling you to focus more on the artistry and less on the mechanics of the software. Consider exploring resources like the "Selections and Masking Mastery Course," which offers comprehensive lessons and practice files to deepen your understanding of these critical Photoshop functionalities, further enhanced by the efficient use of shortcuts.

The realm of digital design is constantly evolving, with tools like Affinity Designer and Adobe Illustrator offering alternative approaches to graphic creation. Similarly, platforms like WordPress provide a robust content management system, and understanding how to integrate graphics created in Photoshop is a key skill. While specific references to "Sora OpenAI" or current year-based trends might appear in broader discussions, the fundamental principles of efficient design software usage, as embodied by Photoshop's shortcuts, remain timeless.
By integrating these keyboard shortcuts into your daily practice, you are not just learning a software program; you are investing in your efficiency, your speed, and your overall mastery of the digital art form. The journey from a beginner fumbling with menus to a proficient artist seamlessly executing complex edits is paved with the consistent and deliberate use of these powerful commands.