Procreate Pocket, the powerful digital art application for iPhone, offers an expansive universe of brush customization, allowing artists to move beyond pre-set tools and craft truly unique digital painting and drawing experiences. The application's Brush Studio is the epicenter of this creative freedom, providing deep control over every aspect of brush behavior, texture, and rendering. From combining existing brushes to fine-tuning individual settings, understanding these tools unlocks "almost limitless new brushstroke effects."
The Art of Combining Brushes: Creating Dual Brushes
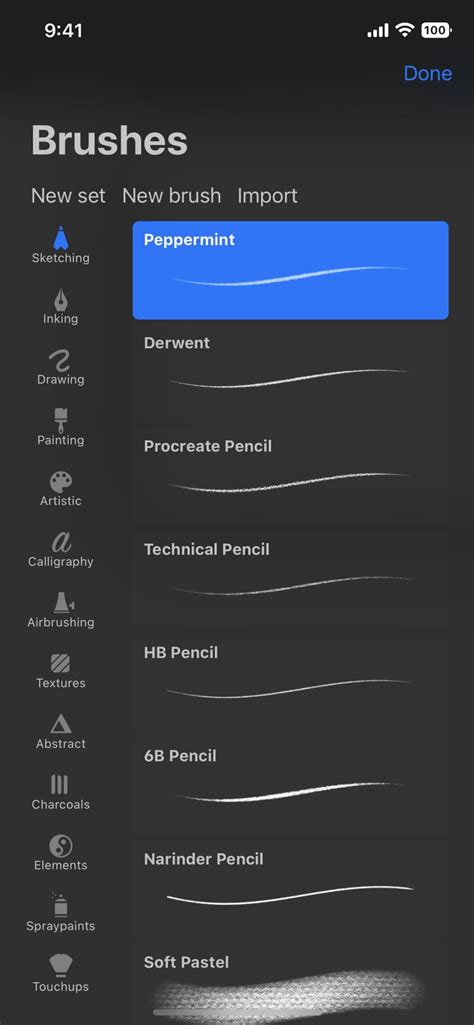
One of the most immediate ways to expand your brush repertoire in Procreate Pocket is by combining two individual brushes to create a "Dual Brush." This feature allows for the creation of intricate and novel brushstroke effects by layering the characteristics of two separate tools. To begin this process, tap the "Brush" button to open the Brush Library. It is crucial to note that brushes must reside within the same "Brush Set" to be combined. This organizational requirement ensures that the application can efficiently manage and apply the properties of both selected brushes.
The ability to combine brushes is limited to single brushes; existing "Dual Brushes" cannot be further combined, nor can the default Procreate brushes be used as components in this process. To initiate the combination, tap the first brush you wish to use. This brush will be designated as the "Primary" brush and will be highlighted in bright blue. To select the second brush, which will serve as the "Secondary" brush, swipe right on your desired brush. This action will turn the secondary brush dark blue. Once both a primary and secondary brush are selected, the word "Combine" will appear at the top left of the Brush Library, signaling that the dual brush is ready to be created. The resulting "Dual Brush" will automatically adopt the name of the Primary brush. For further customization, you can rename your new Dual Brush by tapping it to enter its dedicated Brush Studio.
Within the Brush Studio for a Dual Brush, you gain the ability to edit the settings of each constituent brush independently. Tap the brush you wish to edit, and it will highlight in blue, indicating it is selected for adjustment. A key element in shaping the unique characteristics of your Dual Brush lies in its "Combine Mode." Changing this setting can result in "interesting visual mixes" between the primary and secondary brushes. To explore these possibilities, tap your Dual Brush to enter its Brush Studio. At the top of the Brush Studio interface, a preview window displays the two brushes that constitute your Dual Brush. By default, the "Combine Mode" is set to "Normal." Tapping on any of the available "Combine Modes" will instantly update the preview in the "Drawing Pad," allowing you to see the live results of your adjustments.
Diving into the Brush Studio: Unlocking Advanced Settings
The "Brush Studio" is the heart of Procreate Pocket's brush customization, offering a comprehensive suite of tools not only for editing existing brushes but also for crafting entirely new ones from scratch. There are two primary approaches to navigating this powerful environment. You can enter the studio with a clear vision of your desired brush and meticulously adjust settings until you achieve your goal, or you can enter the "Brush Studio" specifically to "edit a brush." To edit an existing brush, a simple tap on the brush in the Brush Library will select it, followed by a second tap to enter the "Brush Studio" and begin your modifications.
HOW TO CREATE BRUSHES IN PROCREATE
The "Brush Studio" presents a left-hand menu of attributes that can be tweaked. Tapping on any of these attributes reveals a menu of adjustable settings. These settings allow you to refine fundamental aspects of your brush, such as its "shape and grain," the "appearance of your brush Stroke Path," and how "Procreate renders the end result." The "Dynamics" section is particularly crucial for dictating how your brush responds to the speed of your strokes and how colors might shift in response to input from the Apple Pencil. For those aiming to mimic traditional painting techniques, the "Wet Mix" attribute offers the ability to alter how your brush "moves pigment around the canvas."
Every slider within the "Brush Studio" can be adjusted numerically for "greater control." Tapping on the numerical value next to a slider opens the "advanced brush settings" panel. Here, you can "type in the precise number you need" or utilize the "Scribble" feature with your Apple Pencil to input values. This advanced panel can reveal up to four distinct setting types: "Numeric," "Pressure," "Tilt," and "barrel roll" (exclusively for Apple Pencil Pro). The "Numeric" setting offers a more precise method for assigning a numerical value than using a slider.
The "Pressure" setting allows you to assign a pressure curve to an individual brush studio setting. By toggling on the "Pressure Curve," you can then "add points and adjust the shape of your curve" by tapping and dragging along a blue line. The default curve is a straight diagonal line, but you can add up to four extra points to customize it to your liking. Similarly, the "Tilt" setting enables you to assign an "Apple Pencil tilt angle" to a setting. Toggling on "Tilt" allows you to adjust the tilt angle by touching and dragging a blue point. The default tilt is set to 9 degrees. For the Apple Pencil Pro, the "barrel roll" setting offers further control, allowing you to assign its input to a brush studio setting. This interface typically includes a toggle for "Relative to stroke," which dictates whether the stroke's shape always begins in the same position, and another toggle for enabling or disabling barrel roll itself.
Shaping the Stroke: From Shape to Grain
At the core of any Procreate brush lies its "Shape" and "Grain." The "Shape" defines the fundamental form of the brush tip, while the "Grain" provides its texture. You can set a "Taper" on the brush's path, allowing strokes to start thin, reach full thickness, and then taper off again as you finish the stroke. The "Shape Source" is where you can import an image to define the very form of your brush tip. "Dragging this shape creates a stroke." A smooth circular shape will naturally produce a smooth, even stroke, whereas an irregular, patchy shape will result in a rougher texture. You can adjust the shapes within existing Procreate brushes or import your own custom shapes by tapping "Import" and selecting an image from your photos or files. The "Source Library" offers over 150 unique shapes to serve as the foundation for your brushes, accessible through the "Shape Editor."
A stroke is formed by repeatedly "stamping" the brush shape along a path. The "Stroke Path" settings allow you to control how these stamps are placed and behave. By increasing the "Spacing" slider in the "Stroke Path" section, you can visualize individual shape stamps, making it easier to understand how various settings impact the stroke. By default, a shape stamps in the same direction without rotation. The "Scatter" setting allows you to randomize the rotation of the shape with each stamp, adding organic variation. The "Shape Rotation" slider controls the orientation of your shape relative to the stroke's direction. At 0%, the shape direction remains static. At 100%, the shape rotates to follow the stroke's path. "Jitter" can randomize the rotation of your shape at the beginning of your stroke.
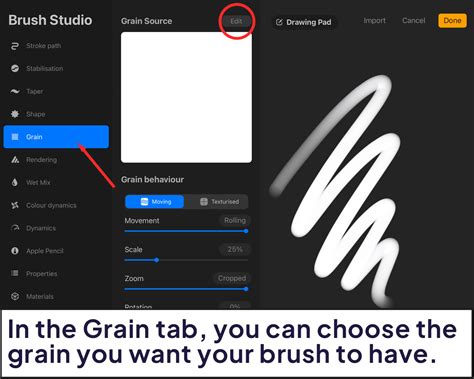
The "Grain" is the texture that resides within your brush shape. Think of the shape as a container and the grain as the paint roller. The "Grain Editor," accessed by tapping the "Grain image icon" next to "Grain Source," allows you to create new grains from any image. You can import and edit images to turn them into "tiling textures for your brushes." The "Grain" settings determine whether the texture moves with your stroke or remains static. Setting the grain to "Moving" means the roller is locked in place, creating a more streaky and blurred effect, akin to how paint might move with a physical roller. Setting it to "Texturized" means the roller is unlocked, resulting in a crisp and clear texture that remains static behind your stroke.
The "Cropped" setting in the "Grain" section keeps the texture size fixed regardless of the brush size, while "Follow Size" scales the grain along with the brush size. "Follow Stroke" makes the grain rotate to follow the direction of your stroke, similar to the "Moving" effect. The "Grain Strength" slider controls the intensity of the texture over the base color. "Contrast" sets the minimum level of contrast within the texture. "Offset Jitter" can be used to create a more organic effect by randomizing where the texture places down with each new stroke. For patterns like a "Grid brush," turning off "Offset Jitter" ensures consistency. "Grain filtering" adjusts "antialiasing," affecting the softness of the edges.
Rendering and Dynamics: The Science of Brush Behavior
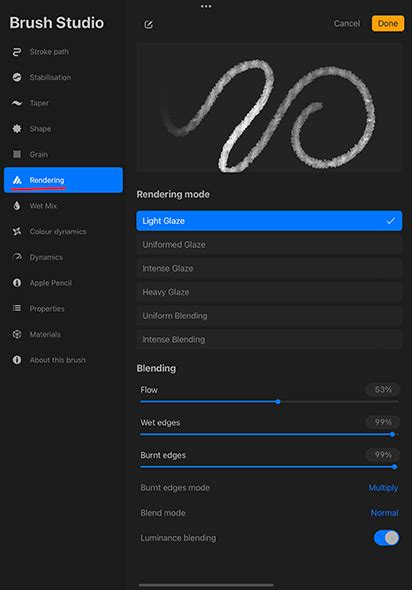
Procreate Pocket offers a wide array of "render modes" that control how your brush strokes are displayed on the canvas, allowing for effects that mimic physical paint. On the lighter end of the spectrum, "Light Glaze" is akin to laying down diluted paints. "Intense Blending" combines aspects of Adobe® Photoshop® rendering with a "caustic approach to rendering color," and is particularly effective for wet brushes that "squash and mix colors together."
The "Wet Mix" attributes are designed to simulate the behavior of wet media. You can control how "pigment dilutes" and how "colors mix into each other." The "Dilution" slider determines how much water mixes with the paint on your brush. The "Attack" slider influences how much paint is laid down initially, with longer strokes leaving more paint behind. The "Charge" setting dictates how much paint "sticks to the canvas" and how strongly your brush "pulls paint around the canvas," including paint already on the canvas. "Blend Mode" settings control how the grain texture blends with the underlying color.
"Color Dynamics" unlock a realm of digital-specific color effects. This feature allows your brush to "shift through different types of color values," including hue, saturation, lightness, and darkness. You can even designate a "secondary color" and transition between primary and secondary colors with each stroke. Each stamp of the brush can deviate from your chosen color at random, controlled by sliders that determine the extent of these deviations. The "Pressure" setting within Color Dynamics can alter color, saturation, or brightness within a stroke based on the applied pressure. For instance, at 100% pressure, a stroke could transition through the entire color spectrum.
"Dynamics" settings also allow your brush to respond to the speed of your strokes. You can use the "speed of your stroke to vary its size" or its "opacity." The Size slider, when set to -100%, will result in slower strokes being thinner, while +100% reverses this, making faster strokes thinner. Similarly, opacity can be controlled: at -100% opacity, slower strokes reduce opacity, while +100% reduces opacity with faster strokes. The "Pressure Smoothing" setting fine-tunes how the "Pressure slider interacts with your brush," affecting the transition smoothness from low to high pressure, much like "StreamLine" for pressure.
Organizing and Sharing Your Creations
Procreate Pocket's brush management system is now deeply integrated with the iPad's "Files app." Your brush libraries, brush sets, and individual brushes are stored as files and folders within "On My iPad â Procreate â Brushes" or "iCloud Drive â Procreate Brushes." This integration means that changes made within Procreate are reflected in the Files app, and vice versa. You can "import individual .brush files by bringing them into a brush set folder in the Files app." When importing a single brush, a new set named "Imported" is automatically created.
HOW TO CREATE BRUSHES IN PROCREATE
The Brush Library interface provides intuitive ways to manage your tools. You can "Create new brush" to open the Brush Studio and start from scratch, or "Create new brush set" to organize your custom creations. Importing brushes, brush sets, or entire brush libraries from the Files app is also straightforward. To duplicate a brush, simply swipe left on it and tap "Duplicate." Similarly, duplicating a brush set requires a double-tap on the set, followed by selecting "Duplicate." An exact copy will appear below the original. Renaming brushes and brush sets can be done directly within Procreate or by navigating to the files in the Files app.
"Recent brushes" are conveniently located at the top of the brush library sets, accessible by tapping "Paint," "Smudge," or "Erase," and then selecting "Recent." You can "swipe left on the brush and then tap the Find button" to locate the original set a brush belongs to. "Pinning" a brush to the top of your Recent set is achieved by swiping left and tapping "Pin," identifiable by a pin symbol. To remove a pinned brush or clear brushes from Recent, swipe left and tap "Clear."
Sharing individual brushes or entire custom brush sets is facilitated through the "Share" option, accessed by swiping left on the brush thumbnail or by double-tapping a brush set. For backup purposes, saving brushes or brush sets to an external hard drive or a cloud service is highly recommended. Moving brushes and brush sets between libraries is a drag-and-drop operation. Tapping and holding a brush or set will "lift it up," allowing you to drag it. Hovering over a brush set title and dropping the brush onto it will copy the brushes into that set. To move multiple items, lift the first item and then tap additional items with another finger to create a stack. When moving brushes and sets in Procreate version 5.4 and above, these items are moved entirely to their new locations.
Deleting a brush or brush set is a permanent action that removes it from both Procreate and the Files app. Therefore, it is crucial to "always ensure you have backed up any important brushes and Sets before deleting." If a brush is accidentally deleted, it may be retrievable from the "Recently Deleted" folder within your Locations in the Files app.
Procreate Pocket's commitment to empowering artists extends to its core library, featuring 18 "handcrafted brush sets" designed to cover a wide spectrum of artistic needs. These sets range from the clean and simple "Studio Pen" and the comic-focused "Inkling" to the technical "Technical Pen" and the sketching-oriented "Sumi-e." Other sets offer realistic and digital painting effects, textures, lettering tools with "Streamline" enabled, and playful sets that showcase the "unique capabilities of Procreateâs versatile Brush Studio," including brushes that change color or create smoky effects. The "Material" brushes are geared towards 3D painting, while the "Grunge" set adds realistic textures, and the "Organic" set provides natural elements like grass and leaves. Finally, the "Watercolour" set offers realistic watercolor simulations.
The ability to "sign your name to your custom brushes" and add a profile photo is a valuable feature for creators. This information is embedded in the ".brush" file, ensuring your work is always credited to you. You can access "Image Source options" by tapping the "person icon," allowing you to take a photo using your iPad's camera for your profile. You can also "Sign your name on the dotted line using your finger." For those who wish to experiment further with a brush design without losing their current progress, saving a "Reset Point" is an option. On a core brush, "Reset" will revert it to its default Procreate Pocket version. To establish a new reset point on a default brush, you must first duplicate it. Resetting a brush in Procreate requires entering the Brush Studio. The context menu, accessible from the brush library, also provides options for resetting.
Procreate Pocket's extensive brush customization, from the fundamental combining of brushes to the granular control offered within the Brush Studio, empowers artists to transcend the limitations of pre-made tools. By understanding and utilizing these features, creators can develop a truly personalized digital art workflow, producing unique and expressive artwork with unparalleled flexibility.