Krita, a powerful open-source and free alternative to professional art software like Photoshop, is a favorite among digital artists. However, a common stumbling block for new and even experienced users can be the elusive pressure sensitivity feature. This guide aims to demystify the process of troubleshooting and resolving pressure sensitivity problems within Krita, ensuring your digital brush strokes accurately reflect the pressure you apply.
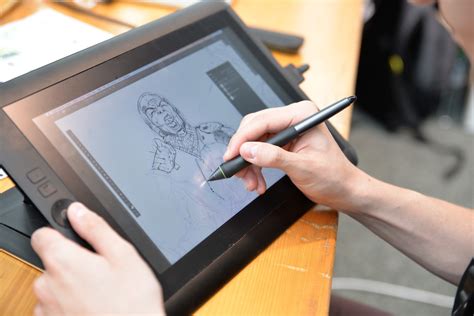
Understanding the Problem: Pressure Sensitivity Not Working in Krita
The core issue often encountered is that pen pressure functionality works flawlessly in other applications but inexplicably fails within Krita. This can be particularly frustrating when you've invested in a quality drawing tablet and are eager to utilize its full capabilities. Users often find themselves searching for specific settings within Krita to enable or configure this feature, only to come up empty-handed. This article provides a comprehensive walkthrough to identify and rectify such issues, drawing from real-world user experiences and solutions.
Prerequisites for a Functional Pressure Sensitivity Setup
Before diving into Krita-specific configurations, it's crucial to ensure that your system and hardware are correctly set up. This foundational step is often overlooked but is critical for the proper functioning of pressure sensitivity.
Driver Updates: The Unsung Heroes
The most common culprit behind pressure sensitivity woes lies in outdated or corrupted drivers. This applies to both your operating system and your drawing tablet's specific software.
- Windows Updates: Regularly check for and install all available updates for your Windows operating system. These updates often include crucial driver enhancements and bug fixes that can impact hardware functionality.
- Tablet Drivers: Equally important is ensuring that your drawing tablet's drivers are up-to-date. Visit the manufacturer's website (e.g., Wacom, Huion, XP-Pen) and download the latest driver package for your specific tablet model. A simple restart of your computer after updating drivers is often recommended.
Hardware Verification
- Updated Tablet Drivers: As mentioned, ensure you have the latest drivers installed for your pen tablet.
- Actual Pen Tablet with Pressure Sensitivity: This guide assumes you are using a genuine pen tablet designed with pressure sensitivity capabilities. Graphics displays and touchscreens without dedicated pen input might not support this feature.
- Krita Version: While Krita is continuously updated, ensure you are using a recent, stable version of the software. Older versions might have known bugs or lack support for newer hardware.
The solutions presented here have been proven effective on various Windows versions, including Windows 8 and Windows 10, and with popular tablet brands like Wacom Intuos Pro.
How to install the Wacom driver on Mac including security settings with Guido
The Core Solution: Configuring Krita's Toolbar
The primary method for resolving pressure sensitivity issues within Krita, as discovered by users navigating numerous forums, involves a specific adjustment to the toolbar configuration. This process might seem counterintuitive as it doesn't directly relate to "pressure sensitivity settings" in a conventional sense but rather ensures the necessary visual elements are present for Krita to recognize and utilize the tablet's input.
Step-by-Step Toolbar Adjustment
Follow these precise steps to re-enable pressure sensitivity functionality:
Driver and Connection Check: Before proceeding, double-check that all your drivers are updated and that your tablet is properly connected to your computer. Verify that the tablet is recognized and functioning correctly in other applications.
Open Krita: Launch the Krita application.
Access Toolbar Configuration: Navigate to the top menu bar. Mouse over to Settings, then select Configure toolbars….
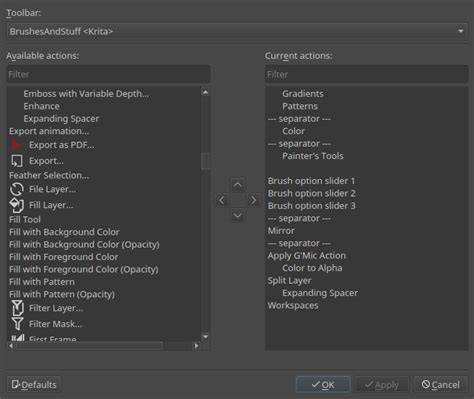
Select the Main Toolbar: In the "Configure Toolbars" window that appears, ensure that
mainToolBar <Krita>is selected in the Toolbar: dropdown menu. This targets the primary toolbar at the top of your Krita interface.Locate "Pressure Usage (small button)": Scroll down the list of available actions on the left side of the "Configure Toolbars" window. Look for an item labeled Pressure Usage (small button).
Add the Button: Highlight or select "Pressure Usage (small button)" by clicking on it. Then, click the right arrow button (
>) to move it from the available actions list to the active toolbar configuration on the right.Apply Changes: Click the Apply button at the bottom of the window, followed by OK.
Enabling the File Toolbar
This next set of steps is crucial and often the missing piece for many users. It involves making a specific, less obvious toolbar visible.
Access Toolbar Visibility Settings: Go back to the main menu bar and click on Settings.
Select "Tool Bars Shown": Scroll down the settings menu until you find the option Tool Bars Shown. This is typically located below "Configure toolbars."
Check the "File" Toolbar: A small submenu will appear under "Tool Bars Shown." You will see options like "File" and "Brushes and Stuff." Ensure that there is a checkmark next to File. If there isn't, click on "File" to add the checkmark.
Observe New Buttons: Upon checking the "File" toolbar, you should immediately notice four new buttons appearing on your Krita interface, typically grouped near the top. These buttons are essential for Krita to correctly interpret and utilize your pen tablet's pressure data.
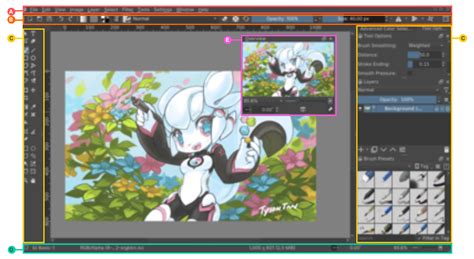
The "Profit!" Moment
With these steps completed, the pressure sensitivity functionality should now be active and working correctly within Krita. You can test this by selecting a brush tool and trying to draw with varying degrees of pressure on your tablet. You should observe differences in line thickness and opacity corresponding to the pressure applied.
Deeper Dive: How This Works and What Else to Consider
While the above steps resolve the immediate issue, understanding why this works can prevent future problems and offer insights into Krita's interface.
The Role of the "Pressure Usage" Button and File Toolbar
The "Pressure Usage (small button)" and the visibility of the "File" toolbar are not directly about setting a "pressure sensitivity level" in Krita itself. Instead, they are critical components that ensure Krita's internal engine correctly interrogates and receives the pressure data stream from your graphics tablet driver.
- Driver Communication: Graphics tablet drivers act as intermediaries between your physical tablet and the software. They translate the analog pressure applied to the pen into digital signals that the computer can understand. Krita needs specific internal "hooks" or commands to actively listen for and process these signals.
- Toolbar Elements as Triggers: The act of adding the "Pressure Usage (small button)" to the toolbar and ensuring the "File" toolbar is visible seems to activate certain underlying modules or processes within Krita that are responsible for tablet input handling. It's akin to turning on a specific channel for Krita to receive the tablet's data.
- Absence of a Direct "Pressure Sensitivity Slider": It's important to note that Krita, unlike some other art programs, doesn't typically feature a global "pressure sensitivity slider" that you adjust to make the pen feel more or less sensitive. Instead, the sensitivity is largely determined by the tablet driver's settings and how Krita interprets the raw data. You can, however, fine-tune brush behavior based on pressure within individual brush settings.
Fine-Tuning Brush Behavior with Pressure
Once pressure sensitivity is confirmed to be working, you can further customize how it affects your brushes.
- Brush Settings Editor: Select a brush tool (e.g., the Paintbrush tool). Open the Brush Settings Editor by going to Settings > Dockers > Brush Settings Editor or by pressing
Ctrl+Shift+B. - Configure Dynamics: Within the Brush Settings Editor, you'll find various "Dab" options and "Dynamics" tabs. Under the Dynamics section, you can configure how different aspects of the brush stroke respond to pressure.
- Opacity: This is the most common setting. You can make opacity directly controlled by pen pressure.
- Size: You can also link brush size to pen pressure, allowing for expressive variations in line width.
- Flow, Hardness, Rotation, and More: Depending on the brush engine, you can link many other brush parameters to pen pressure, enabling a wide range of artistic effects.
- Pressure Curve: For advanced users, some tablet drivers offer a pressure curve editor. This allows you to remap the input pressure from your tablet to a different output sensitivity within the driver itself. This is a powerful tool for customizing the feel of your pen input across all applications.
Common Misconceptions and Pitfalls
- Confusing Pressure Sensitivity with Tablet Functionality: Users might mistake a non-functional pressure sensitivity in Krita as a sign that their tablet itself is broken, when in reality, it's a software configuration issue.
- Over-reliance on "General" Settings: Many users expect a single, obvious "pressure sensitivity" toggle within Krita's main preferences. The solution, however, is more nuanced and tied to toolbar configuration.
- Ignoring Driver Updates: As highlighted, outdated drivers are a persistent cause of such problems across various software.
- Tablet Driver Conflicts: In rare cases, multiple tablet drivers or remnants of old drivers can conflict. A clean uninstall of all tablet drivers, followed by a fresh installation of the latest version, can resolve such conflicts.
Advanced Troubleshooting: Beyond the Toolbar
If the described toolbar configuration doesn't resolve your issue, consider these additional steps:
- Krita's Tablet Settings: While the primary fix is the toolbar, Krita does have some specific tablet settings. Go to Settings > Configure Krita… > Tablet Settings. Here, you can select your tablet API (e.g., WinTab, Windows Ink). Experimenting with these can sometimes help, though Krita often defaults to the correct one. Be aware that switching between WinTab and Windows Ink might require a Krita restart.
- Test in a New Document: Create a completely new, blank document in Krita to rule out any document-specific corruption or settings.
- Check Other Krita Brushes: Try different brush presets. Some brushes might have their dynamics configured in a way that doesn't readily show pressure sensitivity, while others are designed to utilize it heavily.
- Krita Community Forums: If all else fails, the Krita community forums are an invaluable resource. Many users have encountered and solved similar issues, and the developers are active in providing support.
By systematically working through these troubleshooting steps, you can ensure that Krita's pressure sensitivity functions as intended, unlocking its full potential for your digital art creation.
tags: #krita #pressure #sensitivity