Lightroom Classic's Lens Blur panel offers a powerful way to simulate the aesthetic of wide-aperture lenses, creating a pleasing separation between your subject and the background. This tool, found within the Develop module under the Basic panel, allows photographers to add an artistic blur effect to any part of their image, transforming ordinary shots into visually compelling compositions. While it's a valuable addition to Lightroom's developing toolkit, understanding its nuances and limitations is key to achieving realistic and impactful results.
The Core Functionality: Applying and Adjusting Blur
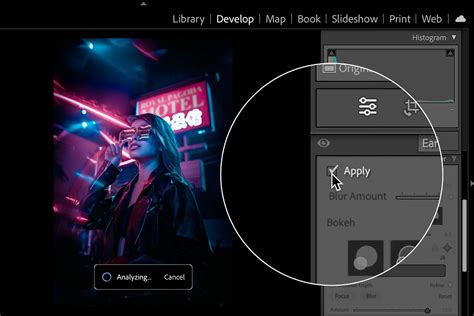
At its heart, the Lens Blur panel is designed to apply a simulated blur effect to the background of your photos. To initiate this process, you first need to check the "Apply" box. This action triggers Lightroom's AI to generate a depth map of your image, a crucial step that informs where the blur will be applied. The AI analyzes the image to recognize the subject and determine different depth levels. This analysis, particularly on powerful machines, can take anywhere from 2 to 6 seconds.
Once the depth map is generated, the "Blur Amount" slider becomes your primary tool for controlling the intensity of the simulated blur. Sliding it to the right increases the prominence of the blur, while moving it to the left reduces its strength. It's important to note that the effectiveness of the blur is often most apparent in photos that already possess some degree of background blur. For the best results, starting with a photo where the background is already out of focus is recommended. If you had intended a blurred background from the outset, setting your camera's aperture to f2.8 or wider would have been the ideal photographic approach, rather than relying solely on post-processing.
Understanding Bokeh: Shaping the Out-of-Focus Highlights
Beyond simply applying blur, the Lens Blur panel offers creative control over the appearance of out-of-focus light sources, known as bokeh. Five distinct bokeh shapes are available, accessed via the icons located above the "Boost" slider. These include: Circle, Bubble, 5-Blade, Ring, and Cat Eye. The differences in these effects are most pronounced in images that feature highlights or lights within the background. For instance, a photograph with a bokeh effect applied might show circular or bubble-like highlights, adding a dreamy or artistic quality to the background. Experimenting with these options can significantly alter the mood and aesthetic of your final image.
The "Circle" and "Bubble" bokeh effects are often cited as the most versatile and useful for a wide range of photographic scenarios. The "5-Blade" option mimics the aperture shape of many camera lenses, while "Ring" and "Cat Eye" offer more stylized and unique visual characteristics.

Visualizing Depth: Decoding the AI's Understanding
To gain insight into how Lightroom is interpreting the depth of your image, the "Visualize Depth" checkbox is invaluable. When activated, this feature displays a color-coded depth map, where different colors represent varying degrees of sharpness and distance. In a typical scenario with a well-defined subject, white and yellow hues indicate the sharpest areas, usually corresponding to your main subject. As the depth increases, colors transition through orange, pink, and purple, signifying progressively more distant elements.
This visual representation is crucial for understanding the AI's analysis and identifying potential inaccuracies. The depth map also includes a slider box, a white rectangle that delineates the area of the photo where Lightroom is not applying lens blur. This allows you to see the boundaries of the blur effect as interpreted by the software.
What are depth maps (and why should you care)?
Setting the Focal Range: Defining What Stays Sharp
The "Focal Range" is a critical setting that dictates the depth levels within your image and precisely defines which areas will remain in focus and which will be blurred. Lightroom offers three primary methods for setting this focal range:
- Subject Focus: This option leverages AI to automatically identify your subject and set the focal range accordingly, applying the blur effect to everything around it. This is a convenient choice when your subject is clearly defined.
- Point/Area Focus: This allows you to manually specify a focal point or area. You can click on a specific point in your image to set the focus, or click and drag to define a larger area that you wish to keep sharp.
- Manual: This provides the most granular control, allowing you to directly manipulate the depth map and its boundaries.
When you select "Visualize Depth," you'll notice that the depth map uses color tones to indicate these different depth levels. Warm colors generally represent closer elements, while cooler colors indicate those further away. The slider box, as mentioned, defines the range where blur is applied. You can click on the image to set a focal range or drag to encompass a larger area. The AI's ability to accurately generate a depth map is significantly enhanced when there is a clearly defined subject against an obvious background.
Refining the Depth Map: Addressing AI Imperfections
While the AI-powered depth map generation is impressive, it isn't always perfect. In some instances, the AI might misinterpret the depth of certain elements, leading to unrealistic blur. For example, a part of your subject might be incorrectly identified as being in the distance.
The "Brush Refinement" icon, located near the "Visualize Depth" checkbox, reveals a set of Brush tools. These tools allow you to meticulously refine the depth mask. You can select either the "Focus" brush to paint over areas you want to keep sharp, or the "Blur" brush to selectively add blur to specific regions. The effectiveness of these brush tools in achieving a good result is highly dependent on the complexity of your image and the nature of the AI's misinterpretation. In some cases, despite your best efforts with the brush tools, you might not be able to achieve a perfectly realistic result.

Considerations for Realistic Results and Potential Issues
Achieving a truly realistic blur effect with Lightroom's Lens Blur tool requires a mindful approach. It's crucial to understand that this tool simulates an optical effect and cannot perfectly replicate the physics of a real lens.
When the Depth Map Isn't Accurate:In experiments, the depth map generation works best with a clearly defined subject against an obvious background. This is not surprising, but it does mean that the depth map isn’t always accurate. For instance, at first glance, a result might appear good. However, zooming into 100% can reveal inaccuracies. With "Visualize Depth" checked, you can see what has happened. The AI might mistakenly believe that a part of a model's hoop is in the distance, when it's actually close to the camera like the model. In such cases, the Brush Refinement tools become essential for attempting to correct these errors.
GPU Acceleration and Performance:The Lens Blur tool, like other AI-powered features in Lightroom, relies on GPU acceleration for optimal performance. If you encounter issues, such as crashes or slow processing, it's worth investigating your GPU settings. Swapping your GPU setting (turning it on or off, or setting it to Auto) can sometimes resolve problems. NVIDIA control panel settings and Windows Graphics control panel interactions can also play a role. For users experiencing crashes, a buggy graphics driver is a common culprit. Updating drivers directly from the GPU manufacturer (NVIDIA, Intel) is often recommended over relying on manufacturer-specific drivers (like those from Lenovo or Acer), which may not be as frequently updated.
There are also preferences within Lightroom that relate to GPU acceleration. While these preferences are primarily for acceleration, AI functions like Lens Blur can utilize the GPU regardless of these settings. Some users have found success by disabling GPU inference to force AI commands to run on the CPU, although this can significantly slow down the processing.
Caching Issues:Cache management can also impact the performance and stability of the Lens Blur tool. Purging the cache and increasing its size in Lightroom's preferences have been reported to help resolve issues where the blur effect might not work consistently or causes errors. Some users have inquired about automatically purging the cache upon closing Lightroom, but this is not a standard feature.
System Information and Troubleshooting:If persistent issues arise, sharing your system information via Lightroom > Help > System Info can be helpful for troubleshooting. For advanced users, there are methods to force ML inference to always run on the CPU instead of the default GPU. This can be a last resort if GPU-related problems continue.
Beyond the Basics: Batch Copying and Presets
Once you've achieved a desired Lens Blur effect on a particular photo, you can efficiently apply these adjustments to multiple images. By right-clicking on the edited image and selecting "Copy Edit Settings," you can then paste these settings onto one or more other images in your filmstrip. If multiple files are selected, the "Sync" button allows you to choose which current settings to paste from the selected photo onto the others. "Auto Sync" offers a more dynamic approach, automatically applying changes to other selected photos as you make them.
Lightroom also offers the ability to create custom presets for Lens Blur. By selecting the Lens Blur tool and any other desired settings, you can click the plus icon in the Presets tab and then select "Lens Blur" to create your own reusable preset. This can be particularly useful for maintaining a consistent aesthetic across a series of images. Additionally, the "Presets > Adaptive: Blur Background" option can apply Lens Blur with a single click, with an adjustable preset amount slider for intensity control.
The "Get it Right in Camera" Principle
While Lightroom's Lens Blur tool is a powerful post-processing capability, it's essential to remember the adage: "The best option, as always, is to get it right in camera." A photograph that is intentionally shot with a shallow depth of field (using a wide aperture) will inherently possess a more natural and realistic background blur than one that relies solely on digital simulation. The Lens Blur tool is a fantastic way to enhance an existing blur or to add it where it wasn't possible in-camera, but it should not be seen as a complete shortcut to achieving optical blur. Photographers should strive to have an awareness of when they are "stepping over the line into fake blur territory" and to use the tool judiciously.
Ultimately, the Lens Blur panel is a significant and valuable enhancement to Lightroom Classic. When used with understanding and caution, it empowers photographers to creatively control background aesthetics and achieve compelling visual separation between their subjects and their surroundings, adding a professional polish to their images.