Working with typography in digital design software can be a meticulous process, and the clarity of text is paramount for effective communication and aesthetic appeal. A common, yet often frustrating, issue that designers encounter is the appearance of jagged or pixelated text, particularly when using external monitors. This phenomenon is directly related to anti-aliasing, a technique used to smooth out the jagged edges of digital graphics, including text. When anti-aliasing fails to function correctly, the visual quality of typography can be significantly degraded, impacting the overall user experience and the professional output of design projects. This article delves into the intricacies of anti-aliasing in Adobe InDesign, exploring why it might falter, especially in conjunction with specific hardware and software configurations, and provides a comprehensive guide to troubleshooting and resolving these issues.
The Enigma of Jagged Typography: Initial Observations and User Experiences
The problem of poorly rendered text in Adobe InDesign, specifically a lack of effective anti-aliasing, has been a recurring concern for designers. One user recently described their experience working with a new external monitor, a BenQ SW240, a 27-inch WQHD display. Despite the monitor's high resolution, text rendering in InDesign was found to be "terrible." Attempts to resolve this by deactivating and reactivating anti-aliasing within InDesign proved futile. Even disabling "GPU Performance" settings did not yield any improvement.
The suspicion that this is an anti-aliasing issue, stemming from a combination of Creative Cloud applications and this particular monitor, was strong. This suspicion was further solidified by the fact that fonts were displayed perfectly in InDesign on the user's MacBook Pro. Moreover, text rendered adequately in other applications, such as web browsers, on the same external monitor. This pointed away from a fundamental issue with the monitor's resolution itself.
A significant exacerbating factor was noted: the problem appeared to worsen after updating to macOS Big Sur. In older versions of OS X, font smoothing was an available option, but this setting was notably absent in Big Sur. This shift in operating system behavior suggested a potential conflict or a change in how macOS handles font rendering at a system level, which InDesign might be inheriting or struggling to adapt to.
Crucially, the issue seemed to be confined solely to the typography displayed on the InDesign pages, not the application's user interface elements. This distinction is important because it suggests that the problem isn't a general display driver issue but a more specific interaction with how InDesign renders vector text data. Furthermore, the problem was not limited to any particular typeface; all fonts, especially serif fonts which rely on fine details for legibility, were affected, appearing jagged and less refined.
Another designer shared a similar predicament while attempting to design a template for extensive content. Finding Adobe Illustrator inefficient for large volumes of text, they turned to InDesign. Upon replicating a template, they encountered the same irritating problem: "The typography looks jagged. It’s subtle but has an undesired effect." Their online search for a solution also proved unfruitful, highlighting the elusive nature of this particular issue for many users.
The Technical Underpinnings: How Anti-Aliasing Works and Why It Fails
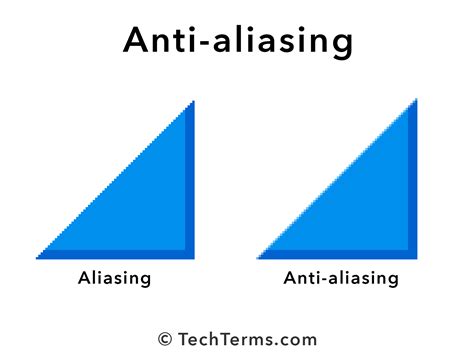
To understand why anti-aliasing might fail, it's essential to grasp its fundamental principles. Anti-aliasing is an algorithmic technique used to mitigate the visual artifacts that arise when representing a high-resolution image or line on a lower-resolution display. In the context of text, it aims to smooth the transition between the sharp edges of a character and the background pixels. Without anti-aliasing, diagonal lines and curves in letterforms would appear as a series of distinct, jagged steps (often referred to as "aliasing").
Anti-aliasing works by introducing intermediate shades of color (or gray, in grayscale anti-aliasing) at the edges of the character. These intermediate shades blend the character's color with the background color, creating the illusion of smoother lines and curves. The effectiveness of anti-aliasing depends on several factors, including the rendering engine of the application, the operating system's text rendering pipeline, the display's resolution and pixel density, and the specific font being used.
When anti-aliasing appears to be failing in InDesign on an external monitor, several technical possibilities arise:
Operating System Level Font Smoothing: As noted by the user, macOS Big Sur removed the explicit "Font Smoothing" (or "subpixel rendering") option from its System Preferences. This system-level setting previously allowed users to control how fonts were rendered, influencing the anti-aliasing process. When this option is absent or its behavior has changed, applications like InDesign might not receive the expected instructions for font smoothing, leading to a default or incorrect rendering. Different versions of macOS, and even Windows, can have varying default font rendering behaviors.
GPU Acceleration and Drivers: While disabling "GPU Performance" was attempted, it's worth noting that GPU acceleration can sometimes interact unpredictably with display drivers and specific hardware. InDesign's GPU Performance feature utilizes the graphics processing unit to accelerate rendering tasks, including text display. If there's a driver incompatibility between the graphics card, the external monitor, and the operating system, it can lead to rendering anomalies. Even if disabling it didn't help, the underlying issue might be related to how the GPU, even when not accelerated, interacts with the display's pixel structure.
Monitor Scaling and Resolution Settings: Although the user confirmed the monitor resolution wasn't the issue, display scaling can play a significant role. Operating systems and applications often use scaling factors to make text and UI elements appear larger on high-resolution displays. If InDesign or the OS is not correctly interpreting the scaling factor in conjunction with the monitor's native resolution and pixel arrangement, it can lead to miscalculations in font rendering and anti-aliasing. For instance, scaling by a non-integer factor (e.g., 150% or 200%) can sometimes introduce rendering artifacts.
Color Settings and Profiles: In some edge cases, discrepancies in color profiles or color management settings between the operating system, the monitor, and InDesign could theoretically influence how pixels are rendered, though this is less common for pure anti-aliasing issues.
InDesign's Internal Rendering Engine: Adobe InDesign has its own sophisticated text rendering engine. It's possible that certain font formats or complex typographic features might interact with this engine in a way that is sensitive to the external display's characteristics or the OS's font handling.
Font File Issues: While the problem affected all typefaces, it's a remote possibility that specific font files, or the way they are interpreted by the system and InDesign, could be contributing. However, given the widespread nature of the issue across multiple fonts, this is less likely to be the primary cause.
Troubleshooting Steps: A Systematic Approach to Restoring Text Clarity
Addressing anti-aliasing problems requires a systematic approach, trying different combinations of settings and configurations. Given the user's experiences, here are several steps that can be taken, moving from simpler software adjustments to more involved system-level checks.
Adjusting InDesign Preferences
While the user has already tried some basic steps, revisiting InDesign's preferences with a deeper understanding might reveal overlooked options.
Text Engine Preferences:
- Navigate to
InDesign > Preferences > Advanced Text(on macOS) orEdit > Preferences > Advanced Text(on Windows). - Look for any options related to text rendering or anti-aliasing. While direct "anti-aliasing" toggles are rare here, sometimes there are settings that influence how text is drawn.
- Important Note: In recent versions of InDesign, the primary anti-aliasing control is often tied to the GPU Performance setting and OS-level rendering. However, it's always worth ensuring all related text preferences are set to their defaults or standard options.
- Navigate to
GPU Performance Settings:
- Go to
InDesign > Preferences > GPU Performance. - Toggle the "GPU Performance" option on and off. Restart InDesign after each change. While this was already tried, sometimes the interaction can be finicky, and a fresh restart might be necessary.
- If "GPU Performance" is on, ensure your graphics card drivers are up to date. Outdated drivers are a common source of GPU-related rendering issues.
- Go to
Display Performance Settings:
- Go to
InDesign > Preferences > Display Performance. - Under "Typical Display," ensure "Anti-aliased Graphics" is checked. While this primarily affects vector graphics, it's worth ensuring all anti-aliasing options are enabled within InDesign's display settings.
- Experiment with different "View Resolution" settings (e.g., "High" vs. "Medium") to see if it impacts the perceived jagging, though this is more about preview quality than fundamental rendering.
- Go to
Operating System Level Adjustments
The macOS Big Sur update is a significant clue, suggesting that OS-level settings are crucial.
Checking for Hidden Font Smoothing Settings (macOS):
- While the direct "Font Smoothing" option is gone from System Preferences in newer macOS versions, there might be command-line tools or third-party utilities that allow for its re-enabling or adjustment.
- Open
Terminal(Applications > Utilities > Terminal). - Try entering commands like:
bashdefaults -currentHost write -g AppleFontSmoothing -int 1(where1is light,2is medium,3is strong smoothing). - After running such commands, you must restart your Mac for the changes to take effect. You may need to experiment with different integer values (0, 1, 2, 3) to find the optimal setting.
- Caution: Modifying system defaults can sometimes have unintended consequences. It's advisable to research these commands thoroughly before execution.
Display Scaling Settings (macOS & Windows):
- macOS: Go to
System Preferences > Displays. Select your external monitor. Under "Resolution," choose "Scaled." Instead of selecting the default "Looks like" resolution, try selecting "Default for display" or manually choosing a different scaled resolution. Sometimes, using a resolution that is a direct multiple of the monitor's native resolution (if available and sensible) can improve rendering. - Windows: Go to
Settings > System > Display. Under "Scale and layout," try changing the scaling percentage. If it's set to, for example, 150%, try 100% or 200% to see if it resolves the issue. Then, adjust InDesign's UI scaling if necessary.
- macOS: Go to
Graphics Driver Updates:
- Ensure your graphics card drivers are up to date. Visit the manufacturer's website (NVIDIA, AMD, Intel) and download the latest drivers specifically for your graphics card and operating system.
Monitor-Specific Settings
While the monitor itself might not be the root cause, its settings can influence how it receives and displays an image.
Monitor Input Settings:
- Check your BenQ SW240 monitor's On-Screen Display (OSD) menu. Look for settings related to "Input Signal," "Color Format," or "Picture Mode."
- Ensure the monitor is set to receive the correct signal type (e.g., DisplayPort or HDMI) and that the color format is set appropriately (e.g., RGB or YCbCr, with RGB generally preferred for computer graphics).
- Some monitors have specific "Text" or "Sharpness" settings within their OSD. While sharpness can sometimes enhance text, over-sharpening can introduce artifacts that mimic aliasing. Try resetting these to default or neutral values.
Monitor Firmware:
- Check BenQ's support website for any available firmware updates for your SW240 monitor. While less common, firmware can sometimes address display compatibility issues.
Font Rendering in Other Applications
The fact that fonts look good in other applications is a key piece of information.
- Comparison: Open a document with similar text in a web browser (e.g., Chrome, Firefox) or a simple text editor (e.g., TextEdit on Mac, Notepad on Windows) on the same external monitor. Compare the rendering quality. If fonts look sharp and smooth in these applications, it strongly suggests the issue is specific to InDesign's interaction with the display setup.
- Illustrator Comparison: If possible, open a simple text document in Adobe Illustrator on the same monitor. Illustrator also has its own text rendering engine and GPU acceleration. Comparing its performance can further isolate whether the problem is InDesign-specific or a broader issue with Adobe Creative Cloud applications on this setup.
Advanced Considerations and Potential Workarounds
If the standard troubleshooting steps do not yield satisfactory results, consider these more advanced strategies.
Font Management Software:
- If you use a font manager, try disabling it temporarily or reactivating the fonts through the system's default font book. Sometimes, font managers can interfere with how fonts are accessed and rendered.
InDesign Preferences Reset:
- A more drastic step is to reset InDesign's preferences to their default state. This can resolve corruption in preference files.
- To do this, close InDesign. Then, hold down
Ctrl + Alt + Shift(Windows) orCmd + Option + Shift(macOS) while launching InDesign. You will be prompted to confirm that you want to delete your preference files.
Testing Different Font Formats:
- If you are using OpenType fonts, try a TrueType version of the same font if available, or vice-versa. Some older applications or systems might have better compatibility with specific font formats.
Creative Cloud Cleaner Tool:
- As a last resort for software issues, you could use the Adobe Creative Cloud Cleaner Tool to uninstall Creative Cloud applications and then reinstall them. This ensures a clean slate for the Adobe software suite.
Workaround: Exporting for Clarity:
- While not a direct fix for the on-screen rendering, if the primary goal is to have clear typography in the final output, ensure your export settings (e.g., for PDF) are optimized for print or high-resolution viewing. InDesign's rendering for export is generally independent of the screen preview issues.
Adobe Fonts Not Activating? Fix It Fast!
The Role of macOS Big Sur and Evolving Display Technologies
The mention of macOS Big Sur is particularly relevant. Apple's operating system updates often involve significant changes to core frameworks, including those responsible for rendering graphics and text. The removal of the explicit "Font Smoothing" preference in Big Sur indicates a shift in how Apple intends for font rendering to be handled, likely leaning more heavily on system-wide anti-aliasing algorithms that are less user-configurable. This can create compatibility challenges for applications that relied on older methods of controlling font smoothing.
Furthermore, the increasing prevalence of high-resolution displays (like the user's WQHD monitor) and varying pixel densities means that applications and operating systems must adapt to render content sharply across a wide range of screen technologies. When these adaptations are not perfect, or when there's a mismatch between the OS, the application, and the monitor's specific characteristics, issues like the one described can emerge. The interaction between the display's subpixel arrangement and the OS's rendering algorithms is complex and can lead to different visual results on different monitors, even at the same resolution.
Conclusion: A Persistent Challenge Requiring Vigilance
The struggle with jagged text and ineffective anti-aliasing in Adobe InDesign on external monitors, especially after OS updates, is a testament to the intricate interplay between software, hardware, and operating system settings. While the problem can be incredibly frustrating, by systematically working through the troubleshooting steps outlined above-from adjusting InDesign preferences and OS display settings to updating drivers and understanding the underlying technical principles-designers can often find a solution. The key lies in isolating the variable that is causing the rendering anomaly, whether it be a specific OS setting, a driver conflict, or an interaction with the monitor's scaling and color interpretation. Although a direct "anti-aliasing" toggle within InDesign might be less prominent in newer versions, the principles of smooth text rendering remain critical, and persistent investigation is often required to achieve the crisp, professional typography that designers demand.